Step-by-step guide to setting up conditional logic for product add-ons and options in WooCommerce

You’re adding extra options to your products but you only want to show them when certain conditions are met. For instance, customers can enter text to be engraved on your products – but only if they’ve selected a checkbox first. Or – some options are available only for certain product variations. This article will show you how to use the WooCommerce Product Add-Ons Ultimate plugin to create conditional product add-ons.
Everything you need to know about WooCommerce conditional product options and add-ons
Through this article, we’ll look at what WooCommerce extra product options are and how you might use them in WooCommerce.
Use the menu on the left to navigate the article.
We’ll look at how you can apply conditional logic to enhance your product options, with several examples of how this might apply in real life. The examples will include:
- An online jewellery store that offers optional engraving
- A store selling personalised gifts
- A furniture store selling highly customisable products
I’ll walk through examples of simple and complex conditions, including fields that are dependent on multiple conditions being met, with clear instructions on how to set them up.
With the Product Add-Ons Ultimate plugin, you can apply your conditions to fields or to groups.
We’ll also look at applying conditional logic to WooCommerce product variations so that the customer will only see certain fields if they choose specific variations.
Conditional extra product options in WooCommerce
Product options are extra fields, like checkboxes, text fields, dropdowns, etc, that are added to WooCommerce products, usually through an add-ons plugin like WooCommerce Product Add-Ons Ultimate plugin.

WooCommerce Product Add-Ons Ultimate
Personalize products with extra custom fields and options
Product add-ons are essential if you want to allow your customers to personalise or customise your products. Extra fields:
- Allow you to collect extra information about your customers
- Let customers configure your products in different ways
- Enhance your customers’ experience on your site
Related Tutorial
There’s an in-depth article on customising products in WooCommerce with extra options here.

WooCommerce Product Add-Ons Ultimate
In order to add extra options with conditional logic to your WooCommerce products, you’ll need an add-ons plugin. Add-Ons Ultimate has conditional logic built in to the Basic and Pro versions, allowing you to create products where you can apply WooCommerce product add-ons conditional logic.
WooCommerce Product Add-Ons Ultimate
Personalize products with extra custom fields and options
Group conditions
Note that the examples in this article show you how to display or hide individual fields based on conditions. But you can extend this to apply your conditions to entire groups. This means that you can show or hide multiple fields with a single set of conditional rules.
What is conditional logic?
Let’s step back for a minute and think about what we mean exactly when we talk about conditional logic.
The term ‘conditional logic’ does sound a bit scary. But all it really means is:
If this thing happens, then that thing will happen too
So, for example, let’s imagine we’re running a jewellery business and we’d like to offer our customers the option to have an engraving on their purchased product.
We don’t want a great big text field cluttering up the page so we add a checkbox saying ‘Would you like engraving?’ When the customer selects the checkbox, then the text field appears:

That, in its simplest form, is what conditional logic means.
There are several examples below of how to create product options in WooCommerce using simple conditional logic like this and using more complex conditional logic.
Conditional logic triggers and outcomes
In all cases, the outcome of a piece of conditional logic is to change the visibility of a product option: either to show or hide it. In the example of the engraving above, the outcome of selecting the checkbox is to show the text field.
However, even if the outcome is always the same, the triggers can be different.
Conditions based on other fields’ values
The most common trigger is based on checking the value of one or more fields. The customer can trigger a piece of conditional logic when they change the value of a field. For example:
- Checking or unchecking a text box
- Entering certain defined text into a text input field
- Choosing a specific option from a group of radio buttons or from a dropdown field
- Selecting a specific combination of checkboxes from a group of checkboxes
Cost-based conditional logic
Another trigger is based on cost. So, for example, let’s say that your custom engraving is only available when the customer chooses a product over a certain cost.
We can set a trigger so that the extra field only displays when the cost of the product goes over a certain value. The cost can be altered by the customer if they choose certain options, or if they increase the quantity they’re purchasing.
Product variations conditional logic
A third conditional logic trigger is based on product variations. Using the jewellery example again, let’s imagine that you are using variable products. Engraving is only available on certain variations. In this case, the extra field will only be displayed when specific variations are selected.
Multiple triggers
Product Add-Ons Ultimate can handle all these triggers, even complex ones like showing/hiding a field only when certain options are selected in a checkbox group. It can also handle combining multiple triggers, like only showing a field for certain variations when the cost is greater than a certain value.
Evaluating conditions – how to check what’s true and what’s not
As I mentioned above, the outcome of a condition is to change the visibility of a field. There can be more than one trigger and triggers can be defined in multiple ways. Let’s have a look at an example:
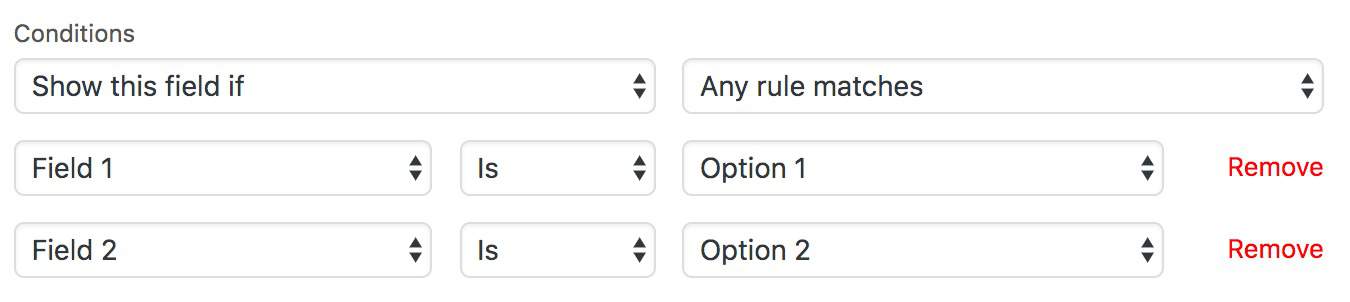
On the first line, we have two select fields. One is an action to define what the outcome of the logic will be – i.e. to ‘Show this field’. The second is an operator to define whether all your triggers need to be true or if any trigger needs to be true. In this case it’s set to ‘Any rule matches’.
The next two lines show two rules. Firstly, we’ll check the value of ‘Field 1’ to see if it’s set to ‘Option 1’. Then, we’ll check the value of ‘Field 2’ to see if it’s set to ‘Option 2’.
Only one of our rules needs to be true for this field to be displayed because our operator is ‘Any rule matches’.
Makes sense? Next, I’ll show you how to set up WooCommerce conditional variations using WooCommerce Product Add-Ons Ultimate.
How to set up WooCommerce product variations conditional logic: Step-by-step tutorial
In this tutorial, we’ll show you how to enhance your product offering with WooCommerce conditional variations. We’ll take you through the process of setting up conditional logic for product options in WooCommerce, step-by-step.
Let’s assume you already have a WooCommerce store set up and a product that you’d like to add conditional logic to.
Step 1: Install the WooCommerce Product Add-Ons Ultimate plugin
Download and install the WooCommerce Product Add-Ons Ultimate plugin. Here’s how:
- Purchase the plugin – you’ll receive an email with a link.
- Download the zip file from the link.
- In your WordPress dashboard, go to Plugins > Add New > Upload Plugin.
- Locate your zip file.
- Click ‘Install Plugin’ then ‘Activate’
Now your plugin will be installed and activated.
Step 2: Create extra fields for your product
Let’s say you want to allow your customers to personalize a greeting card online.
Before we can create our conditional logic rules, we need to create the extra fields for the product – the checkbox and the text field – using the Add-Ons Ultimate plugin.
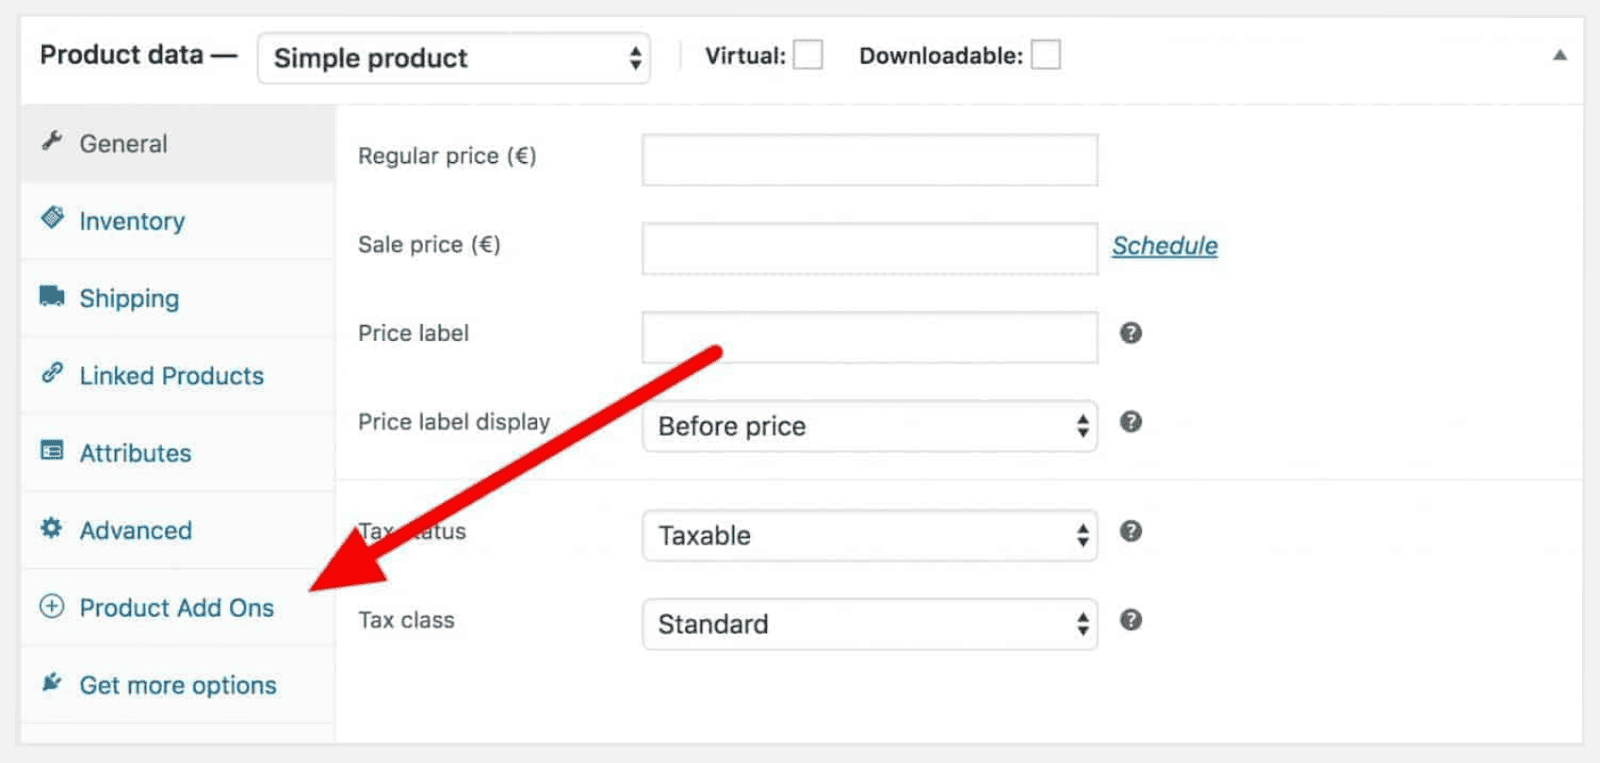
- Click the ‘Product Add Ons’ tab in the ‘Product data’ section.
- Click ‘Add Group’ to create a group for your personalizable field.
- Finally, click ‘Add Field’ to create your first personalizable field.
Following these steps will take you to this interface:
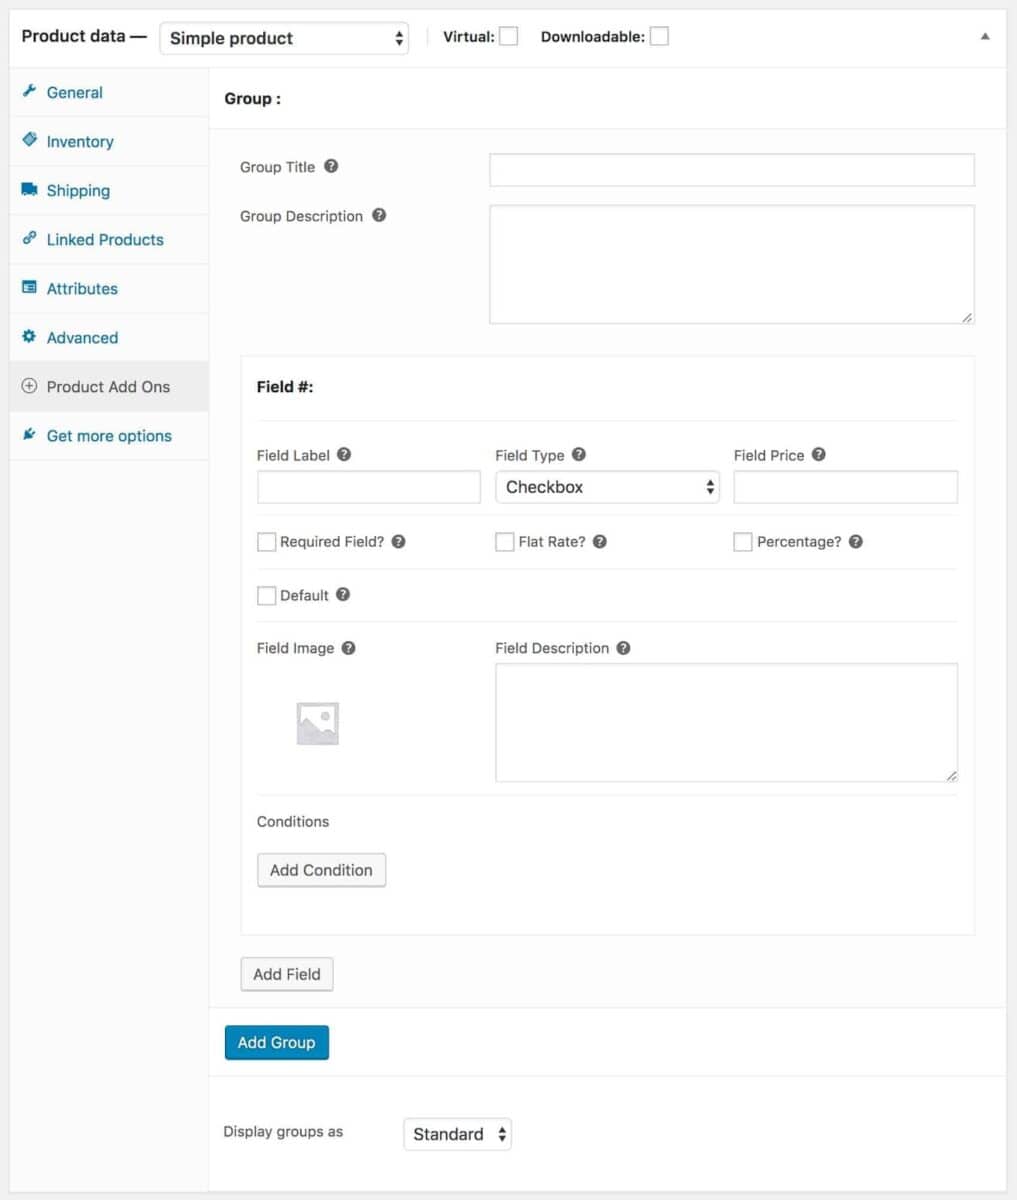
Step 3: Define your groups and fields
Product Add-Ons Ultimate allows you to create additional fields and organize them into groups.
Here, we’ll create a group for options for personalizing the front of the card, but you could also add a second group for options for personalizing inside the card.
- Enter some text in the ‘Group Title’ and ‘Group Description’ fields – this is optional.
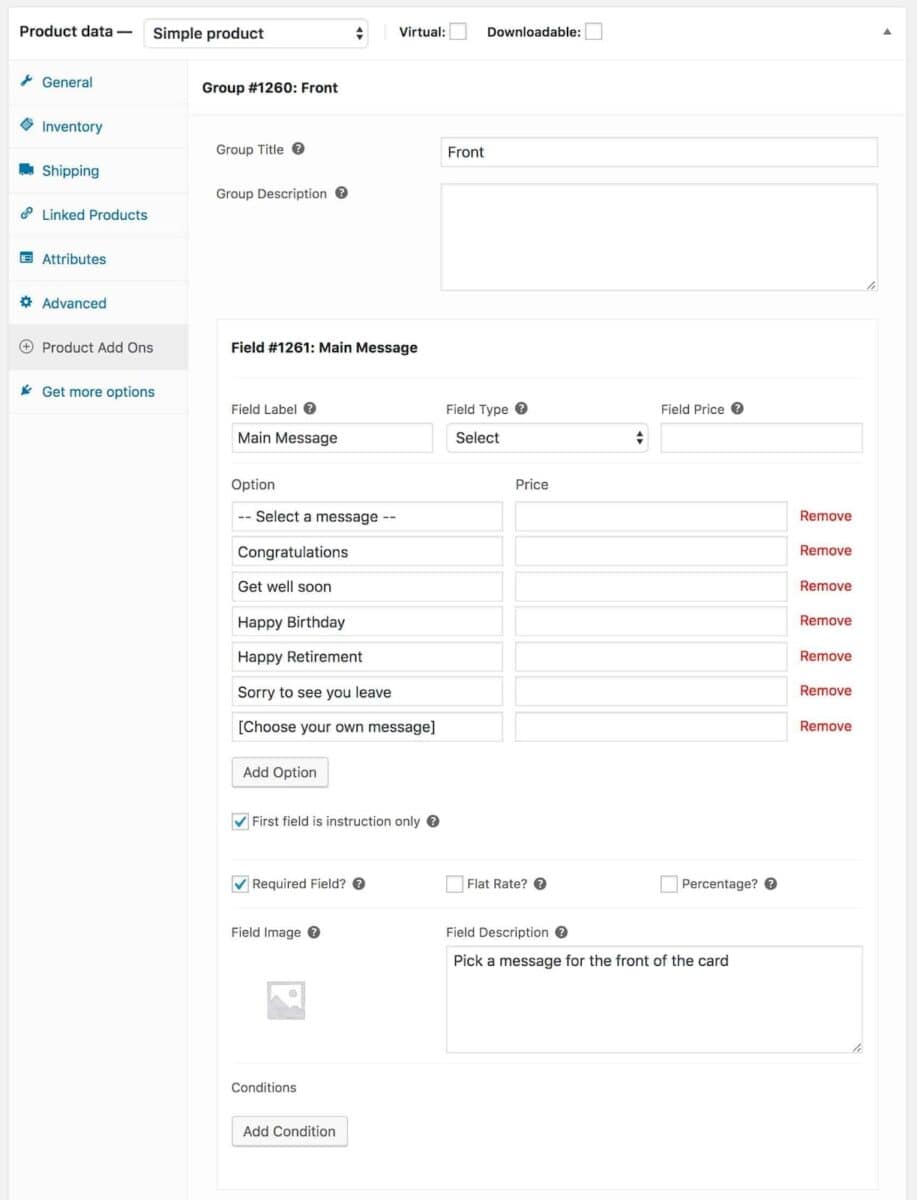
- In the ‘Field Type’ dropdown, choose ‘Select’.
- Add a custom phrase or slogan as options.
- You can also enter some text in the ‘Field Label’ and ‘Field Description’ fields to help the customer understand what the field is for.
Step 4: Use conditional logic
Now we’re going to use conditional logic to show or hide fields based on certain conditions.
- Create a new field and choose ‘Text’ as the ‘Field Type’.
- Add a field label and description as required.
- To apply some conditional logic to this product option, click the ‘Add Condition’ button.
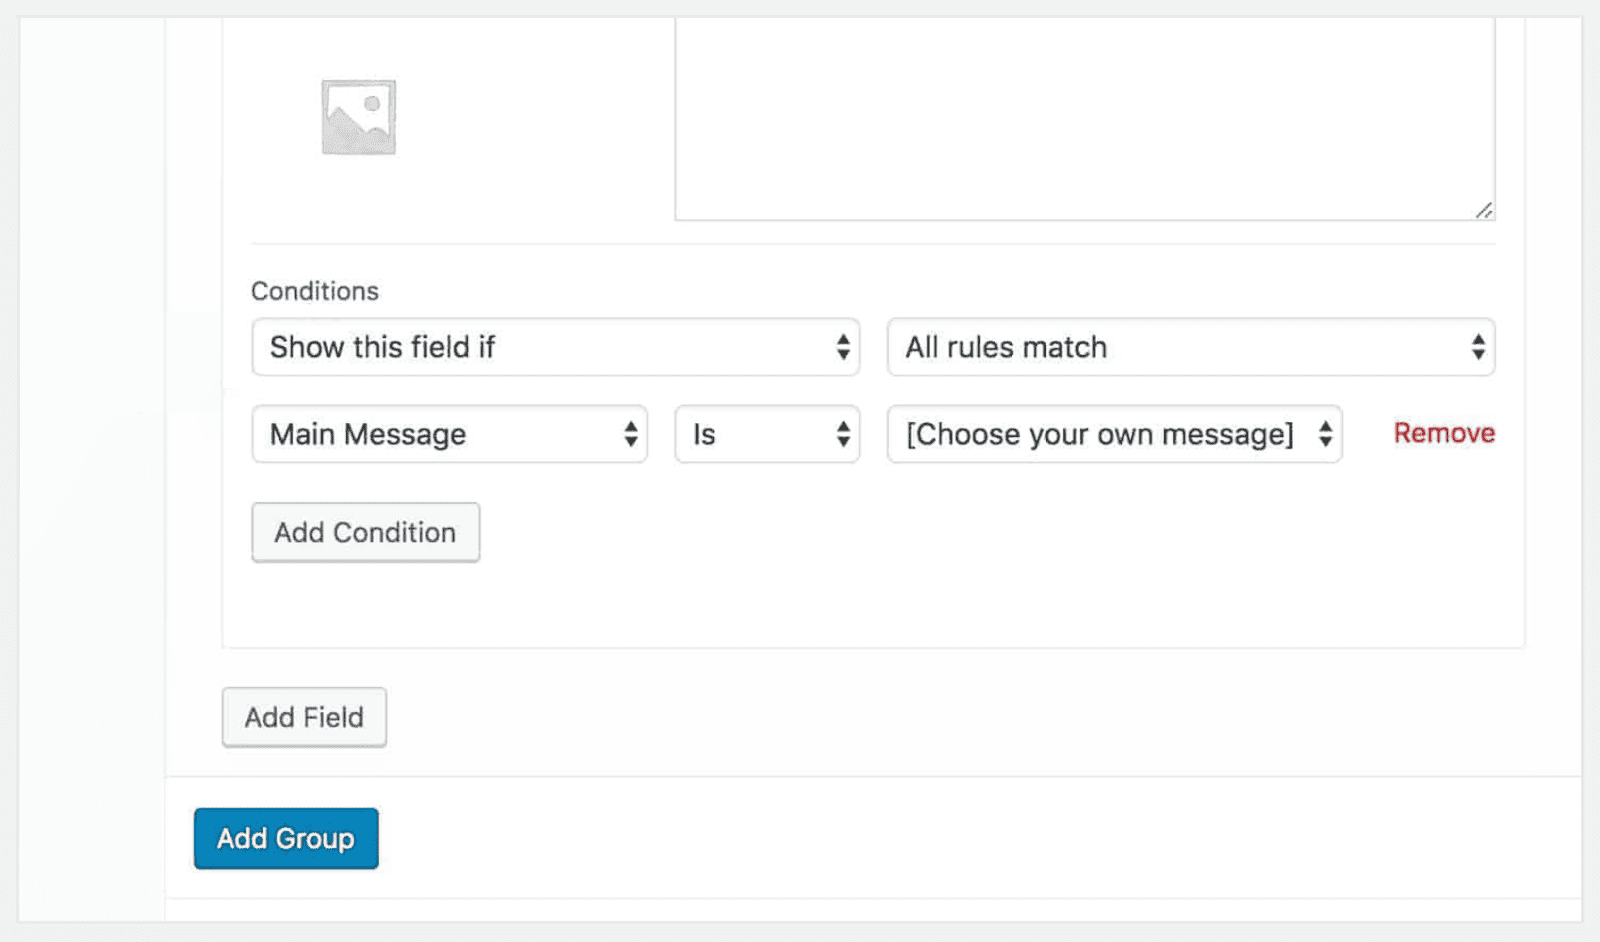
When you click ‘Add Condition’ you get some new options:
- Choose whether to hide or show the field.
- Choose whether all conditions need to be met, or just one.
- Then add the conditions – choose the field (in this case, the ‘Main Message’ field) and the value that it needs to meet the condition (in this case, if the user has selected the ‘[Choose your own message]’ option).
Now, this field will only be displayed on the front end if the user selects [Choose your own message] from the select field.
You’ll notice some other options in the text field above:
- ‘Field Price’: We’re going to charge the customer extra if they want to personalize the card with a custom message
- ‘Max Chars’: We don’t want the customer writing too much text so we’ve set the maximum number of characters to 50 for the custom message
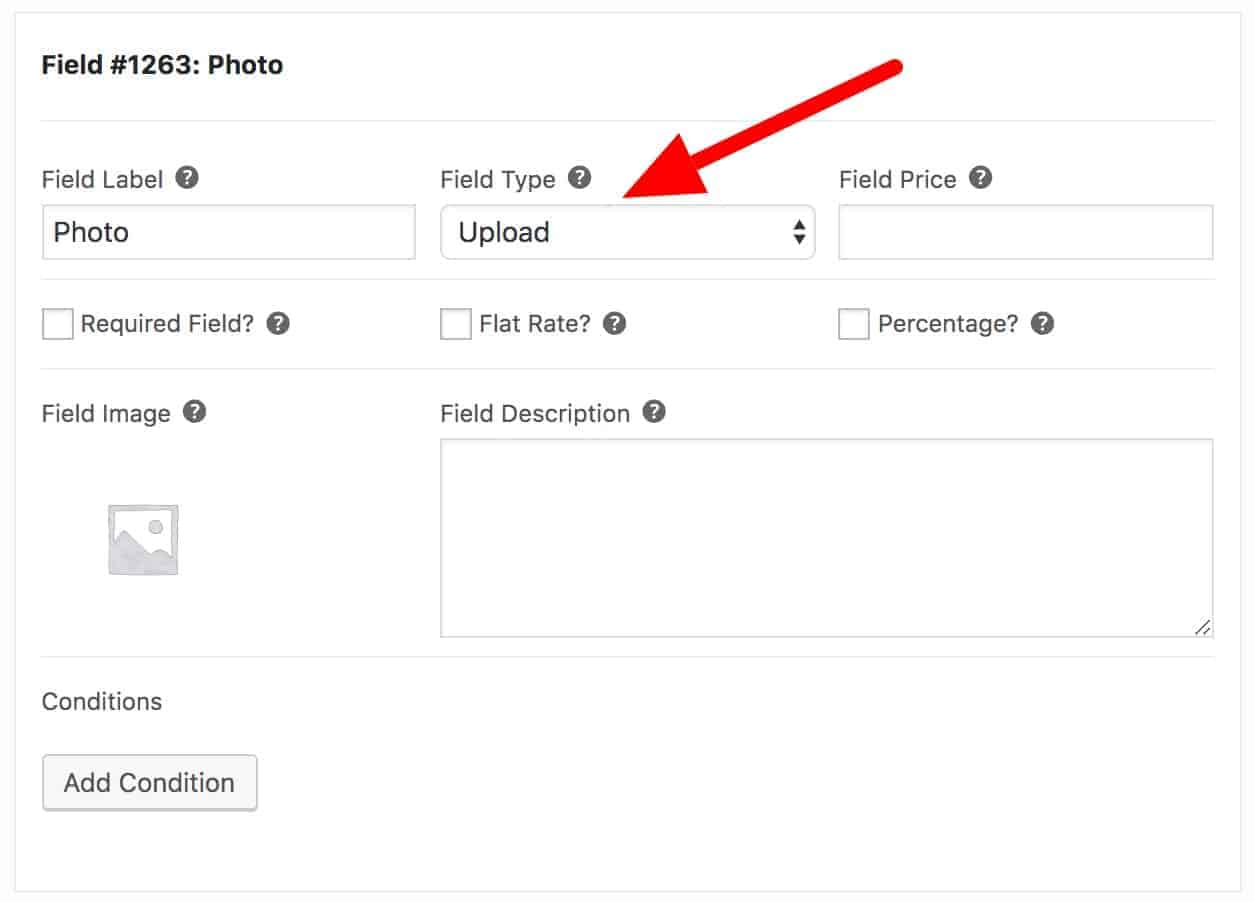
Step 5: Add an image upload field
Let’s finish off the fields for the front of the card with an image upload field. Image uploads are a popular method of WooCommerce product personalization.
- Add a new field and select ‘Upload’ as the field type
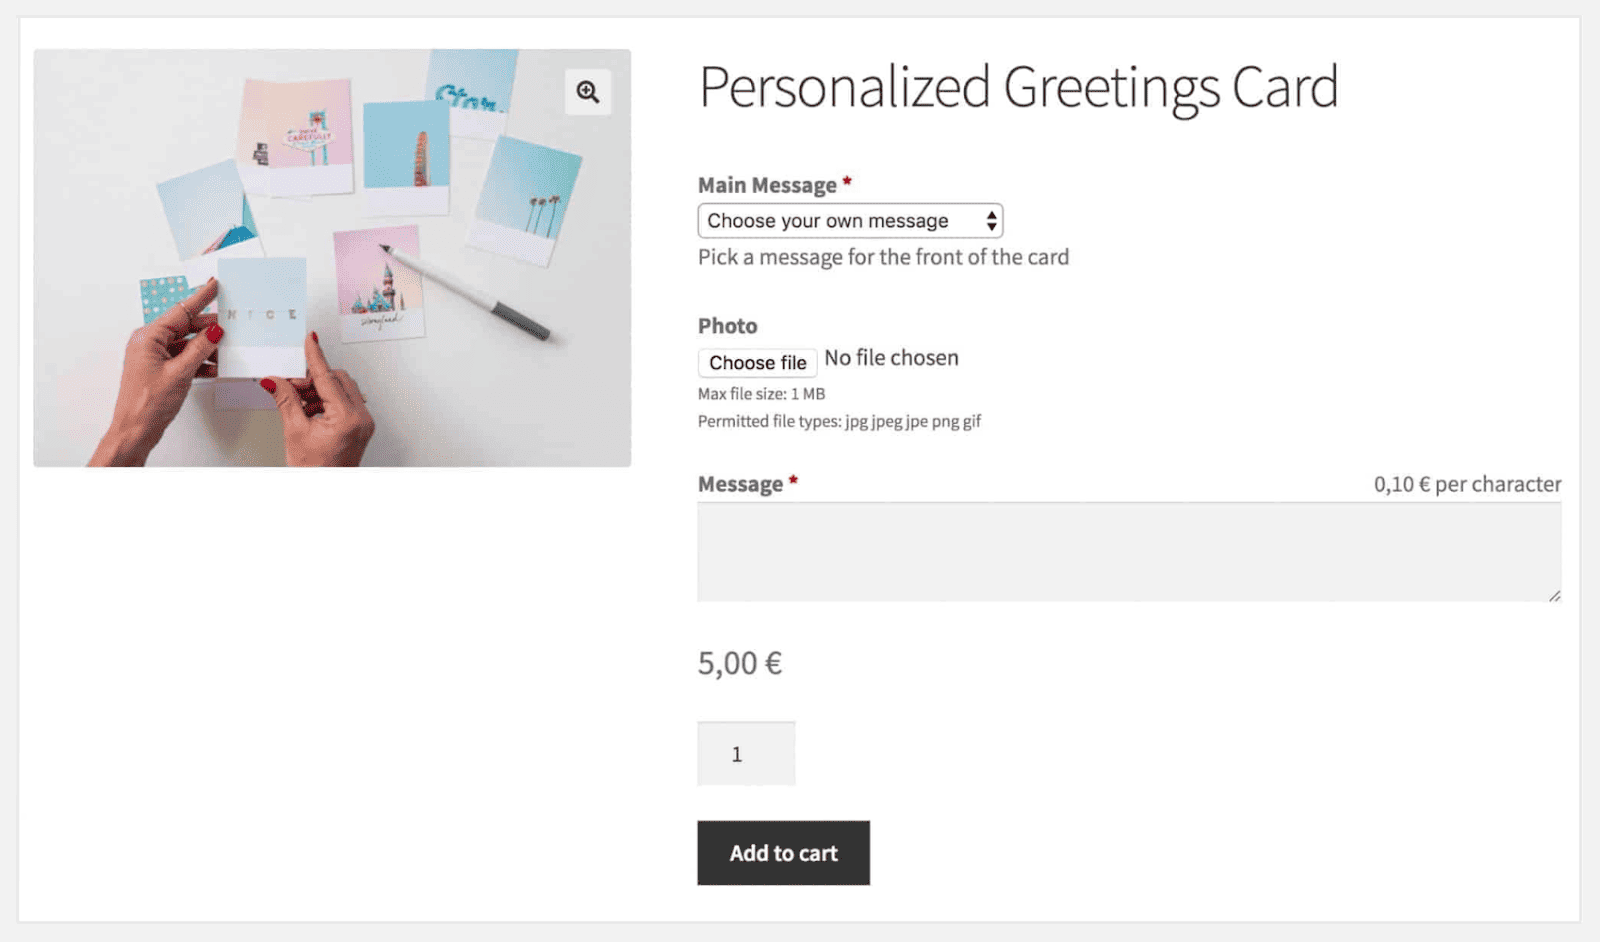
Step 6: Review your product
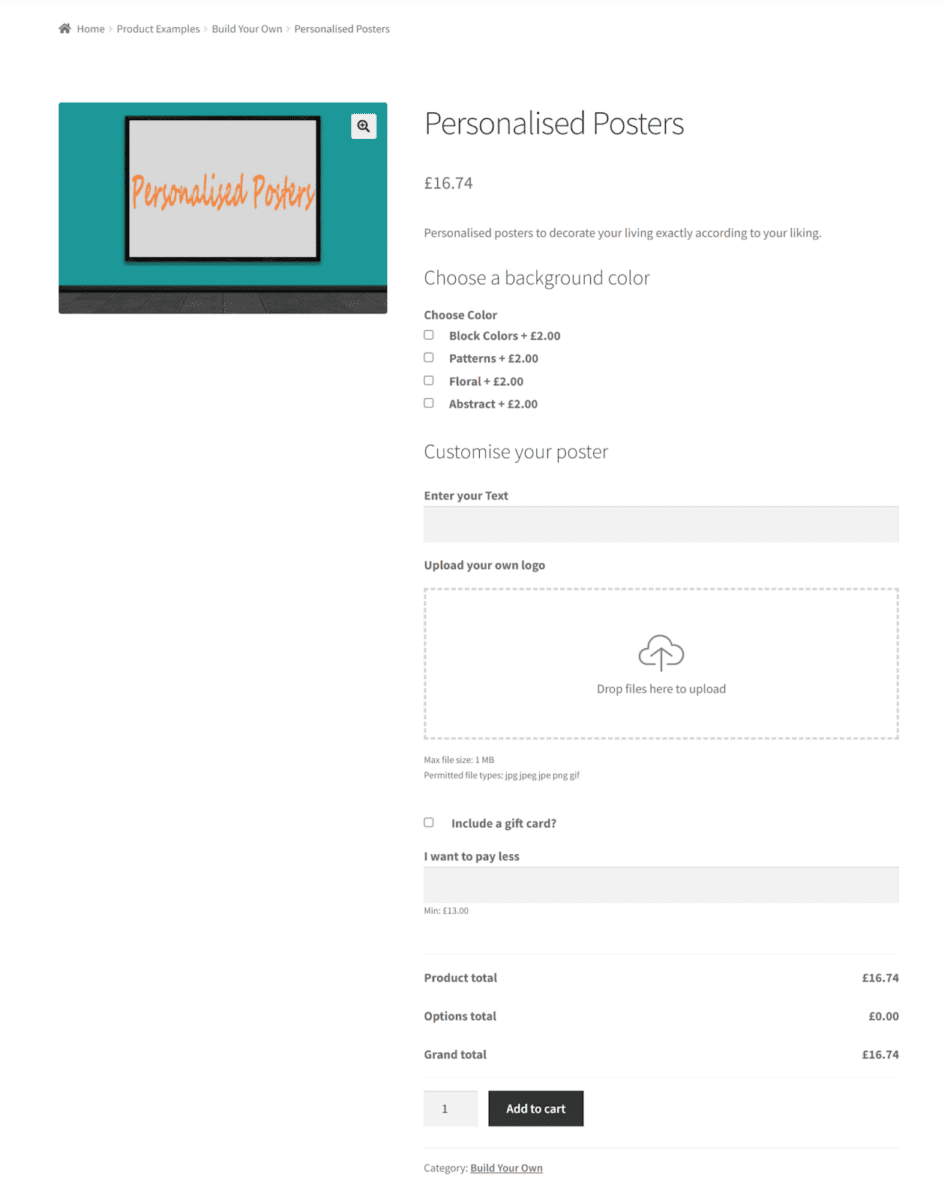
We’ve finished all our personalization options so we just need to save and publish the product and take a look at it on the front end.
This is what the product will look like in the Storefront theme.
WooCommerce conditional variations: frequently asked questions
How do I add multiple variations in WooCommerce?
There are two ways to add multiple variations in WooCommerce – you can either use the default WooCommerce functionality, or you can use a plugin like WooCommerce Product Add-Ons Ultimate. We’ll talk about both options here.
Adding multiple variations using the default WooCommerce functionality
Adding multiple variations using the default WooCommerce functionality is a little complicated. You must add the variations to each product individually, which can be time-consuming. Let’s go through it, step-by-step.
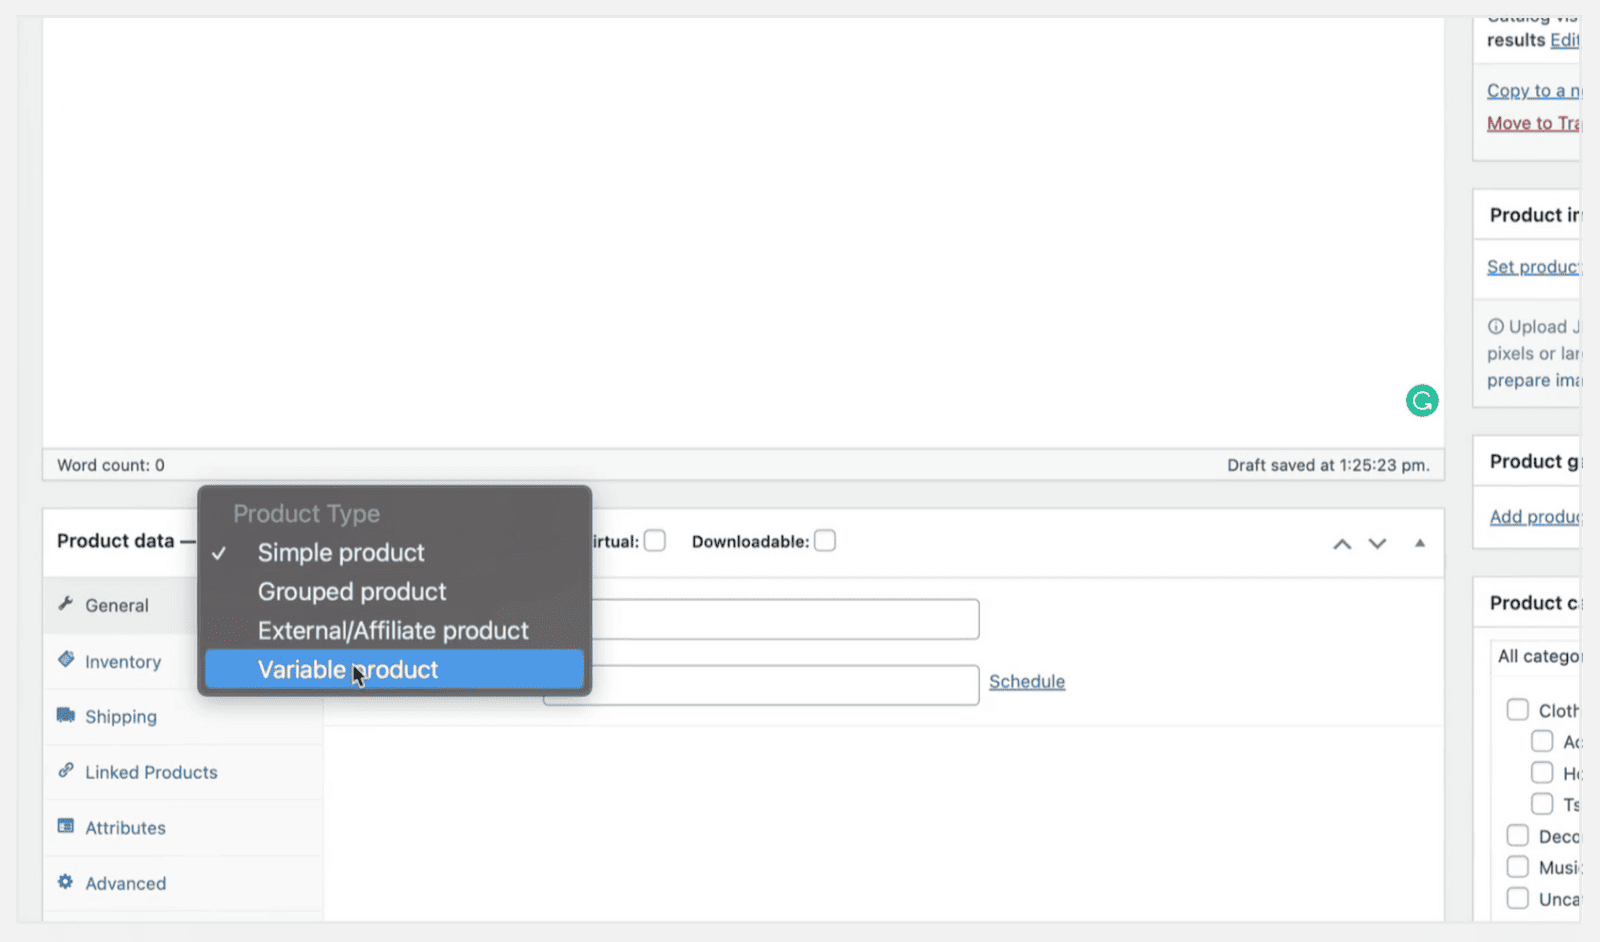
- Open the WooCommerce product page and scroll to the ‘Product Data’ section.
- Select ‘Variable product’ from the dropdown menu.

- Select the ‘Attributes’ tab.
- From here, you can select an existing global attribute from the dropdown menu, or create custom attributes by selecting ‘Custom product attribute.’
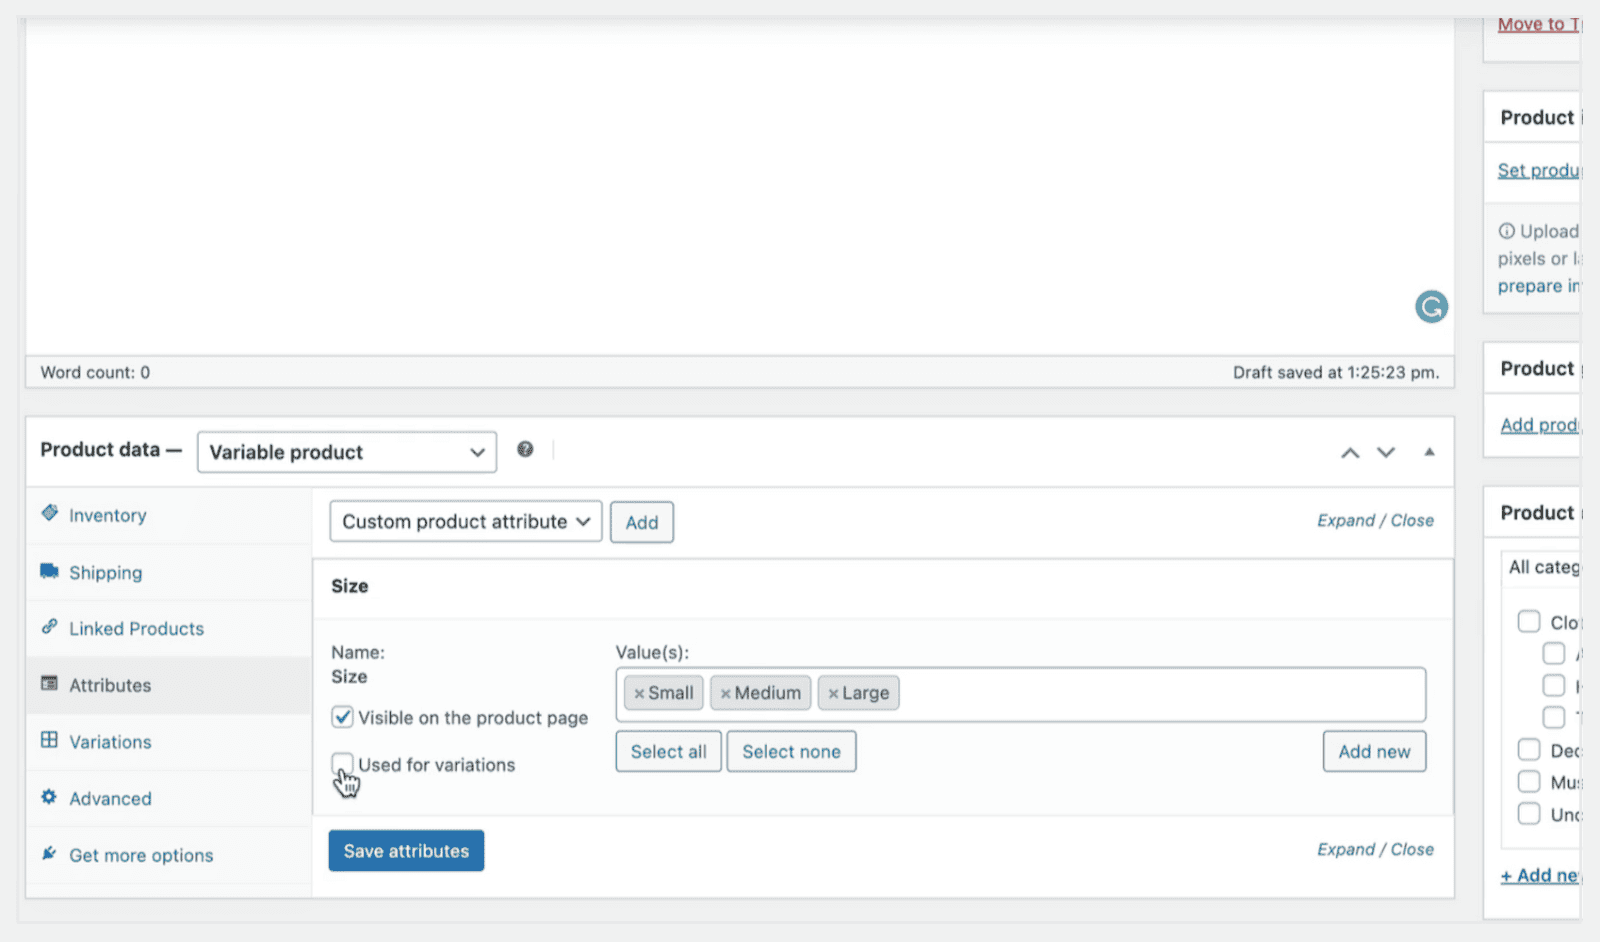
- Add the attributes you wish to apply, including values for each.
- Enable the ‘Use for variations’ option and select ‘Save attributes.’
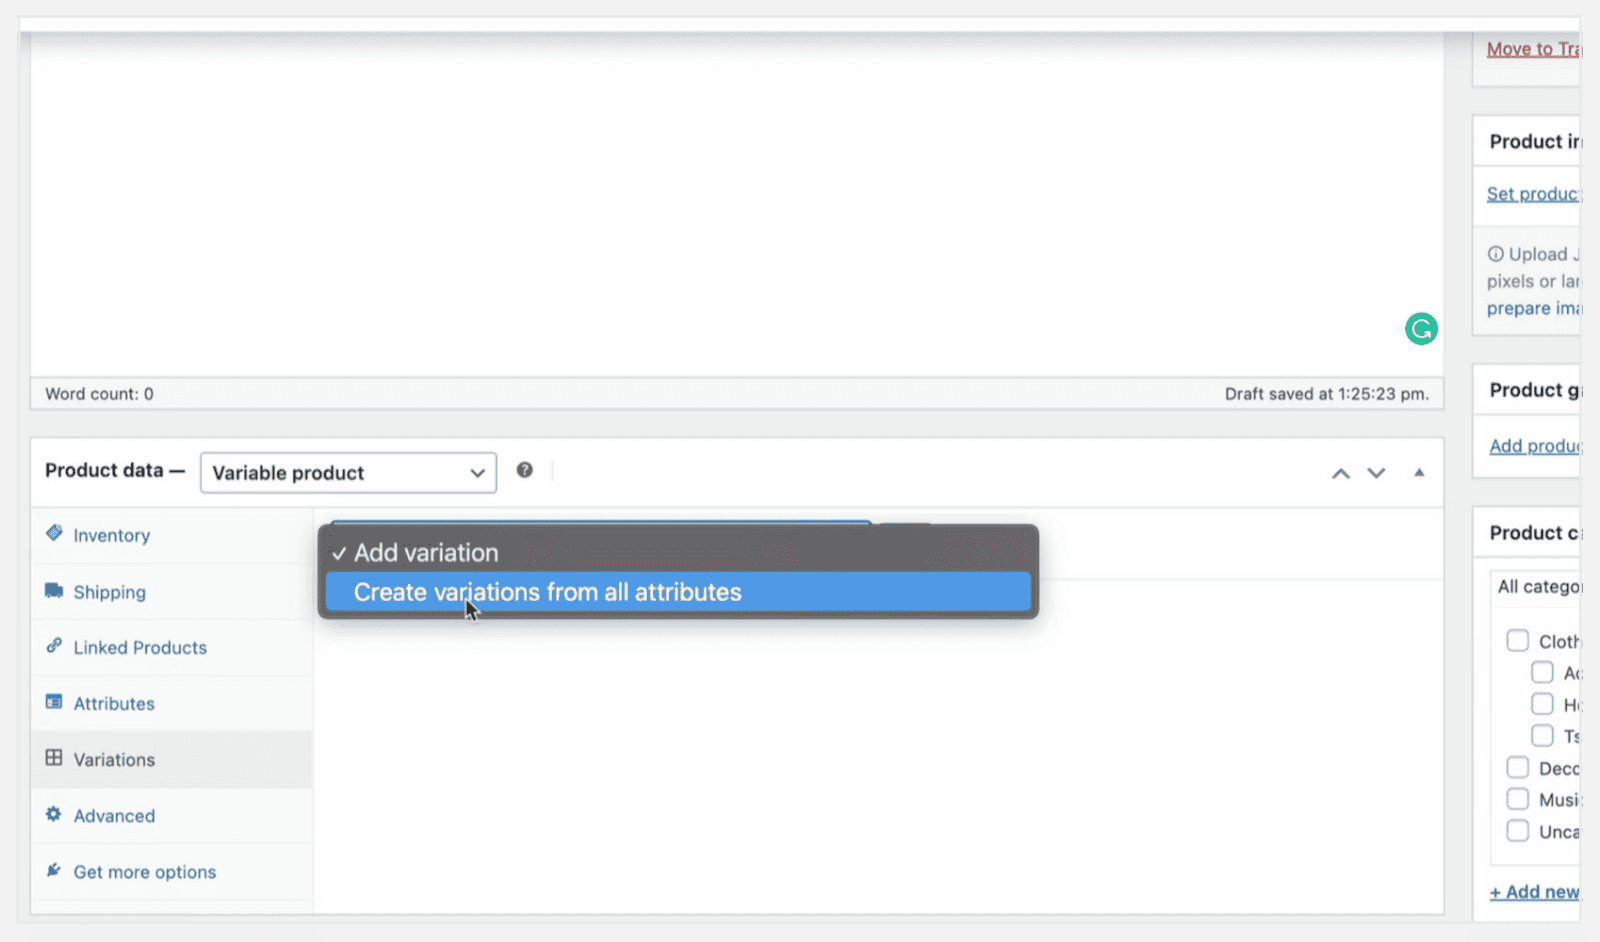
- Select the ‘Variations’ tab.
- Select the ‘Create variations from all attributes’ option from the dropdown menu.
- Variations will appear for every possible combination of attributes. For example, if you’ve added a “Color” attribute with Red and Blue terms and a “Size” attribute with Small and Large terms, you’ll get 4 variations – small red, large red, small blue, and large blue. If you wish, you can add or change details at this stage.
- Select ‘Save changes’.
- Select ‘Publish’.
While WooCommerce allows you to add multiple variations, it’s something of a tedious process. The default product options are not designed to let you edit multiple variations at once and limit how you can display variations to your customers on the front end.
Plugins like WooCommerce Product Add-Ons Ultimate allow you to create custom products with extra options and fields that can be applied to any product on your WooCommerce site, saving you time and effort.
Adding multiple variations using WooCommerce Product Add-Ons Ultimate
Creating variations in bulk using WooCommerce Product Add-Ons Ultimate is quick and simple.
- Open the product’s edit page and select the ‘Product Add-Ons’ tab.
- Add a new group and click on the ‘Add Field’ button to start adding extra options to your product.
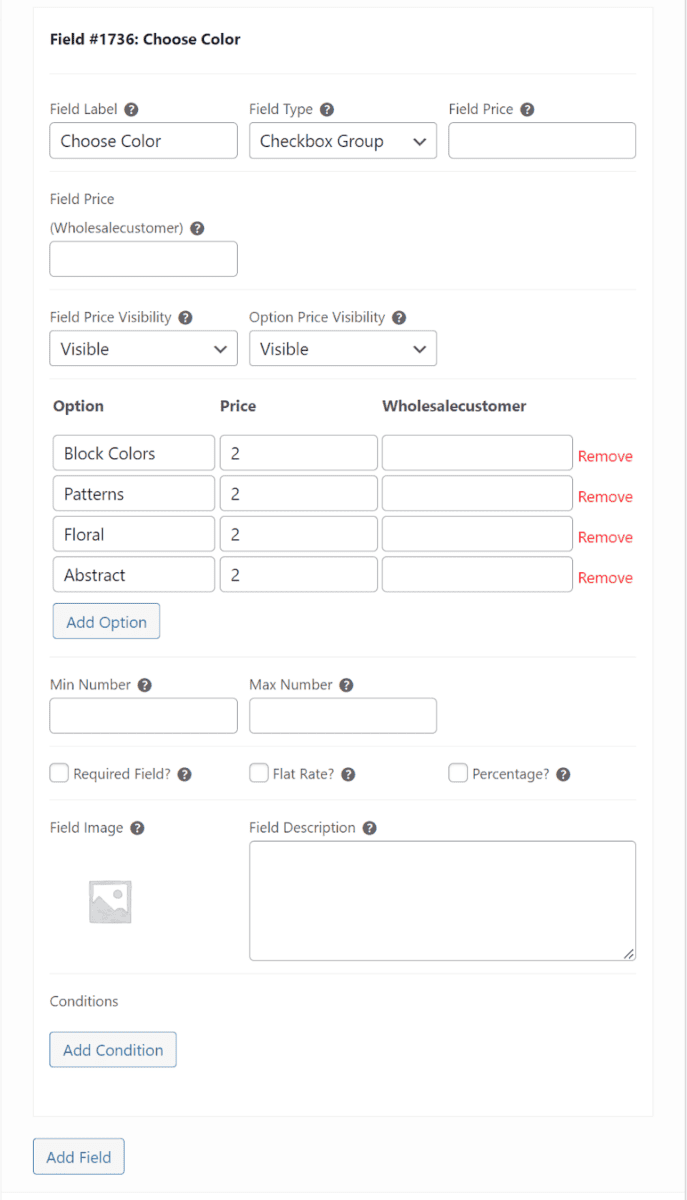
- Select ‘Checkbox Group’ from the Field Type dropdown menu to let customers select from a list of options. Add your checkbox options using the ‘Add Option’ button.
- There are a number of types of variation available, including editable text boxes to collect additional information from the customer, file uploads to let customers add their own images when ordering a product, and pricing options, for example, to allow customers to set their own price.
How many variations can WooCommerce handle?
In theory, you can add as many variations as you like.
In practice, the number of variations WooCommerce can effectively handle depends on factors such as server capacity and website configuration. It’s important to monitor the performance of your WooCommerce store when using multiple variations.
What are the best practices for using Woocommerce conditional variations?
Some best practices for using conditional variations include:
- Keep it simple – avoid overwhelming customers with too many conditional variations. Stick to offering relevant options.
- Test thoroughly – before implementing conditional variations on your live site, test them in a staging environment to ensure they work as intended.
- Regularly update plugins – ensure that the plugins you use for conditional variations are up to date, and include the latest features and security enhancements.
Conditional options for WooCommerce – final thoughts
WooCommerce product add-ons conditional logic sounds like a scary topic – but hopefully you’ve seen how easy it is to set up, even for groups and variations.
All you need is the WooCommerce Product Add-Ons Ultimate plugin.
WooCommerce Product Add-Ons Ultimate
Personalize products with extra custom fields and options
Hey Gareth. This is a pretty cool plugin but I have noticed that when it comes to conditional checks.
Show if an image swatch item contains a certain string.
I am limited to Is or Is not as options when what I really want to check is
Contains or Does not Contain.
These options are enabled until I try to use them to show or hide an element then for some reason they are greyed out and I cant use them.
Are there certain elements that are unable to be used Contains or doesnt contain logical test?
Please let me know
The options depend on the field type – for instance, you can’t use ‘greater than’ on non-numeric field types.
Can I add a condition to hide/show an entire group based on a selection in a different group?
Hi
At the moment, you can only add conditions to fields.
Thanks.
Gareth
Hi there
I run a Bedroom furniture e-commerce and interested in the Add Ons plugin for WooCommerce. My question is I sell beds that are variable products mainly for the size i.e. king size, double, single – I want to add the extra option of including a mattress on the production selection but as the mattress sizes are variable king size, double and single I would only want the same size options chosen for the bed to be displayed i.e. king size bed selected, mattresses available should only be king size mattress
Is this something that is possible with this plugin?
Thanks in advance
Hi
Yes, absolutely. You can do this using variation specific fields: https://pluginrepublic.com/documentation/variation-specific-fields/
Thanks
Gareth
is it possible to disable the form (add to basket) submission unless a checkbox is selected
Hi Ian
Not at the moment but it’s something I’m considering for a future version.
Thanks.
Hi,
About the “WooCommerce product conditional variations” option, the working product demo is not the same as the screenshot (or the description of it). On the demo, there is not a variable product : why? It doesn’t work anymore? There is a another demo somewhere with this feature?
Hi Miguel
Thanks for pointing this out. I’ve updated the link in the article. You can see the demo product here: https://pluginrepublic.dev/product-extras/product/personalised-print-variable/
Thanks.
Hi Gareth,
Thanks for your quick anwser !
Hi Gareth,
Is it possible to have conditional logic based on a customer’s past order history? e.g. if they are only able to see a variant of product Y if they have previously bought a variant on product X (on an earlier date)? We run training courses, and want a ‘defer your course’ option that will only be available to currently enrolled students. Our courses are all sold as variable products.
Our objective would be to have a single ‘deferral product’. This would have a series of variations, each of which would be visible only to students who had previously purchased a specified product variant.
Hi Mark
That’s an interesting idea. You could do this by using the Members Only plugin. When the student purchases product X, they can be assigned a new role. Then you could make product Y restricted so that only students with that role are able to see it.
Thanks.
Is there a limit of fields with associated conditions per product (in my case a single product)?
I have 2 soaps that I can have printed differently. Each either with logo OR with text OR with predefined symbol OR with text + predefined symbol.
And then there would be special packaging. But these fields are no longer saved.
Hi Barbara
Could you submit this as a support request via the form at https://pluginrepublic.com/support/? Then we can take a look and get straight back to you.
Thanks.
Hi Gareth!
I solved the problem with your link – thanks a lot!
My company sells grain by lb. where some customers may wish to have the grain purchased to be milled. We charge a nominal fee ($0.20) per unit order to mill the grains. Can this plugin handle and calculate the milling fee based on the variable amount of units the customer desires to purchase?
Hi Mark
Yes, the Pro version of the plugin can do this using a ‘Calculation’ field. You can create a field that will add cost based on the quantity selected by the customer.
Thanks.
Hello
Is there a way to put in different picture in options if the customer chose A or B
Hi Thomas
You could do this by creating two separate fields (with different images) then display Field A or Field B based on the user’s selection.
Thanks.
Hello
what type of field should i use?
Hi
This depends on what you want to achieve. There are a number of different field types that allow the user to select options, e.g. radio, checkboxes, select fields, etc.
Thanks.
Hi
Is possible for you to ad a Field for an image box?
You can add an Image Swatch field – e.g. https://pluginrepublic.dev/product-extras/product/radio-group-image/.
Thanks.