WooCommerce addons plugin

In this article, I’m going to look at some more scenarios where you would need to use WooCommerce addons. This involves the WooCommerce Product Add Ons Ultimate plugin – a WooCommerce product addons plugin available on this site – which allows you to add custom fields to your products.
If you’d some further information on personalizing WooCommerce products, including more real-world scenarios and some discussion on the business rationale behind personalized products, take a look at this article.
WooCommerce Product Add-Ons Ultimate
Personalize products with extra custom fields and options
What are WooCommerce addons?
WooCommerce addons allow your customers to personalize your products with additional options. Options include:
- Checkboxes
- File uploads
- Name Your Price fields
- Number inputs
- Select fields
- Text inputs
- Textareas
You can add as many of these fields to your products as you wish. You can group them into multiple groups and apply conditional logic – so you can hide fields unless certain conditions are met, e.g. hide a text input unless the user selects a checkbox. You can also specify which fields are required.
Adding prices to different addons
Product add-ons make it easy for you to create any kind of product that requires user input. Moreover, you can add prices to each field, so if a user enters a value in the field, the price is added to the product price.
Take a look at the screenshot below. When the customer buys their teeshirt, they can specify their own slogan for the shirt and upload images for the front and/or the back. The slogan is a standard text input field and for each letter that the customer enters, an additional $1.50 is added to the product price. For each image that the user uploads, an additional $10 is added.

Read on for real-world examples for using product add-ons on your WordPress site. In all the examples on this page, I’ve just used the default free WooCommerce Storefront theme and the WooCommerce Product Add Ons Ultimate plugin.
How to accept donations in WordPress
There are multiple reasons why you would want to use WordPress to accept donations, including:
- You are a small charitable or not-for-profit organization
- You’re offering a free product with an optional payment
- You’re running a Parent Teacher Associations
- You represent a school accepting donations for kit or other items
- You’re running a special promotion. (I wrote an extensive article on Pay What You Want in WordPress which covers why offering products for free can often be a good business move. It also includes a number of examples of how to use the Name Your Price field.)
- You run a food delivery service and you’d like to offer the ability to leave a tip
Let’s look at a simple way to set up WooCommerce addons to accept a donation and personalized message. This is along the lines of a JustGiving type page – although it could be used for any kind of donation, not necessarily for charity. This method will work well, especially if you are already running WooCommerce.
Create a WooCommerce product to accept donations
- Create a new product in WooCommerce. Add your product name and other information as you would with any other product. Ensure that the product type is ‘Simple’ and enter a price (enter 0 if you wish).
- On the WooCommerce Product Add Ons Ultimate tab, add a new group for your product options. You can give this group a name if you wish.
- Click ‘Add Field’ to add your first add-on.
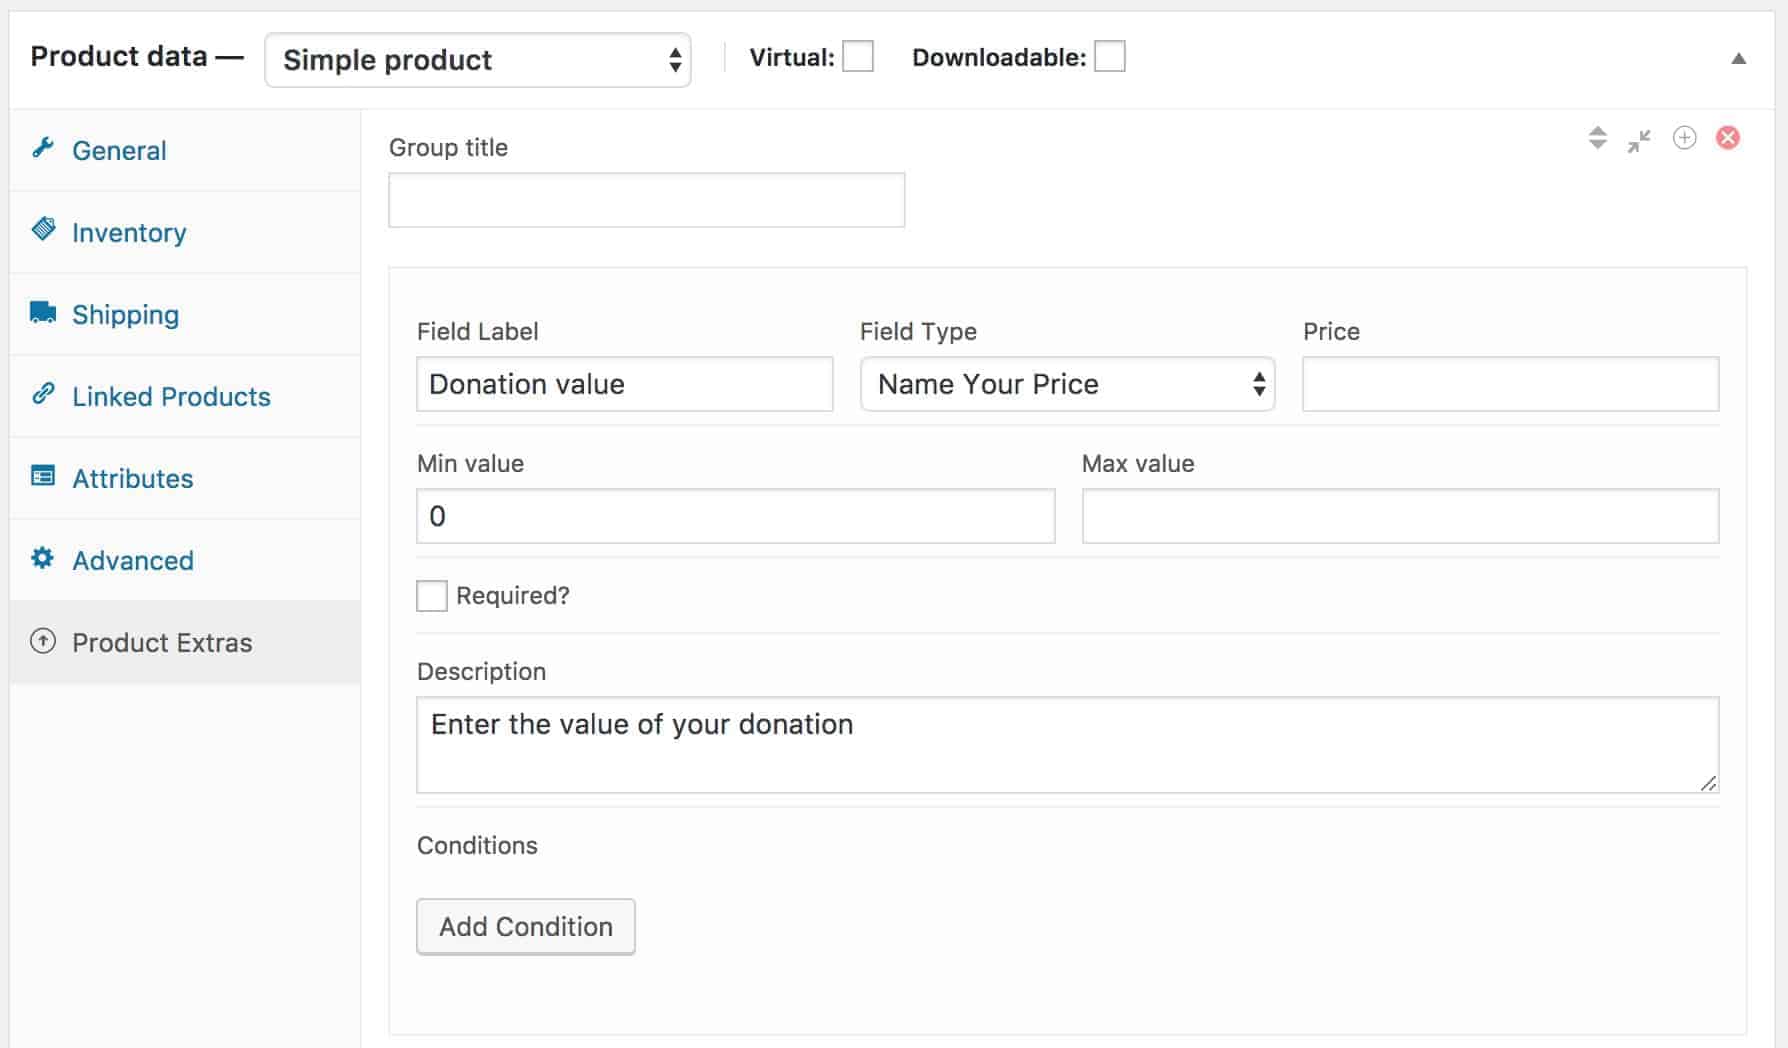
- Choose ‘Name Your Price’ as the add-on field type. This will add a number input field on the product page where your users can enter the amount they wish to donate. You should add a label to this field, e.g. ‘Donation value’.

- Note that you can add minimum and maximum values for donations if you wish. This is helpful if you want to provide the user with guidance for suggested donations.
- Now, on the front end, you’ll see a new number input field where the user can add their donation amount.

- Switch back to the product admin. On the WooCommerce Product Add Ons Ultimate field, add a new field for a personalized message:

This is just a textarea field. I’ve set the maximum number of characters allowed to 250 (just so people can’t write their life stories…). The field isn’t required, so users can decide for themselves whether to add a message. Here’s what the product looks like on the front end:

Now, when the user adds this product to their cart, they can go through the standard WooCommerce checkout process to make their donation.
When you receive the order, you’ll see the add-on fields. You can also export them to a CSV file if you require.
Donation plugin for WordPress
So this is a simple way to accept donations using a WooCommerce addons extension. However, you should note that there are several plugins dedicated to accepting donations through WordPress. I feel that if you are already running a WooCommerce site, you might not need all the features offered by these plugins so a simple Name Your Price addon field on your product would be enough. But if you decide you need a more extensive solution, then you should probably check out GiveWP which is the most well-known plugin in this market.
How to charge per character with WooCommerce addons
With the WooCommerce Product Add Ons Ultimate text and textarea addons, you can assign a price per field or you can charge per character entered into the field. A typical usage for this would be jewellers who offer engraving services, although there are many other ways in which this might be used, including printing, embroidery services, tattoo parlors, and so on.
Create a product with optional engraving
In this example, we’ll imagine we’re running an online jewelry store and we’d like to offer optional engraving services.
- Create a new product in WooCommerce. Add your product name and other information as you would with any other product.
- Ensure that the product type is ‘Simple’ and enter a base price.
- From the WooCommerce Product Add Ons Ultimate tab, click ‘Add Group’ then ‘Add Field’ to include a new addon field.
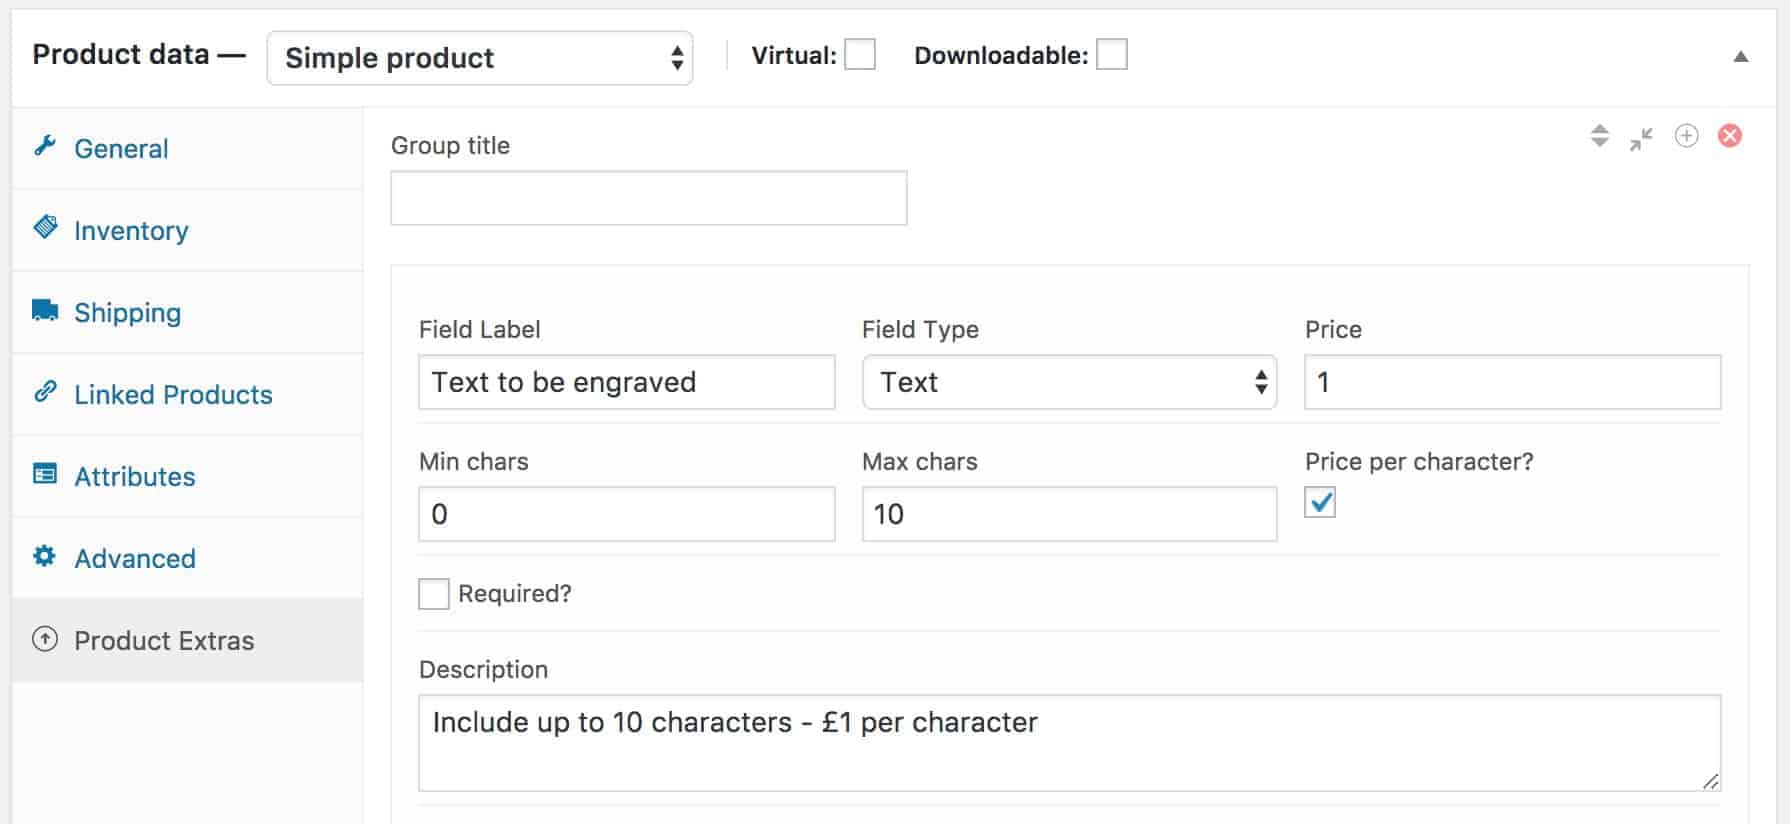
- Choose ‘Text’ as the addon field type. This will add a text input field on the product page where your users can enter the text they would like to have engraved. Add a label, e.g. ‘Text to be engraved’.

- Add a price to the ‘Price’ field. To charge this value per character, select the ‘Price per character’ field. Note that if you don’t select this field, the same price will be charged irrespective of how many characters are entered into this field.
- Add a minimum and maximum number of characters depending on how much room you have on your product
- If an engraving is required, select the ‘Required?’ checkbox.
On the front end, your customers will now be able to enter their own personalized engraving:

Build your own teeshirt with WooCommerce
You can use this method to allow users to personalize teeshirts (or extend it to other clothing types if you wish). In this example, we’ll allow our customers to add a slogan and upload an image to be printed onto the shirt.
- Create a new product and assign a price. This is the price for the basic teeshirt without any customizations
- On the WooCommerce Product Add Ons Ultimate tab, add a new group then click ‘Add Field’ to add a new WooCommerce addons field
- Choose ‘Text’ from the Field Type dropdown and enter a label into the Field Label field

- Add a price: you can either set a single price whatever text the customer enters or charge per character. If you’re charging per character, select the ‘Price per character’ checkbox. The value you’ve entered in the Price field will now be multiplied by the number of characters entered.
- Set minimum and maximum values for the number of characters permitted
- Now add a new field and select ‘File upload’ as the field type so that the customer can upload an image to their shirt. You can assign a price for this.
On the front end, your product will look like this:

How to run a competition with WordPress and WooCommerce addons
The last example I’m going to show you is how to run an online competition using WooCommerce addons where the competition entrants must pay an entry fee and have the option to upload their entries. For this example, I’m going to imagine that we’re running a photography competition but you can use this for any type of online competition.
This example is slightly more complex than the other examples in this article as it will use conditional logic. However, if you’ve read this article all the way through, you’ll know how to start:
- Create a new product for your competition entry. The entrant will buy this product in order to enter the competition
- On the Products Extra tab, add a new group and call it something like ‘Image 1’. We’re going to imagine that the competition rules allow entrants to submit two photographs as part of their entry.
- To the Image 1 group, add two fields – a text field name ‘Image Title’ and a file upload field called ‘Image’. For each image that the entrant uploads, they’ll need to pay $25 so add 25 to the Price field for the file upload. This field is also required:

- Because we’re permitting two photographs per entry, click the ‘Duplicate Group’ icon at the top of the group (a plus sign with a circle round it). This will duplicate the group you’ve just added.
- Update the group name to ‘Image 2’.
Your competition entry page will look like this:

Final thoughts on WooCommerce addons
WooCommerce addons are a great way to add value to your product and go beyond the standard WooCommerce capabilities. You can find out about the WooCommerce Product Add Ons Ultimate plugin which I’ve used in this article to create all the examples by clicking this link.
WooCommerce Product Add-Ons Ultimate
Personalize products with extra custom fields and options

We have a jewelry shop website and we have a personalized items.
Capital and small letters are different when it comes to pricing, does that feature included?
Hi – the plugin doesn’t currently have that feature included, it would need to be custom coded.
Thanks.