How to sell custom jewelry with WooCommerce

If you’re looking for a way to sell jewelry products online, you might consider setting up an online store using WooCommerce.
Although WooCommerce lets merchants sell all sorts of products, it doesn’t offer options to let customers personalise their products before placing their order.
The good news is that selling custom jewelry with WooCommerce is possible with the WooCommerce Product Add-ons Ultimate plugin. You can use it to add fields to your single product page enabling customers to personalise products in different ways.
In this tutorial, we’ll show you how to sell custom jewelry with WooCommerce. Before we begin, let’s quickly take a look at why you’d want to sell custom jewelry in the first place.

Check out this tutorial on how to create an engraving product in WooCommerce.
Why you’d want to sell custom jewelry
Custom jewelry products are in demand all year round due to popular holiday seasons, events, and occasions throughout the year. It’s easy to see how you can achieve huge profit margins selling customized jewelry.
In fact, jewelry sales are expected to reach $645 billion in 2035. It’s also worth mentioning that jewelry profit margins average around 42.6% with many sales taking place online.
So, why not take advantage of the booming industry by selling custom jewelry on your WooCommerce store?
Here are some ideas:
- Sell custom necklaces on your WooCommerce store in the weeks leading up to Valentine’s Day and Mother’s Day.
- Give customers the option to add unique charms to their bracelets around Best Friend Day.
- Let customers buy engraved rings, watches, or pendants from you for weddings, anniversaries, and birthdays or as graduation gifts.
If you’re still unsure about what kind of custom jewelry to sell, here are few more use cases to consider:
Custom jewelry for all occasions
You can sell custom jewelry items for many occasions such as Valentine’s Day, Mother’s Day, Father’s Day, or Best Friends Day. People also like to purchase personalized jewelry as gifts for their loved ones on events such as birthdays, weddings, or anniversaries.
You can sell engraved necklaces, bracelets, or rings as custom jewelry products on your WooCommerce store. You might also give customers the option to add charms, stones, or pendants to their jewelry product.
Handmade jewelry
Another great way to create a custom jewelry store with WooCommerce is to sell handmade jewelry items. You can also go with a theme such as vintage jewelry or trending jewelry.
For instance, you can sell personalised letter rings or necklaces with initials engraved in them as custom jewelry products. Or, you can sell custom necklaces where people can choose the material, font, and size.
Limited edition custom jewelry
You can also sell custom jewelry that represents your brand. For instance, you can provide limited edition custom-made rings or necklaces that are connected to your brand in some way.
Additionally, you can sell custom jewelry alongside other main products that compliment it. For example, you might sell engraved or embossed silicone wristbands or sports wristbands that go with the apparel you sell.
How to sell custom jewelry using WooCommerce
As we mentioned earlier, WooCommerce doesn’t allow customers to personalise their products out of the box. Since selling custom jewelry means collecting information from customers, you need a way to add fields to your single product pages.
This is where the WooCommerce Product Add-Ons Ultimate plugin comes in. It lets you add different fields to your single product pages to let customers personalise their products. The plugin offers 16 different field types to choose from.
The best part is that you can add multiple fields for each jewelry item and organise them into groups. This way, you can deliver a good user experience to prospective customers.
The WooCommerce Product Add-Ons Ultimate plugin gives you the option to charge extra for personalisations, as well. For example, if you add a text field (to allow engraving), you can choose to charge for each character.
For this tutorial, we’ll assume you already have the WooCommerce Product Add-Ons Ultimate plugin installed and activated on your WordPress site.
Step #1: Create a jewelry product
Start by creating a WooCommerce product for the jewelry item you want customers to be able to personalise. For example, you can create a product for a necklace, ring, bracelet, or watch that customers can customize in different ways.
We’ll use a custom necklace as the example product for the purpose of this tutorial. Give your WooCommerce product a suitable title and add a product description.
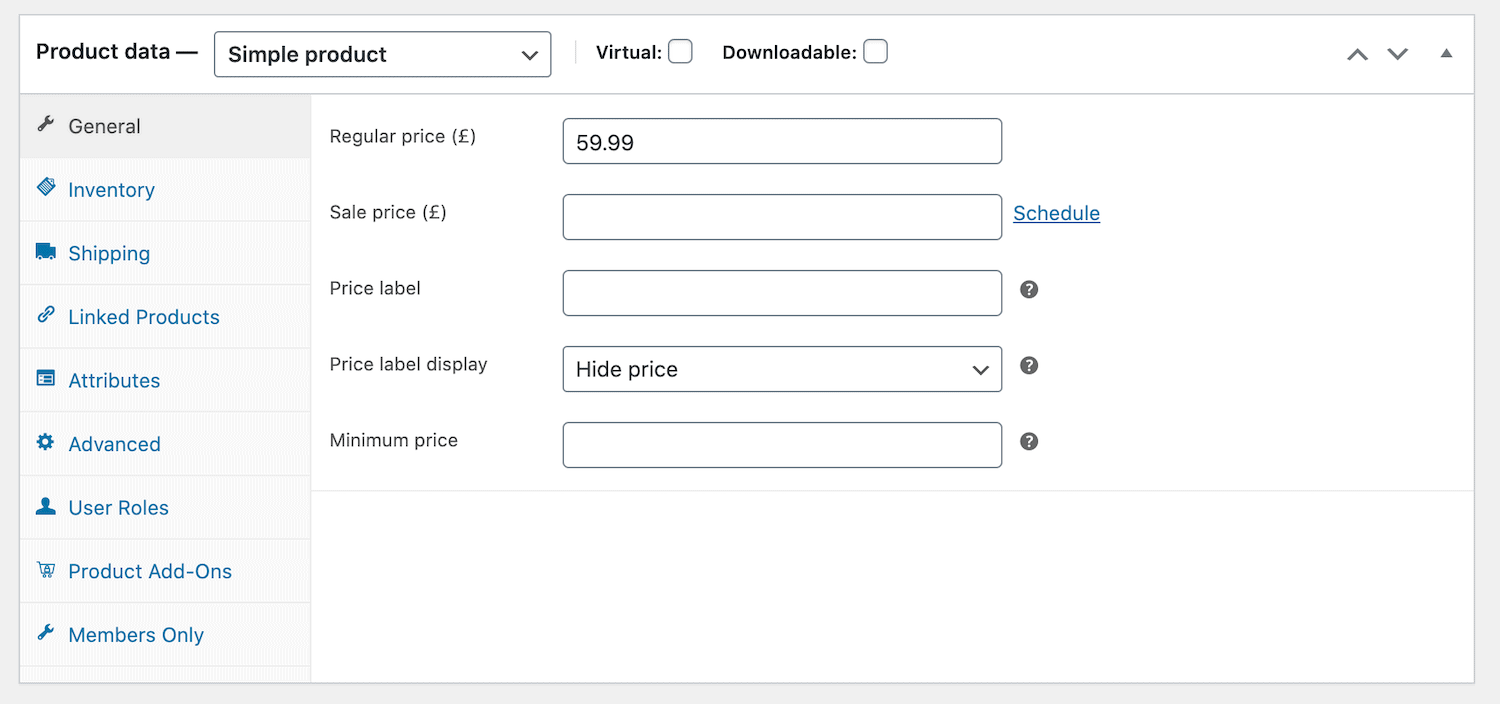
Set the price of the necklace product to the base price you’d like to sell the necklace at. Later on, we’ll show you how you can charge extra depending on the personalisation. Once you’ve set the product price, hide the price label from the single product page.
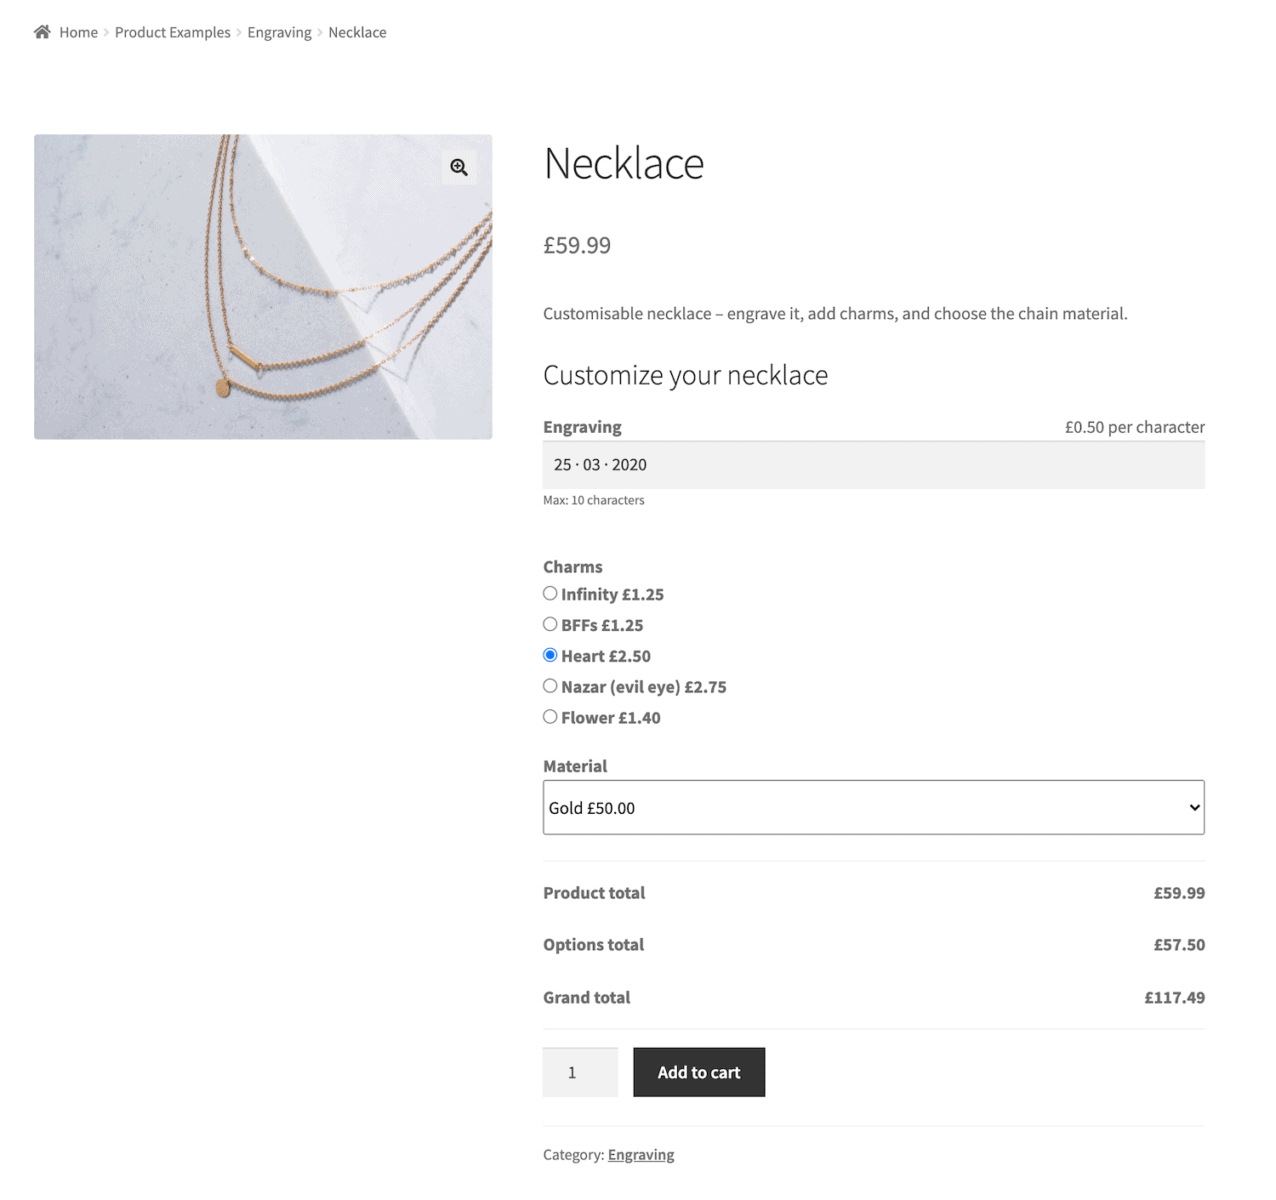
This way, the customer will see the final price of the product after they’ve personalised it. The WooCommerce Product Add-Ons Ultimate plugin automatically calculates and displays the total price of the product above the ‘Add to Cart’ button.
This includes the price of the product (Product total), price for all personalisations (Options total), and the total amount the customer will be charged (Grand total).
Step #2: Add personalisation options
Now that you’ve created a jewelry product, you can use the WooCommerce Product Add-Ons Ultimate plugin to add personalisation options to it.
Following our necklace example, we’ll add three personalisation options that allow customers to enter the text they’d like to have engraved on it, add charms, and select the necklace’s material.
To add fields to the product, scroll down the the Product data section and click the ‘Product Add-Ons’ tab. Add a new field for each customization you want to offer. You can also organise fields into groups if you plan on offering lots of personalisation options.
For engraving option
Use text fields to allow your customers to enter a personalised engraving on the necklace. This can be a name, initials, monogram, or message. The WooCommerce Product Add-Ons Ultimate plugin lets you set the minimum and maximum characters customers can enter and enable price per character. This way, you can charge extra for personalisation.
Here’s what you need to do:
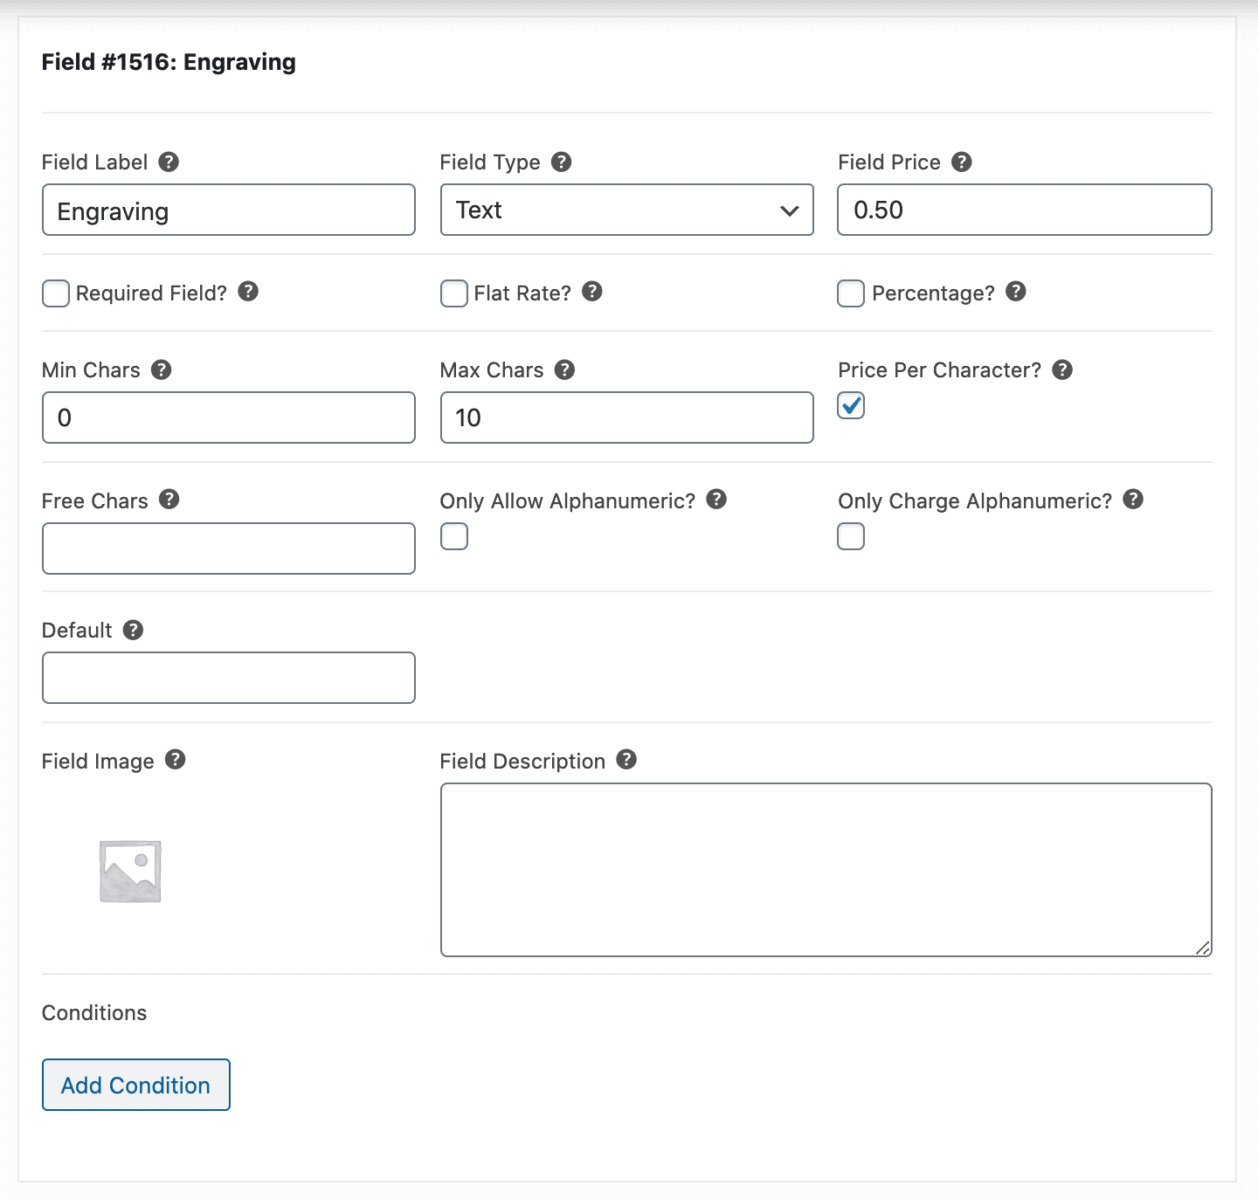
- Set the ‘Field Label’ to ‘Engraving’
- Choose ‘Text’ from the ‘Field Type’ dropdown
- Set the ‘Field Price’ to how much you want you want to charge for the engraving either flat rate, percentage, or price per character
- Set the ‘Min Chars’ and ‘Max Chars’ value to specify the minimum and maximum allowed characters
The text field type also offers additional options that let you only allow alphanumeric characters, only charge for alphanumeric characters, upload an image, and more.
For adding charms
Select fields are great when you need to provide a set of options for your customers to choose from. You can use select fields or radio buttons to let customers add charms to their necklace. For example, you can let customers choose to add an infinity charm, BFF charm, heart charm, nazar charm, or something similar.
Here’s how:
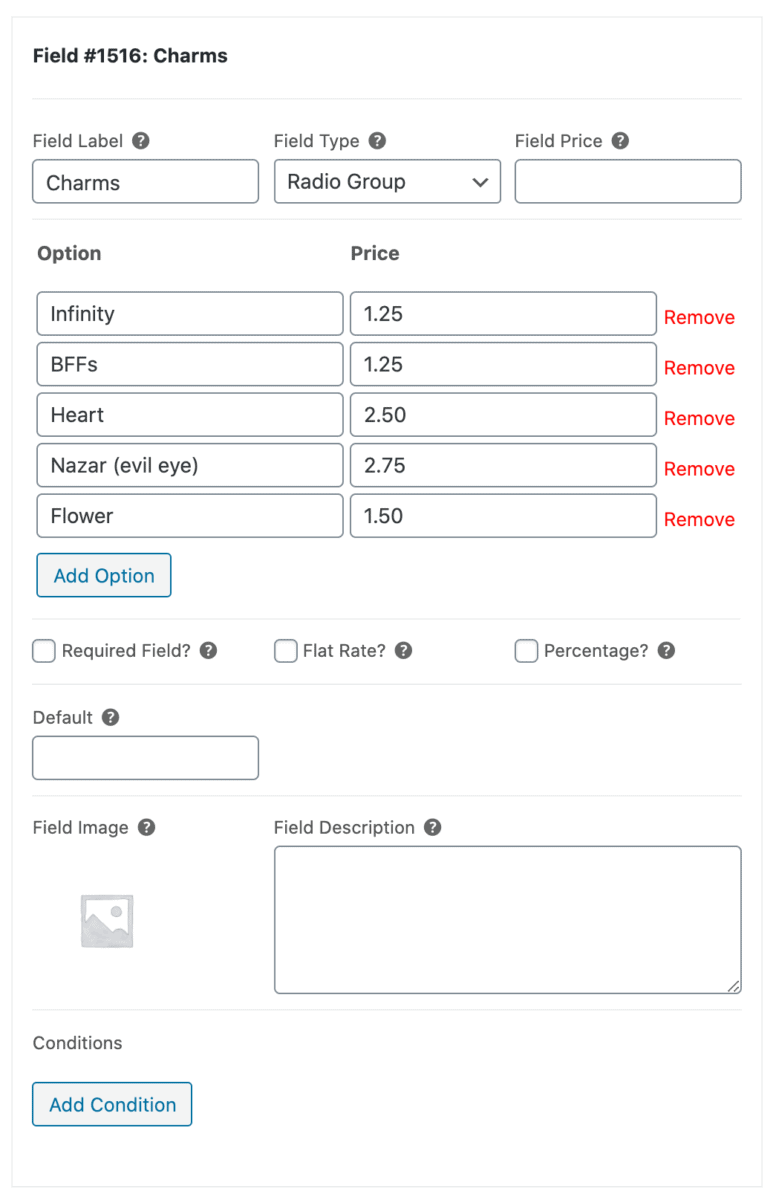
- Set the ‘Field Label’ to ‘Charms’
- Choose ‘Radio Group’ from the ‘Field Type’ dropdown
- Click the ‘Add Option’ button to enter a charm and its price
For selecting materials
You can also use the select field to let customers choose the material of their necklace. For example, you might offer silver, gold, and rose gold options for the necklace’s chain.
Here’s how you can set this up:
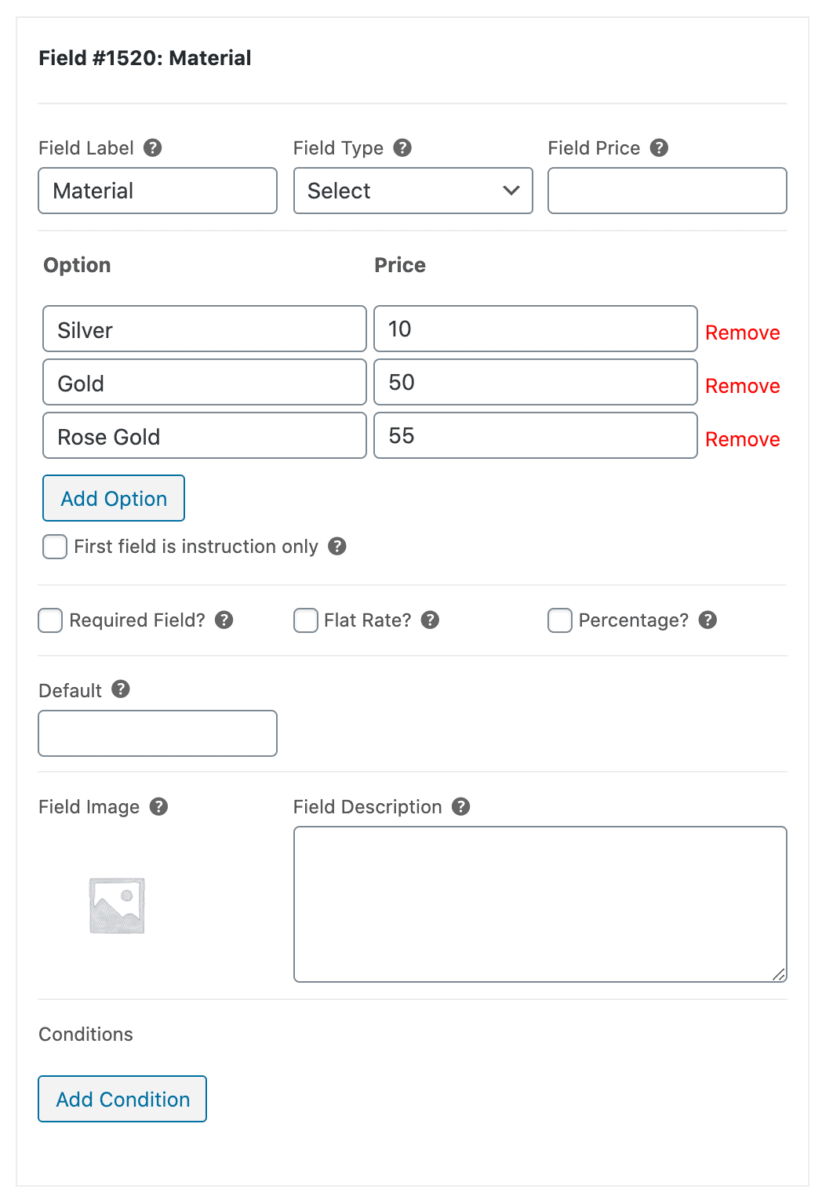
- Set the ‘Field Label’ to ‘Material’
- Choose ‘Select’ from the ‘Field Type’ dropdown
- Click the ‘Add Option’ button to enter a material and its price
Step #3: Preview
Now that your custom jewelry product is ready, you can preview it on your store’s front-end. It should look something like this:
And here’s what it will look like in the cart:

This way, customers can review their cart (and the personalisations they selected) before placing their order at checkout.
Bonus: Add conditional logic
If you want to display certain fields when customers make a specific selection in a previous field, you can use the WooCommerce Product Add-Ons Ultimate plugin’s built-in conditional logic feature.
For example, let’s say you want to sell regular jewelry products while giving customers the option to personalise them. For this, you can create a checkbox field that asks customers if they want to customise the product.
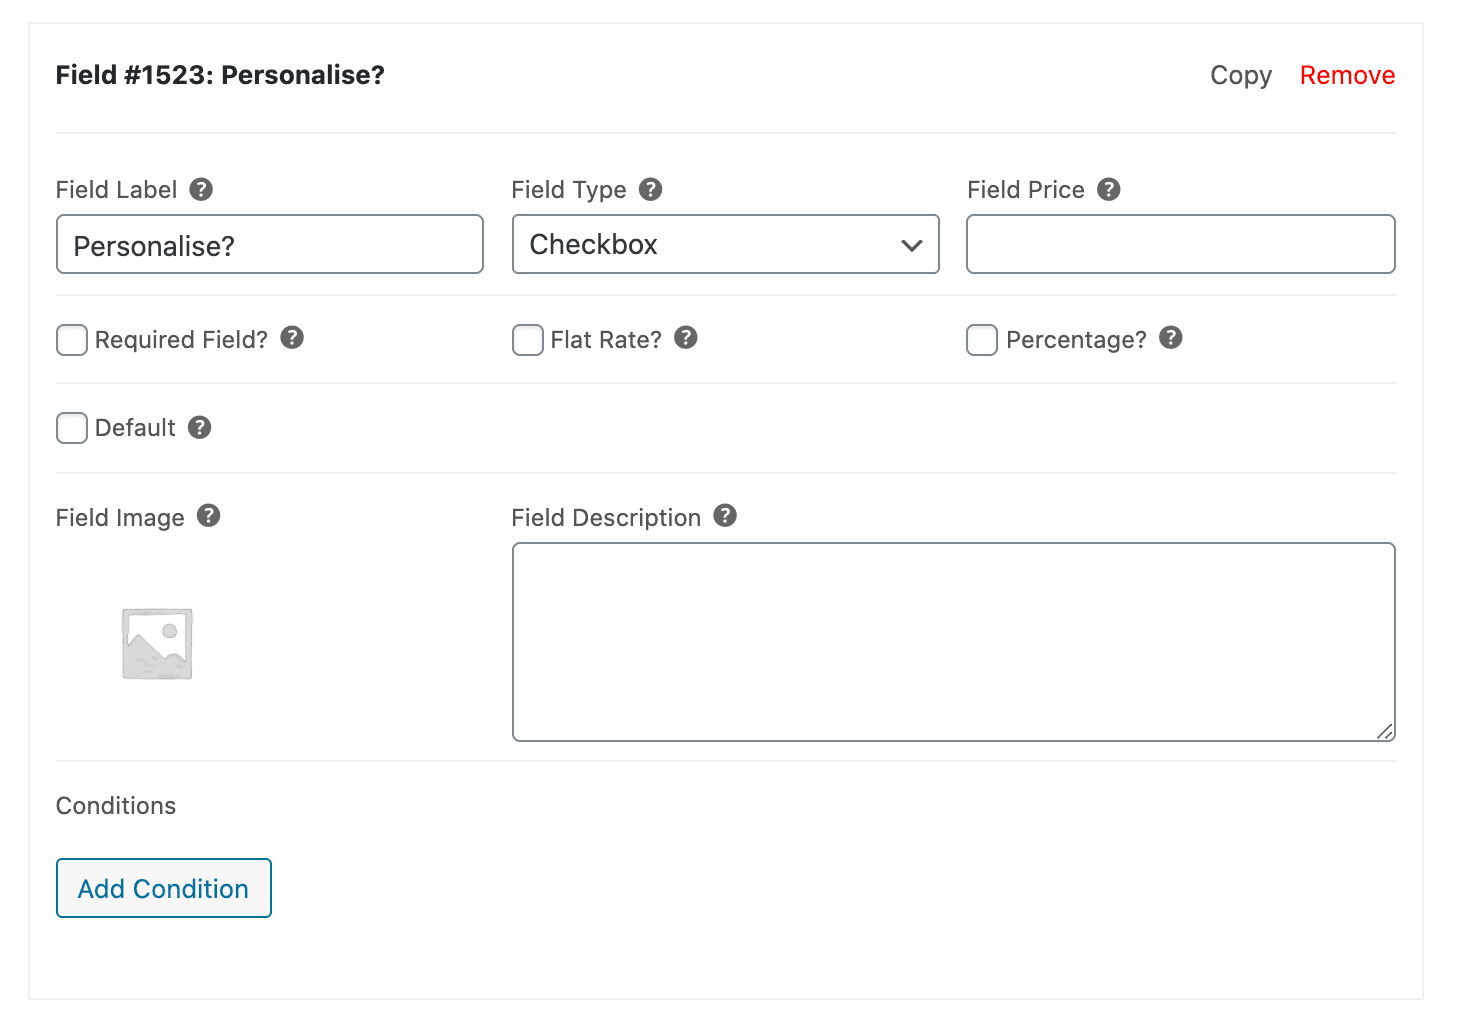
Once that’s done, you can add a condition to the group you created in the steps above.
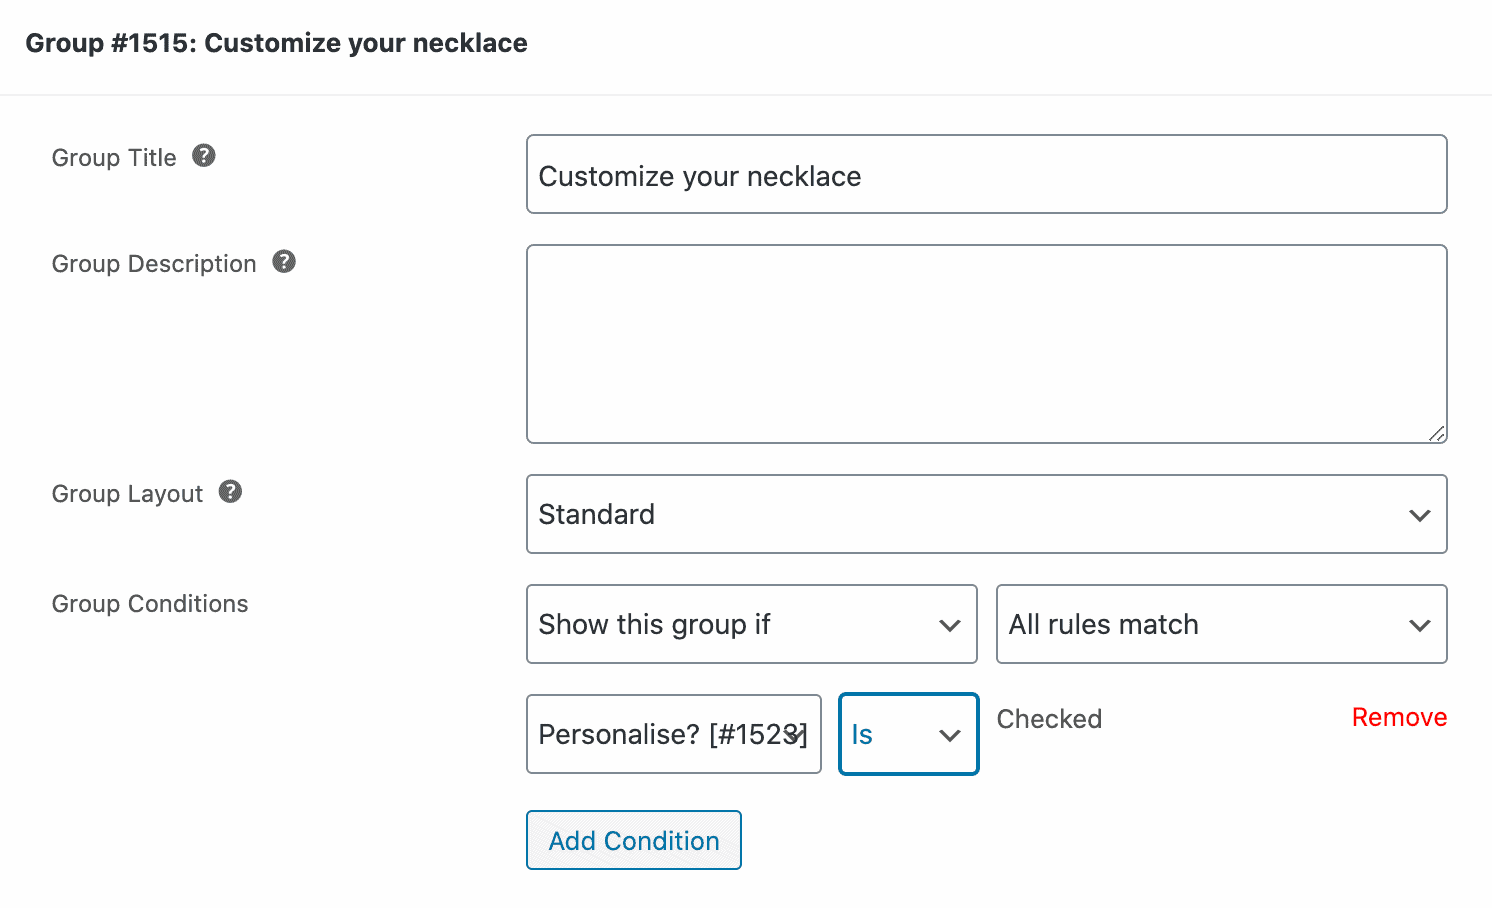
Use the dropdowns in the Group Conditions settings to set up your conditional logic rule(s). You can set multiple rules too, if you’d like.
For example, you can configure the group (and its fields) to only show if the customer selects the Personalise checkbox.
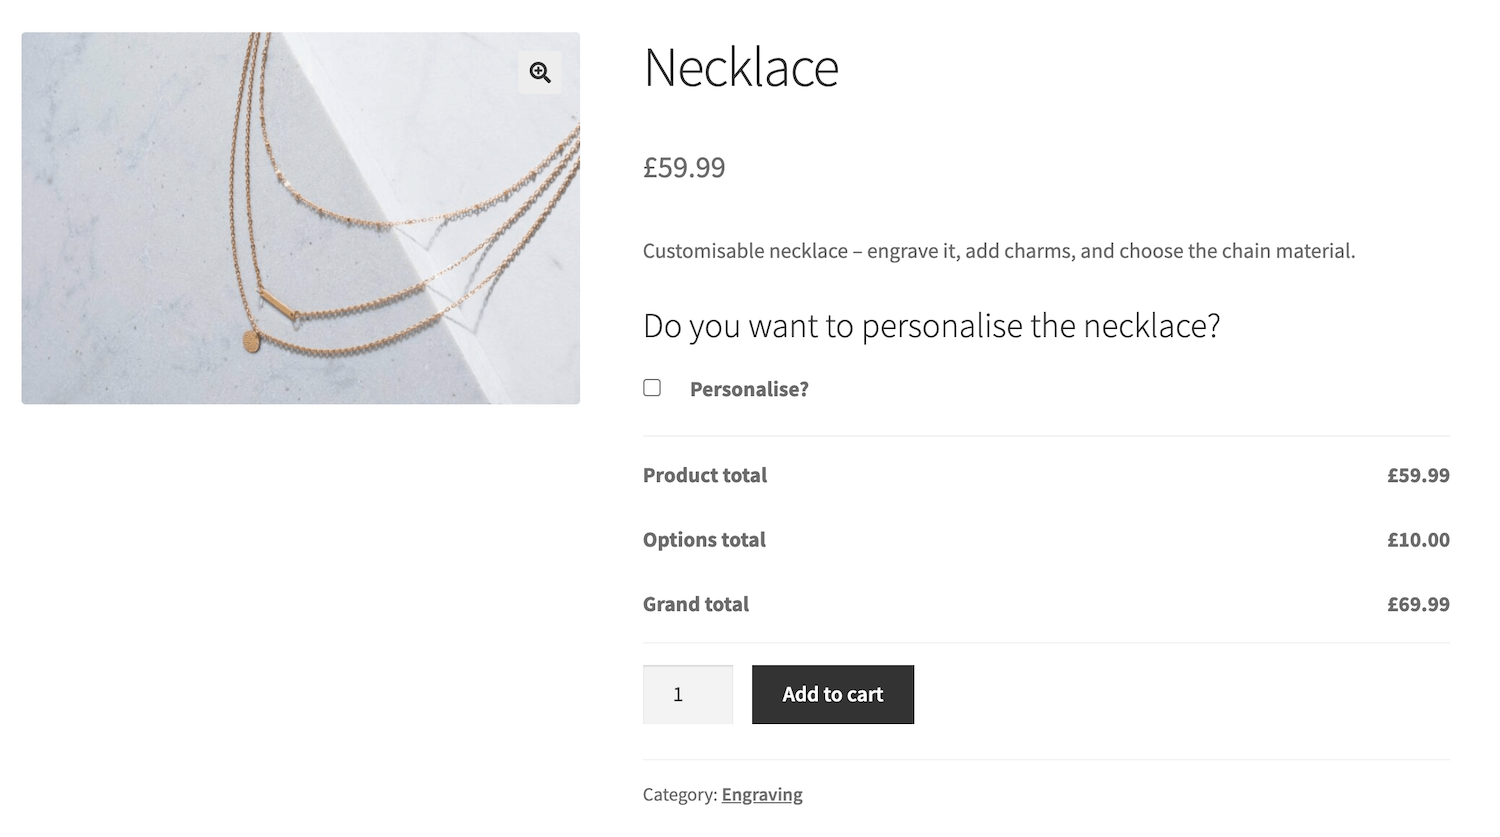
It would look something like this on the front-end before and after customers click the checkbox:

Conclusion
By using the WooCommerce Product Add-Ons Ultimate plugin, you can provide personalisation options for custom jewelry products on your WooCommerce store. This is a great way to differentiate your products and increase sales.
The best part is that you can add as many personalisation options as you’d like and charge extra for custom jewelry. To take things further, you can also use conditional logic to display certain fields when customers make a specific selection in a previous field.
Ready to create custom products on your WooCommerce store? Get the WooCommerce Product Add-Ons Ultimate plugin today!
Hi,.
I went through few of your blogs on custom fields.
These are are very informative.
I was trying to build a custom jewellery website and I wanted a field similar to the one in the following website.
https://ellipstore.com/collections/personalise-jewellery/products/curlicue-name-necklace
A custom field which displays the in put in the selected font.
I am sure you would be having an answer to this.
Hi Murshid
Thanks for your email. Yes, you can use the Text Preview plugin – https://pluginrepublic.com/wordpress-plugins/text-preview-plugin/. This will allow your users to preview text in the selected font, either on the main image or in a separate preview field.
Thanks.
Is that possible to add in custom options
1) add images
2) multi select color
Hi George
You can display images as part of the custom fields and you can allow the user to select colours.
Does that help?