WooCommerce Members Only - Membership Plugin
Control your content and sell members-only products
Protect any content type by user role, log-in or password, sell membership tiers, restrict products and prices with this WooCommerce membership plugin


The ultimate WooCommerce memberships plugin: protect any type of content, create a private store, set tiered access
WooCommerce membership plugin
- Restrict access to any kind of content
- Create private WooCommerce products or stores
- Restrict access through user role, password, login status, individual users
- Create multiple membership levels
Create a WooCommerce membership site
- Control which content users can see
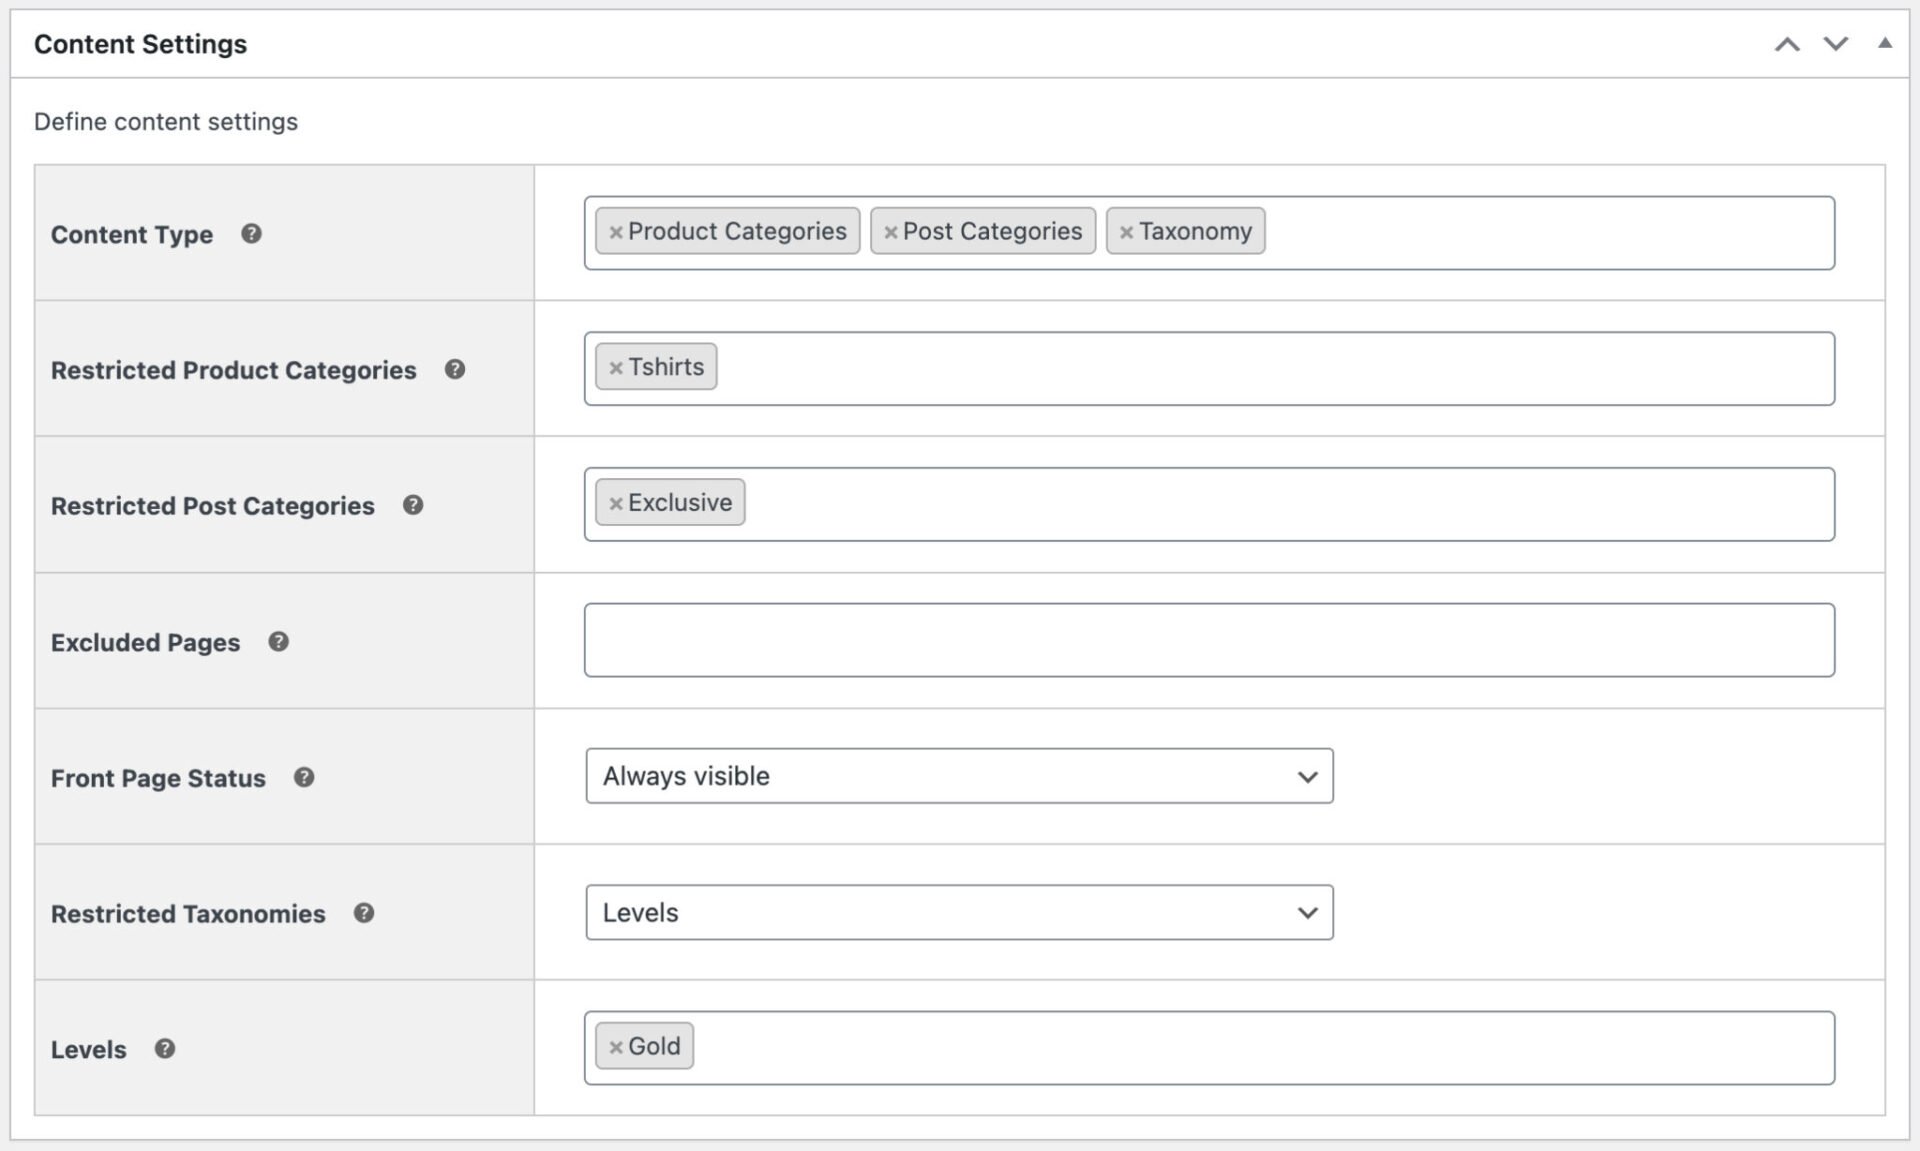
- Protect posts, categories, products, product categories, pages, custom post types, and taxonomies
- Choose how to restrict access
Sell members-only products
- Create different membership tiers
- Allow different user roles different levels of access
- Show or hide product prices to members
What our customers say
Read the great reviews for our WooCommerce membership plugin
See more reviews View us on Trustpilot
WooCommerce Members Only plugin features
Control access to content with the ultimate WooCommerce memberships plugin
Sell or assign memberships manually
Assign membership manually or by purchasing a product
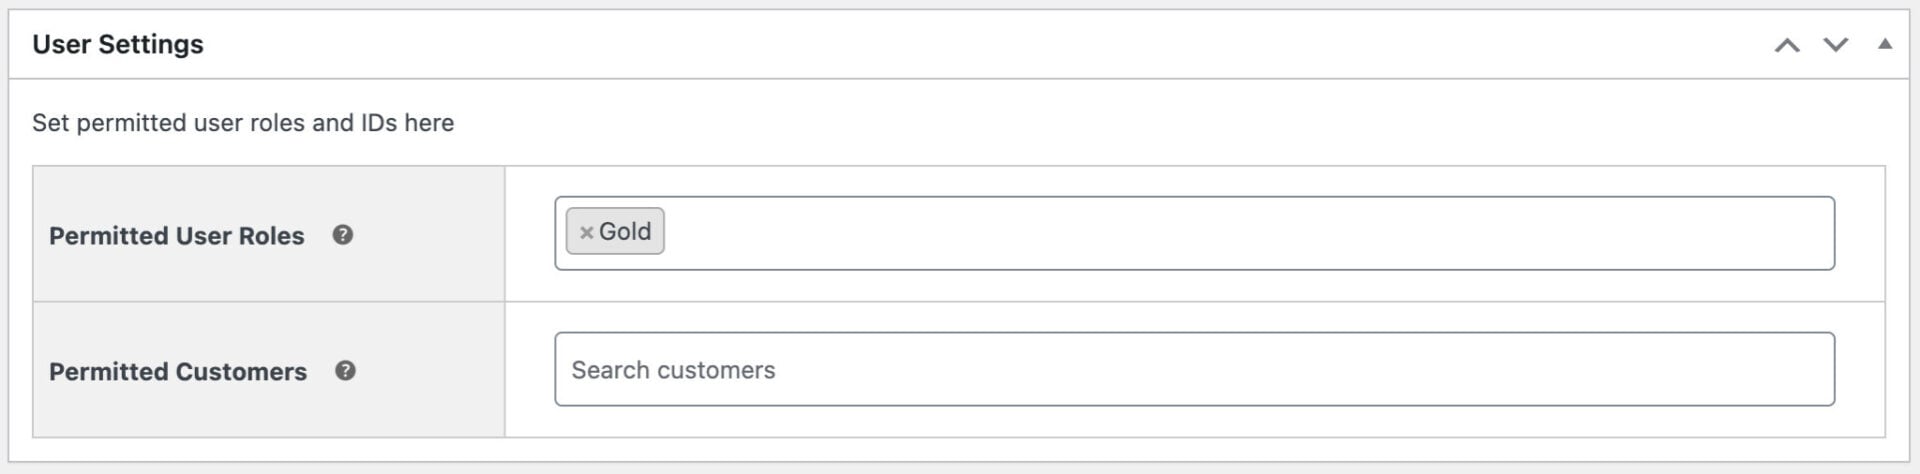
Choose how to protect your content
Restrict access through user role, password protect your content, or by login status
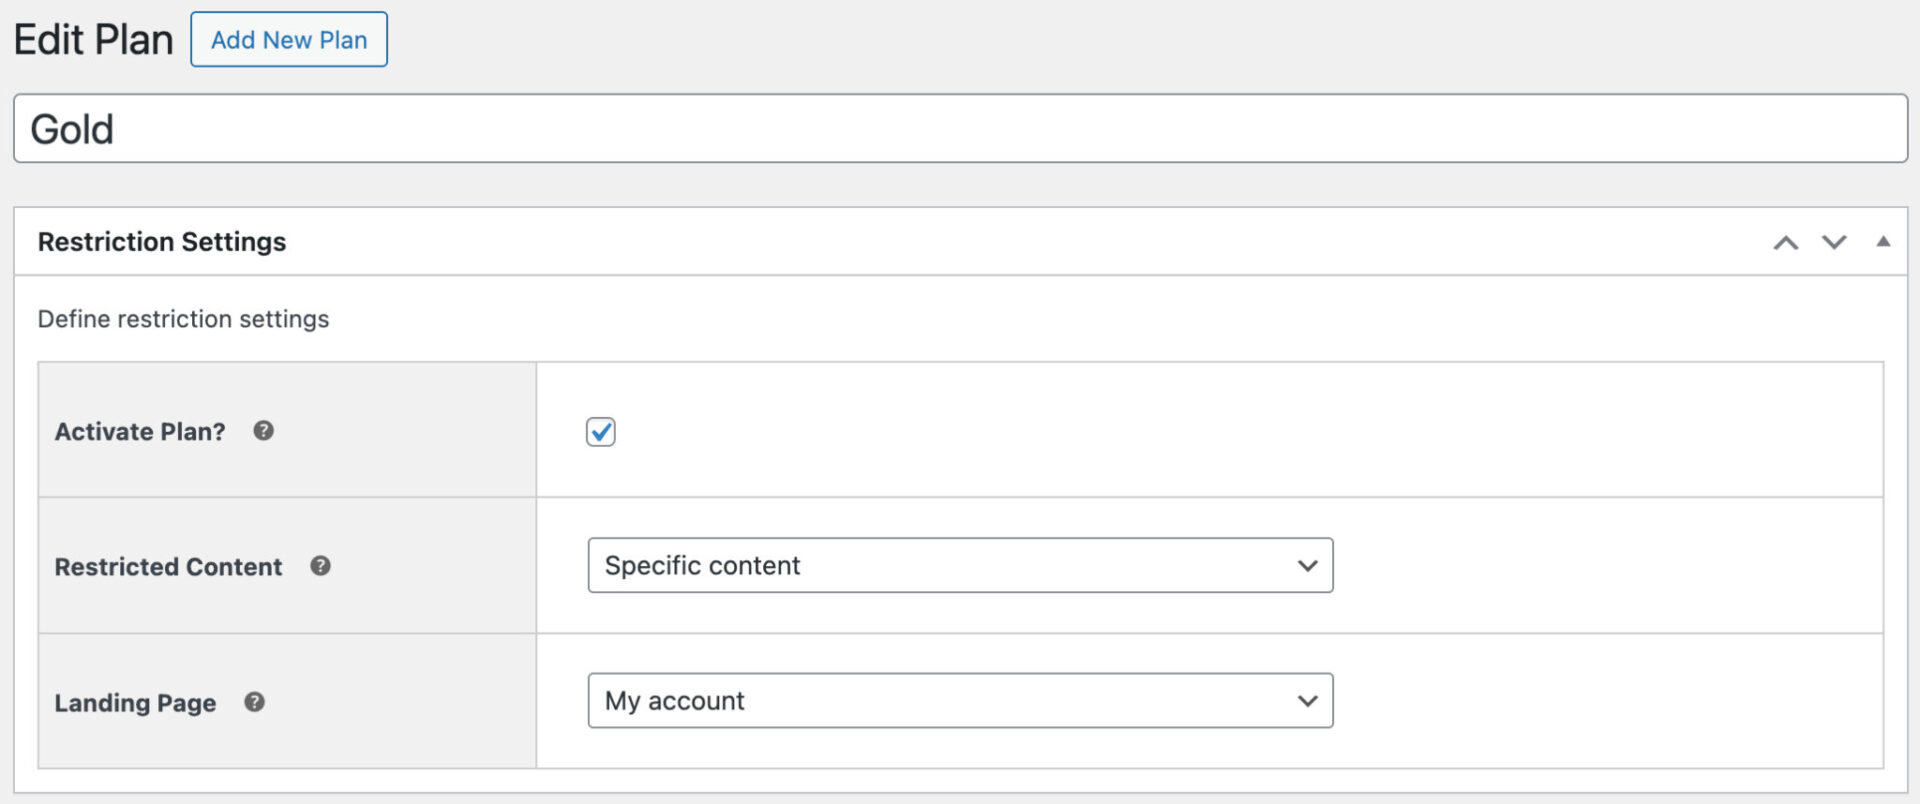
Create multiple membership plans
Each plan can restrict access to different content for different users
Free or paid memberships
Sell memberships or assign them manually. Sell different memberships for different content
Control access
Allow access to content based on user registration (with optional admin approval feature if required), manual assignment, or through purchasing a product
Build a complete membership platform
Perfect for building communities, member directories, online learning platforms, purchasing clubs and members only stores, wholesale and B2B stores
Create members discounts
Members Only integrates with Dynamic Pricing and Discount Rules to create exclusive member discounts
Customizable emails
Fully customizable emails - edit text, preview emails, use custom placeholders and templates
WooCommerce Subscriptions
Members Only integrates with WooCommerce Subscriptions to enable recurring payments and instalment plans
Sell memberships
Create a membership plan then allocate a product that need to be purchased in order to obtain the membership plan. Products can be simple or variations
Sell different membership tiers
Create membership plans for Gold, Silver, Bronze, etc. Allow users to purchase membership and upgrade if they wish
Assign memberships manually
Apply membership roles to users individually or in bulk via the WordPress dashboard
Moderate user approval
Allow any user to register just by signing up - but enable manual admin approval before they can access any content. So users can register on the site but can't access content until they're approved
User role self-selection
Allow users to choose their membership level when registering - and optionally required certain roles to be manually approved. E.g., anyone can sign up for a 'Basic' membership, but 'Pro' users need to be approved
Allow multiple memberships
Customers can belong to multiple membership plans, allowing you to fine-tune what content each user can access
Membership plan duration
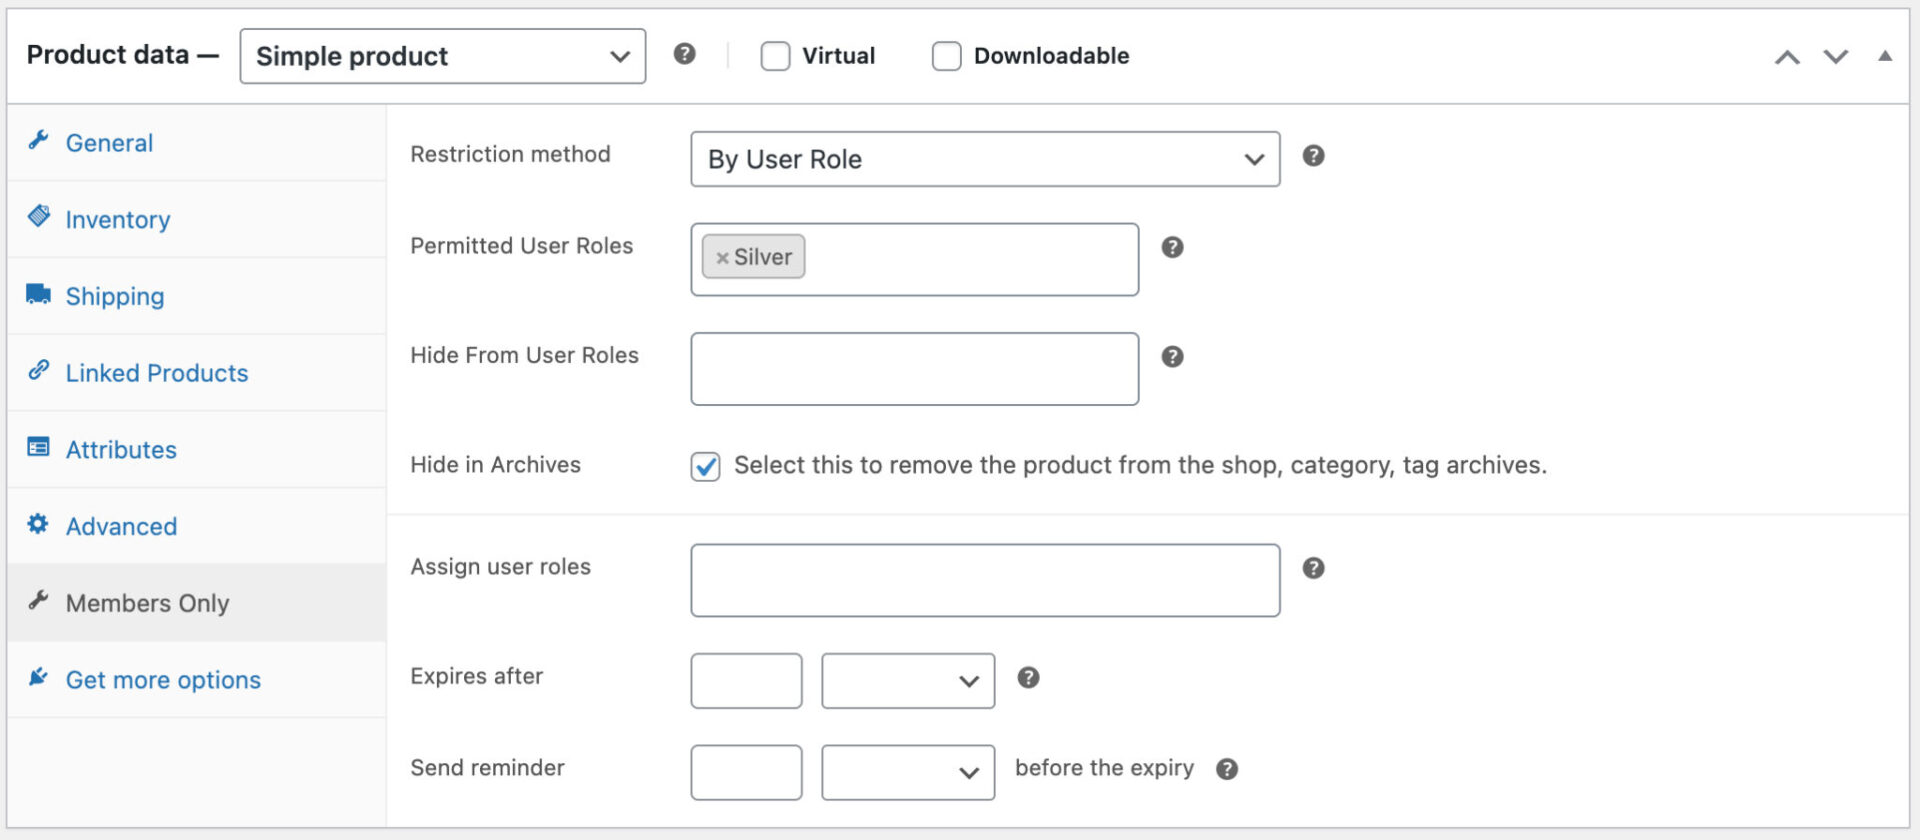
Membership plan duration by fixed period, until set date, or unlimited period (lifetime memberships). Send a reminder when their membership is nearly up
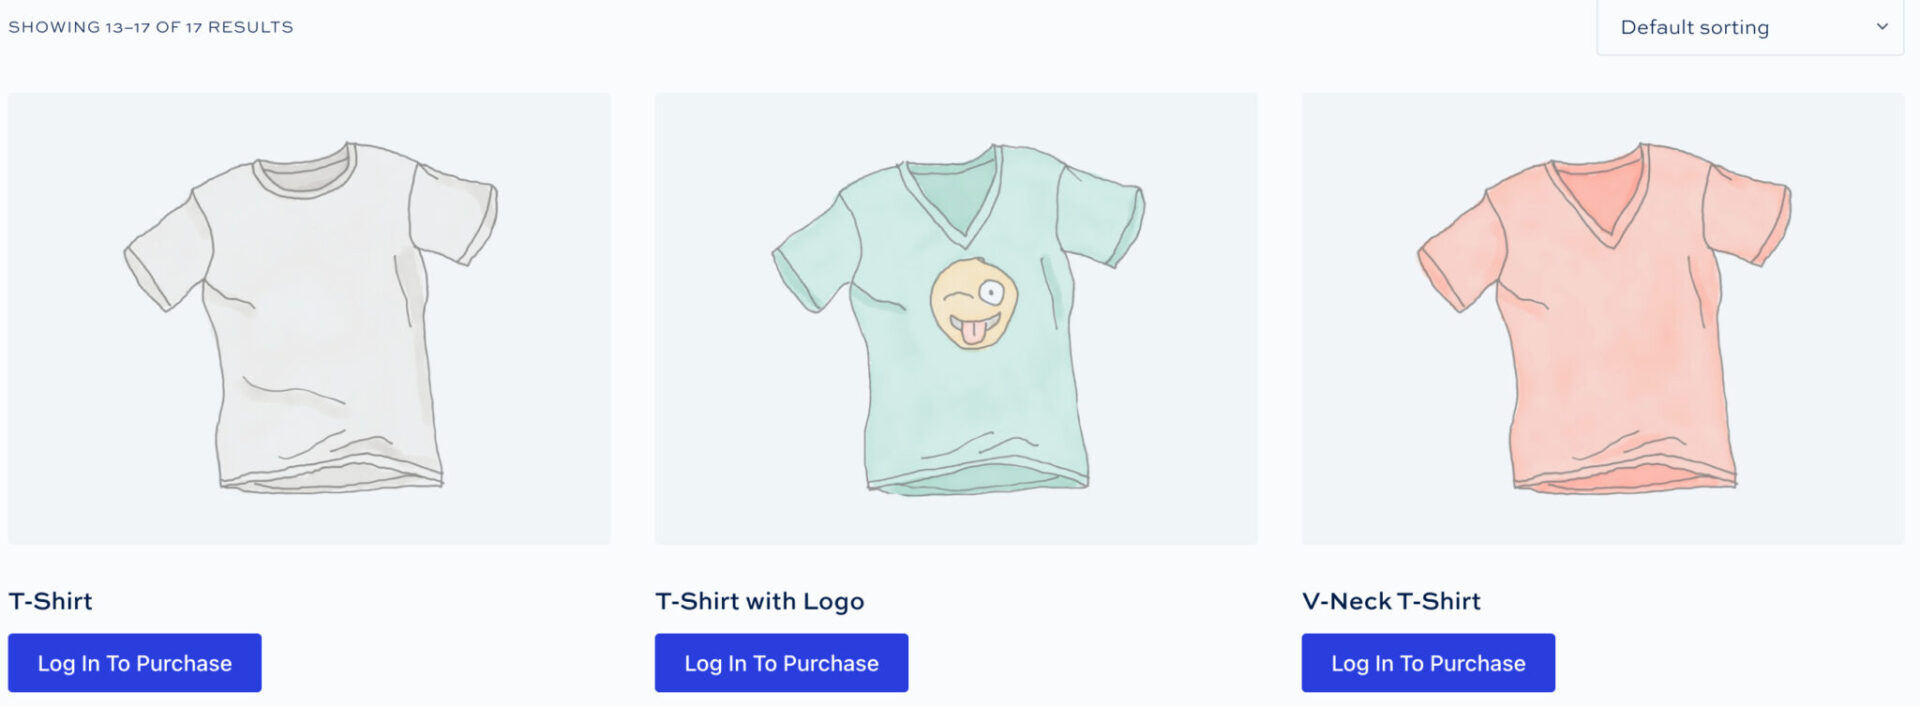
Protect products and categories
Hide WooCommerce products and categories from unauthorized users. Allow users to view products - but not purchase them
Restrict all content types
Restrict access to any content type, including WooCommerce products and categories, posts and post categories, pages, custom post types, custom taxonomies and terms. Use the plugin to protect all kinds of content - courses, tutorials, premium posts, private forums and message boards
Hide your entire site
Choose to restrict access to every page on your site except your homepage and log-in & registration page
Dedicated landing pages
Send non-members to different landing pages depending on what restricted content they try to access, allowing you to create dedicated landing pages for different membership levels
Authentication options
Authenticate users by user role, password, or log-in status. Set different rules for different users or user roles; or set different passwords for different access
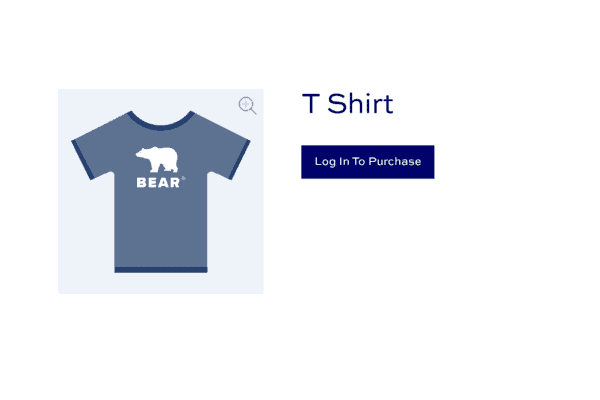
Hide product prices
Display restricted products - but hide prices until users log in. Or hide the products altogether
Alternate add to cart text
Replace the standard add to cart text with your own message - then redirect the user to custom landing pages on click
Private products and stores
The perfect membership plugin to create private WooCommerce products and stores
Integrates with Dynamic Pricing and Discount Rules plugin
Members Only is designed to work with WooCommerce Dynamic Pricing and Discount Rules. Use it to create membership discounts
Multiple discount rule types
Reward members with discounts through bulk pricing, tiered pricing. fixed or percentage discounts, discounts by value, and 'Buy One Get One' offers
Create multiple pricing rules
Create as many pricing rules as you like and assign them to different memberships. Apply discounts to specific products or product categories or to all products
Set specific prices for membership roles
Assign exact prices per membership role for products and variations
Discount by quantity or value
Apply discounts according to the number of items (quantity-based) or the value of items (discounts on spend)
Compatible with WooCommerce Subscriptions
Use the WooCommerce Subscriptions plugin for recurring payments
Shipping and payment methods
Reward members with conditional shipping and payment methods
Custom user registration fields
Add custom user fields to the registration form, including checkboxes, text, select and upload fields
User approval
Choose to allow registrations but require manual approval - for some or all roles
Self-select role at sign-up
Allow users to select the type of membership they're registering for (and optionally require manual approval)
Display fields in custom locations
Choose to add custom fields to the registration form, checkout page, account page, and admin screens
Editable custom user fields
Allow users to edit custom field values from their account page
Conditional user fields
Optionally show or hide user fields based on the value of other fields
Custom redirects
Set where to redirect users to after they login or register
Create subscription products
Require users to purchase a subscription product to qualify for a membership level. If the subscription expires, the user will lose access to the content
Recurring payments or installment plans
WooCommerce Subscriptions allows you to create payment plans for indefinite or fixed length - e.g. pay $100 a month for three months
Free trials
Enable free trials using WooCommerce Subscriptions
Re-assign users with lapsed membership levels
Downgrade users to a different membership level when their subscription expires
Conditional shipping methods
Enable certain shipping methods for different membership levels - permit or restrict shipping methods by user role
Conditional payment methods
Enable certain payment methods for different membership levels - permit or restrict payment gateways by user role
Built on WooCommerce
Members Only is compatible with all WooCommerce payment gateways - making it an extremely flexible way to charge for content
Dynamic Pricing and Discount Rules
Members Only is compatible with our Dynamic Pricing and Discount Rules - allowing you to set different prices for different membership levels
WooCommerce Subscriptions
Use WooCommerce Subscriptions to create recurring revenue on your membership products
WooCommerce Product Add-Ons Ultimate
Product Add-Ons Ultimate is the leading plugin for WooCommerce add-on fields and options
Pricing
All purchases are covered by a 14 day money back guarantee.
All prices are in US Dollars.
Yearly licenses renew annually - cancel anytime
Lifetime licenses are a one-time payment
Single
$69 + VAT *
Use on a single siteUse this plugin on one production site
Renews annuallyThis plugin will automatically renew every year. If you cancel it, you can continue to use the plugin but will not receive support or updates
14 day money back guaranteeIf the plugin isn't what you want, just drop us a line within 14 days for a full refund
Pro
$99 + VAT *
Use on up to 5 sitesUse this plugin on up to 5 sites
Renews annuallyThis plugin will automatically renew every year. If you cancel it, you can continue to use the plugin but will not receive support or updates
14 day money back guaranteeIf the plugin isn't what you want, just drop us a line within 14 days for a full refund
Agency
$349 + VAT *
Use on up to 25 sitesUse this plugin on up to 25 sites
Renews annuallyThis plugin will automatically renew every year. If you cancel it, you can continue to use the plugin but will not receive support or updates
14 day money back guaranteeIf the plugin isn't what you want, just drop us a line within 14 days for a full refund
Single
$189 + VAT *
Use on a single siteUse this plugin on one production site
One-time paymentThis is a single one-time charge. You'll receive support and updates for the lifetime of the product
14 day money back guaranteeIf the plugin isn't what you want, just drop us a line within 14 days for a full refund
Pro
$279 + VAT *
Use on up to 5 sitesUse this plugin on up to 5 sites
One-time paymentThis is a single one-time charge. You'll receive support and updates for the lifetime of the product
14 day money back guaranteeIf the plugin isn't what you want, just drop us a line within 14 days for a full refund
Agency
$899 + VAT *
Use on up to 25 sitesUse this plugin on up to 25 sites
One-time paymentThis is a single one-time charge. You'll receive support and updates for the lifetime of the product
14 day money back guaranteeIf the plugin isn't what you want, just drop us a line within 14 days for a full refund

A full refund if you're not happy
I built this plugin myself and my team and I are available to support you personally. We want you to be 100% satisfied with your purchase so if, for any reason, this plugin doesn't meet your expectations over the next 14 days, let us know and we'll give you a full refund.
Your customer support team is absolutely superb. I have worked with Collins and Clint, and they have been helpful, patient, and incredibly easy to work with.

Why buy the WooCommerce Members Only plugin?
Running an ecommerce store without exclusivity can make it challenging to retain loyal customers and differentiate from competitors. This lack of exclusivity often leads to lower customer engagement and reduced repeat sales, causing a stagnation in growth. By purchasing the WooCommerce Members Only plugin, you can create a sense of exclusivity and community, fostering customer loyalty and increasing repeat sales, thereby driving sustained growth for your store.
FAQs
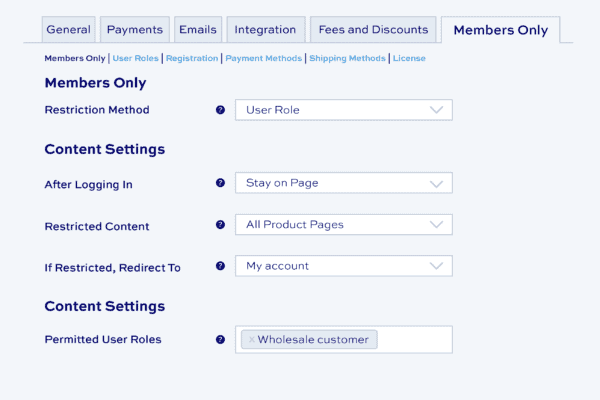
What methods can I use to protect content?
With Members Only, you can choose how to protect your content in a number of ways. You can restrict access by password, user role, or logged-in status. You can even restrict access to individual products and posts according to specific users.
Only the users that you have chosen can access your content.
Password options
- Set one or more global passwords
- Create different passwords for each product or post
- Create different passwords for each product or post category
User role options
- Specify one or more user roles at a global level
- Allow different user roles to access different products or posts
- Allow different user roles to access different product and post categories
- Restrict or enable payment gateways by user role
- Restrict or enable shipping methods by user role
- Set expirations for memberships
Custom registration options
- Allow users to select their role at registration
- Manually approve users after registration, if required
- Prevent pending or rejected users from logging in
- Set different default roles for new users
- Add custom fields to registration form
Other options
- Restrict access to users who are logged in
- Create user-specific products by restricting access to specified products to specific user IDs
User role editor
If you're protecting your content according to user roles, you need a simple way to create and manage user roles. The built-in user role editor lets you:
- Create new user roles
- Duplicate existing roles
- Edit role capabilities
What are the benefits of using this plugin?
Exclusive Offerings: Create a members-only area with premium products, discounts, or early access to new arrivals, boosting customer loyalty and engagement.
Content Control: Tailor your website experience by restricting specific pages, categories, or the entire site to members, allowing for a more targeted approach.
Increased Revenue: Offer membership tiers with varying access levels and benefits, creating additional revenue streams.
Enhanced Security: Restrict access to sensitive content or age-restricted products, ensuring compliance with regulations.
What are the different types of restrictions I can set up?
With the plugin you will have complete control of what the user sees. You can choose to:
- restrict all the content on your site
- restrict certain categories
- apply different rules to different categories
- restrict individual products
- restrict products by user ID
- restrict different products to different users
- hide product prices
- show product prices but prevent certain users from purchasing the products
How easy is it to set up member restrictions?
The plugin is designed for ease of use. You can define member access rules within a user-friendly interface. Simply choose the content (products, categories, pages, etc.) you want to restrict and assign access permissions to specific user roles (e.g., Member, Premium Member).
Can I offer different membership tiers with varying access levels?
Absolutely! The plugin allows you to create multiple membership tiers, each with its own set of access privileges. This lets you cater to different customer needs and create a tiered pricing structure for your memberships. For example, a "Basic Member" might have access to exclusive discounts, while a "Premium Member" might enjoy early access to new products, free shipping, and additional content.
How do members access restricted content?
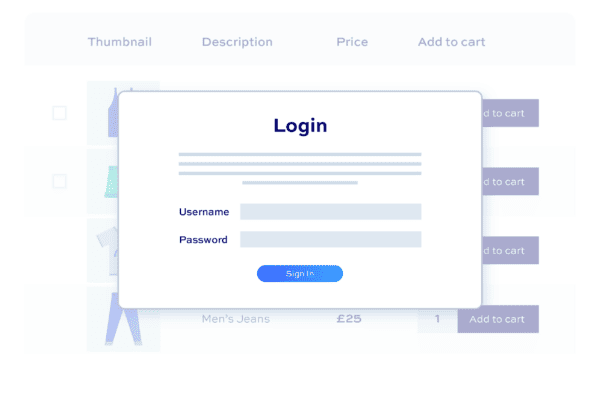
Once you've set up member restrictions, the plugin seamlessly integrates with your WooCommerce store. Members will need to log in to their accounts to access restricted areas. The plugin typically displays a login prompt when a user tries to access restricted content, allowing them to log in or create an account to proceed.
Can I customize the registration form?
Yes, you can add custom fields to the registration form.
Can I review users’ registrations?
Yes, you can choose whether to automatically approve registrations or manually approve them. You can also automatically approve some registrations - e.g. all registrations for retail customers - but manually review other registrations - e.g. for wholesale customers.
What happens to a user’s access if their membership expires?
The plugin offers flexibility in managing expired memberships. You can choose to automatically revoke access to restricted content when a membership expires. Alternatively, you can set up a grace period where users have limited access or see prompts to renew their memberships. You can configure these settings within the plugin's user-friendly interface.
Our products are featured on

Screenshots
See how the plugin looks on the back and front ends.