Custom user registration fields for WooCommerce: the complete guide

Do you need to collect extra information from users through custom fields on your WooCommerce registration form? By default, WooCommerce only asks new users for an email address and possibly a password – but for many store owners this isn’t enough. In this article, we’ll look at how you can add custom user registration fields for any kind of data you might need.
By the end of this article, you’ll know how to:
- Set up the basic WooCommerce registration form
- Decide how and when users can register
- Add standard WooCommerce fields, like address, phone number or company name, to your registration form
- Use a simple drag and drop builder to create new user fields and add them to the form
- Use advanced features like conditional fields, repeatable fields, and file uploads
- Allow users to select their own user role before registering
- Display registration fields on the checkout page and account page
- Approve or reject new user registrations
Because WooCommerce doesn’t have these features built in, you’ll need an extra plugin. Members Only is a membership plugin for WooCommerce that lets you to customize the registration form.

WooCommerce custom user registration fields video tutorial
This video covers how to create custom user fields in WooCommerce.
Why add custom fields to your WooCommerce registration form?
Let’s quickly look at why adding custom fields to the registration form might be useful:
- You’d like users to input billing and shipping data when they register
- You would like to collect other information, like VAT numbers, account manager details
- You might want users to be able to select their user roles when they sign up – for instance, if you have a wholesale site, you might need users to select whether they are wholesale or retail customers
- You require users to upload proof of identity or other documentation
- You’d like users to accept terms and conditions before they register with you
How to enable registration on your WooCommerce site
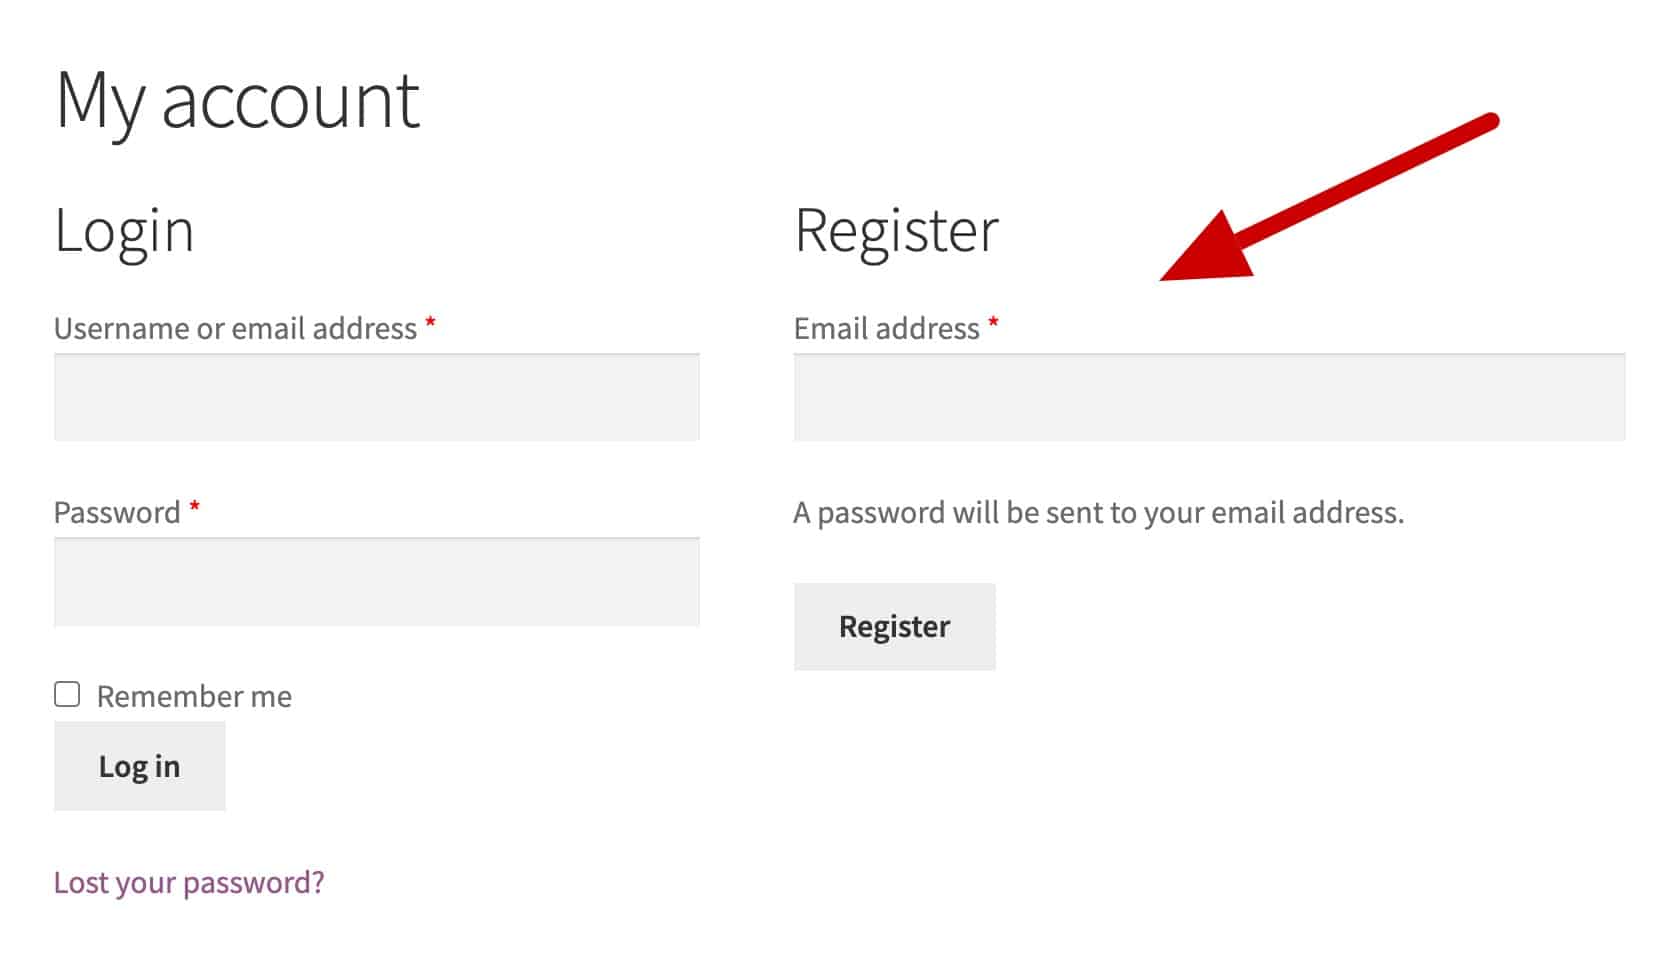
When you install WooCommerce for the first time, it automatically creates a ‘My Account’ page. This includes a number of sections where customers can view information about their account and orders.
However, this information is only visible to users once they’ve logged in. So WooCommerce displays a log-in form and registration form to non-logged-in users.
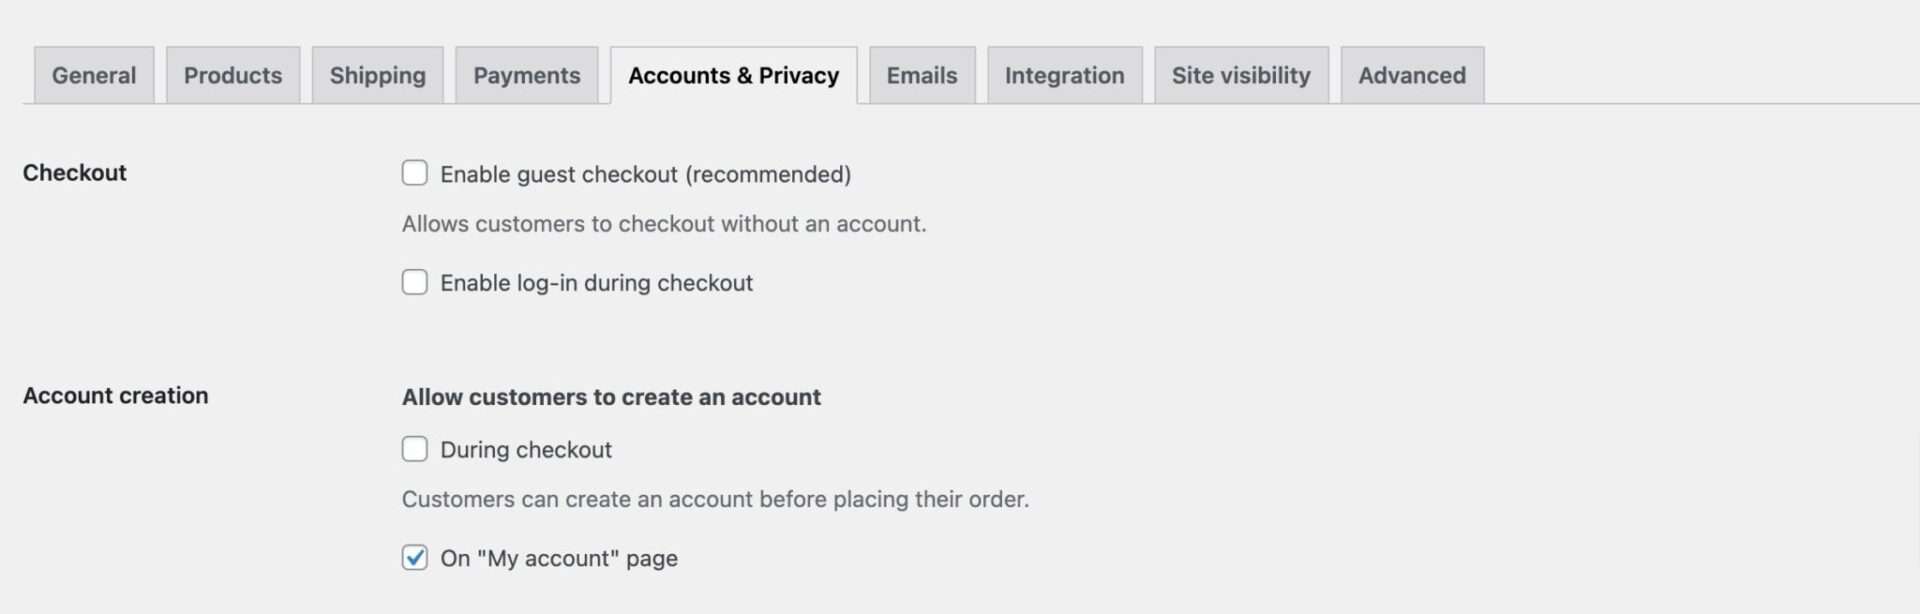
WooCommerce gives you several options for new user registrations. To set up registration in WooCommerce, go to WooCommerce > Settings > Accounts & Privacy. You have a number of options:
- ‘Enable guest checkout’: if you enable this option, users will be able to make purchases on your site without needing to register or create an account
- ‘Enable log-in during checkout’: enabling this option will add a log-in section to the checkout form, so that existing users can log into your site directly from the checkout page. This reduces friction at checkout
- ‘During checkout’: enable this option to allow users to create an account when they place an order
- ‘On “My account” page’: to allow users to sign up using the registration form on the ‘My account’ page, you need to enable this option
Note that Members Only allows you to include custom registration fields on other forms – e.g. at checkout – as well as on the registration form itself.
What user fields are displayed by default on the registration form?
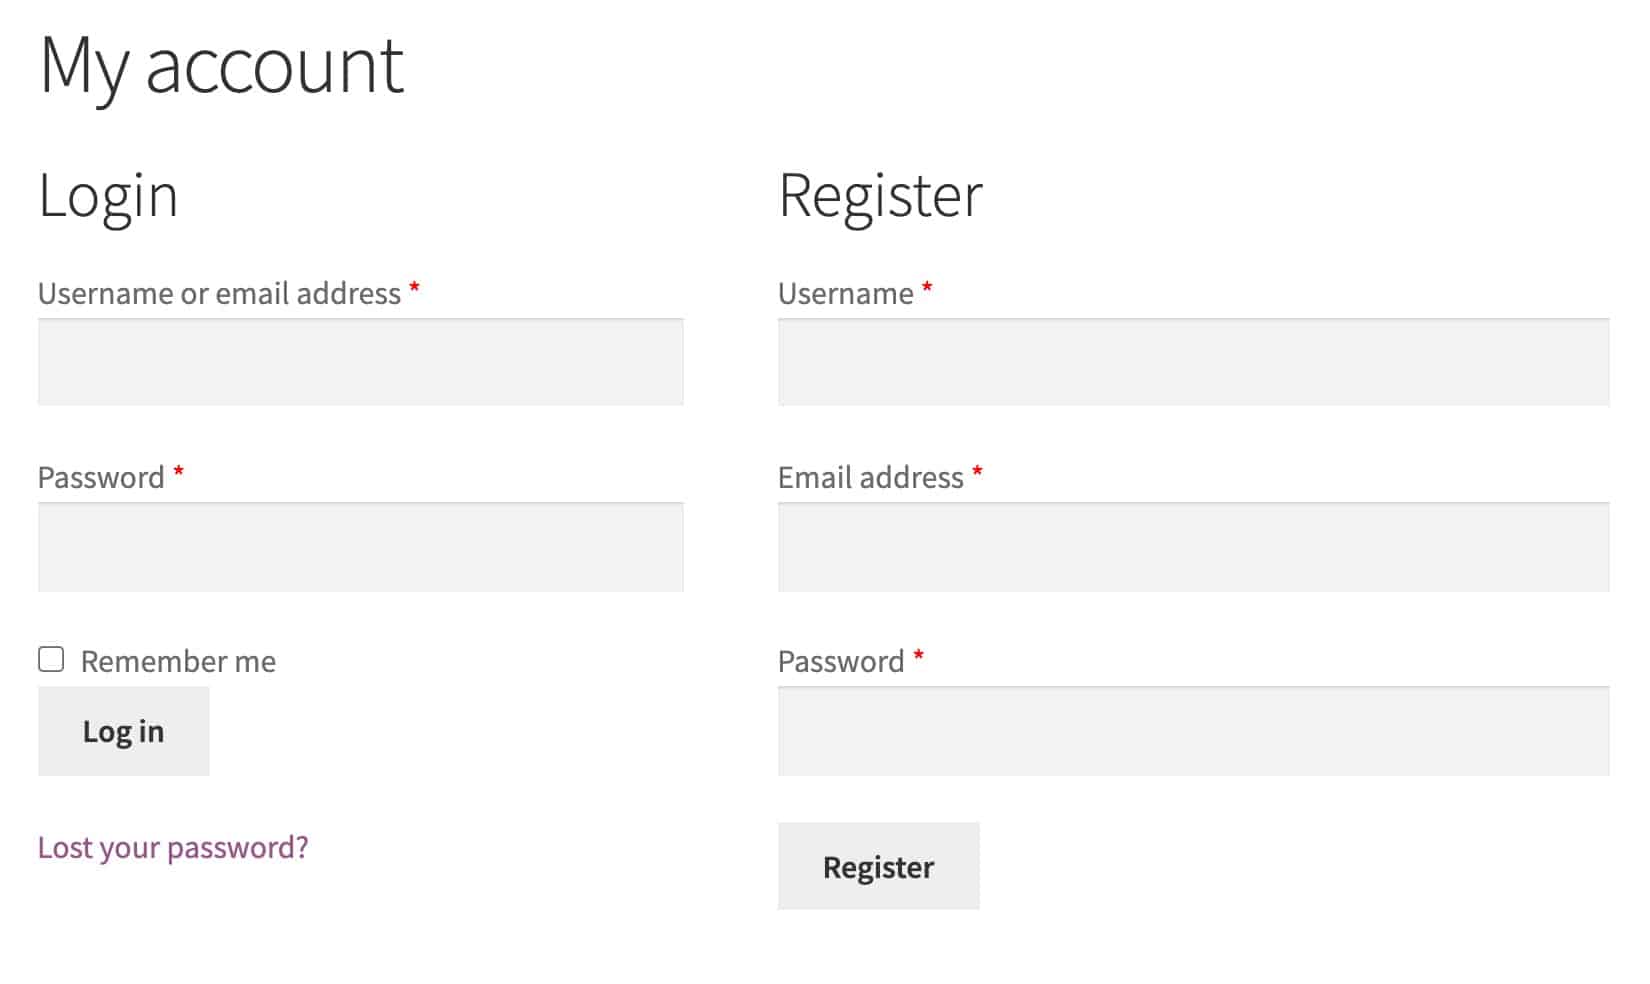
By default, WooCommerce only asks for the user’s email address. But you can specify that the user should enter their own password and/or choose a username as well.
To require the user to enter their own password and/or username, go to WooCommerce > Settings > Accounts & Privacy:
- If you want to allow the user to set their own password, disable ‘Send password setup link’
- If you want to allow the user to create their own username, disable ‘User email address as account login’
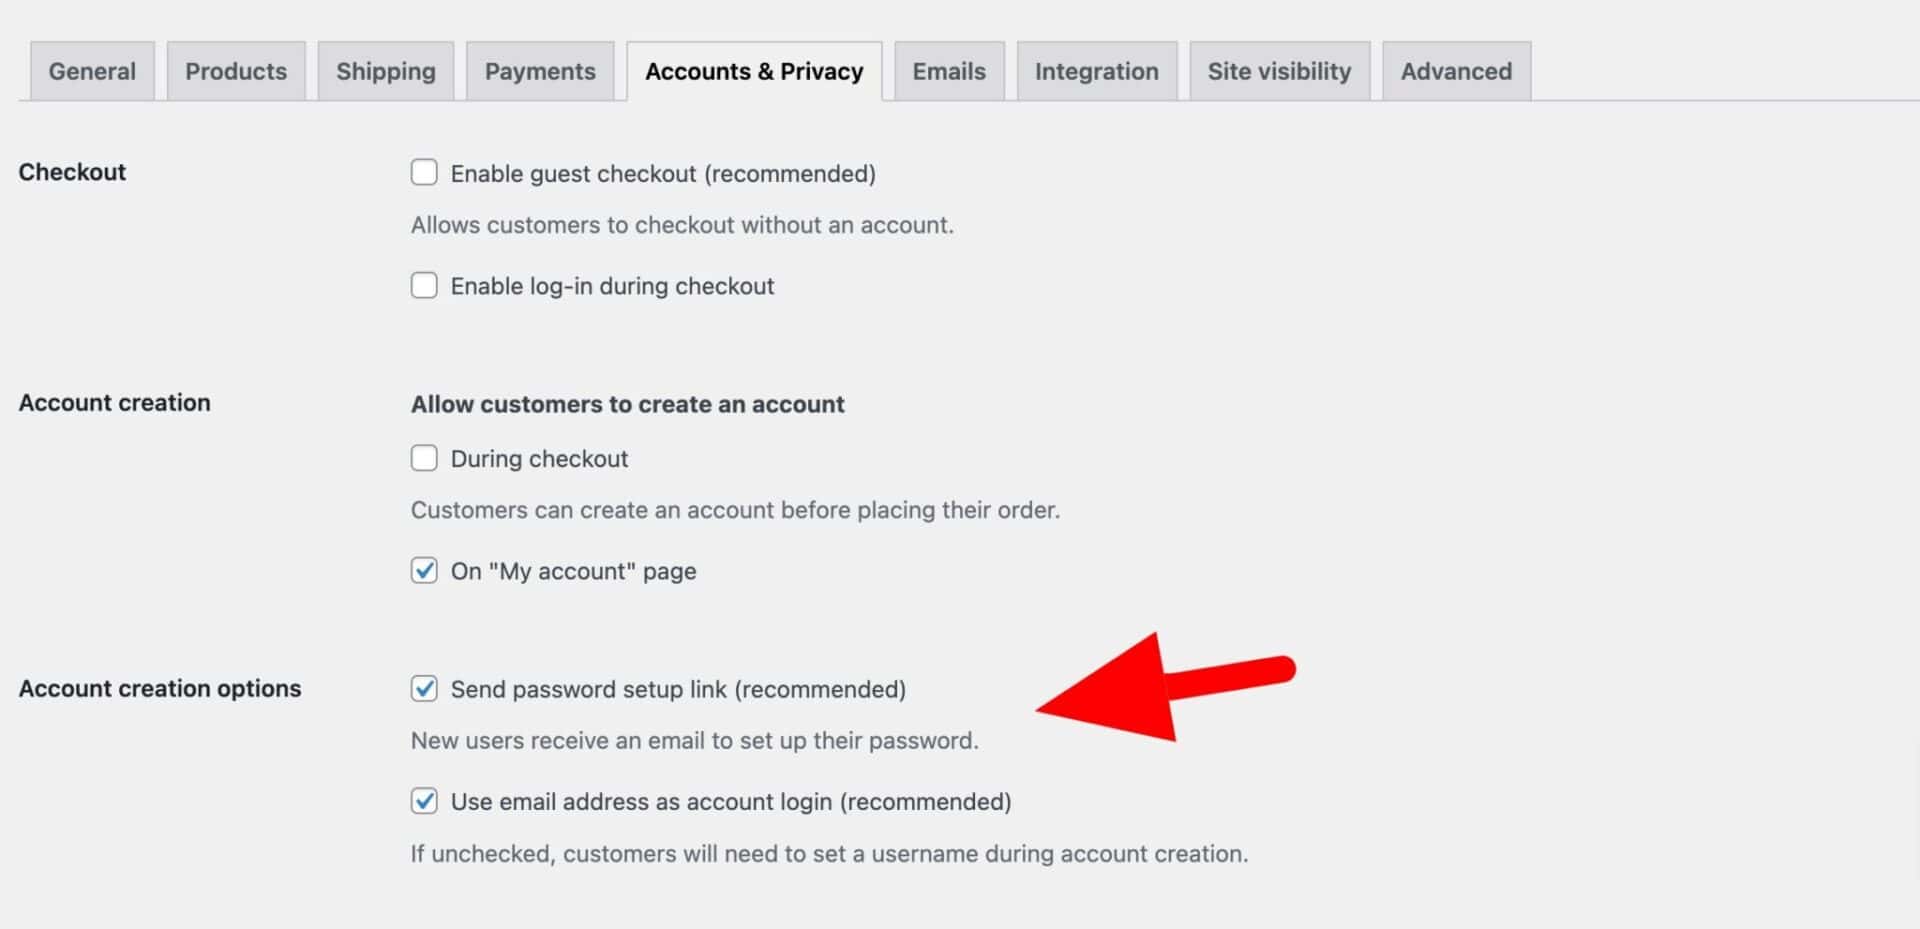
The extra fields will be added to the registration form.
But this is as much as you can do with the standard WooCommerce registration form fields. Now let’s take a look at how to add some custom fields.
Adding billing and shipping fields to the WooCommerce registration form
This part of the tutorial requires the WooCommerce Members Only plugin.
Let’s go through custom user fields to the registration form step by step.
Step #1: Install and activate Members Only
Once you’ve purchased a copy of Members Only:
- Download the zip file by clicking on the link in the welcome email
- Go to Plugins > Add New in your WordPress dashboard
- Click on the ‘Upload Plugin’ button
- Drag and drop the downloaded zip file into the ‘Choose File’ area and click ‘Install Now’.
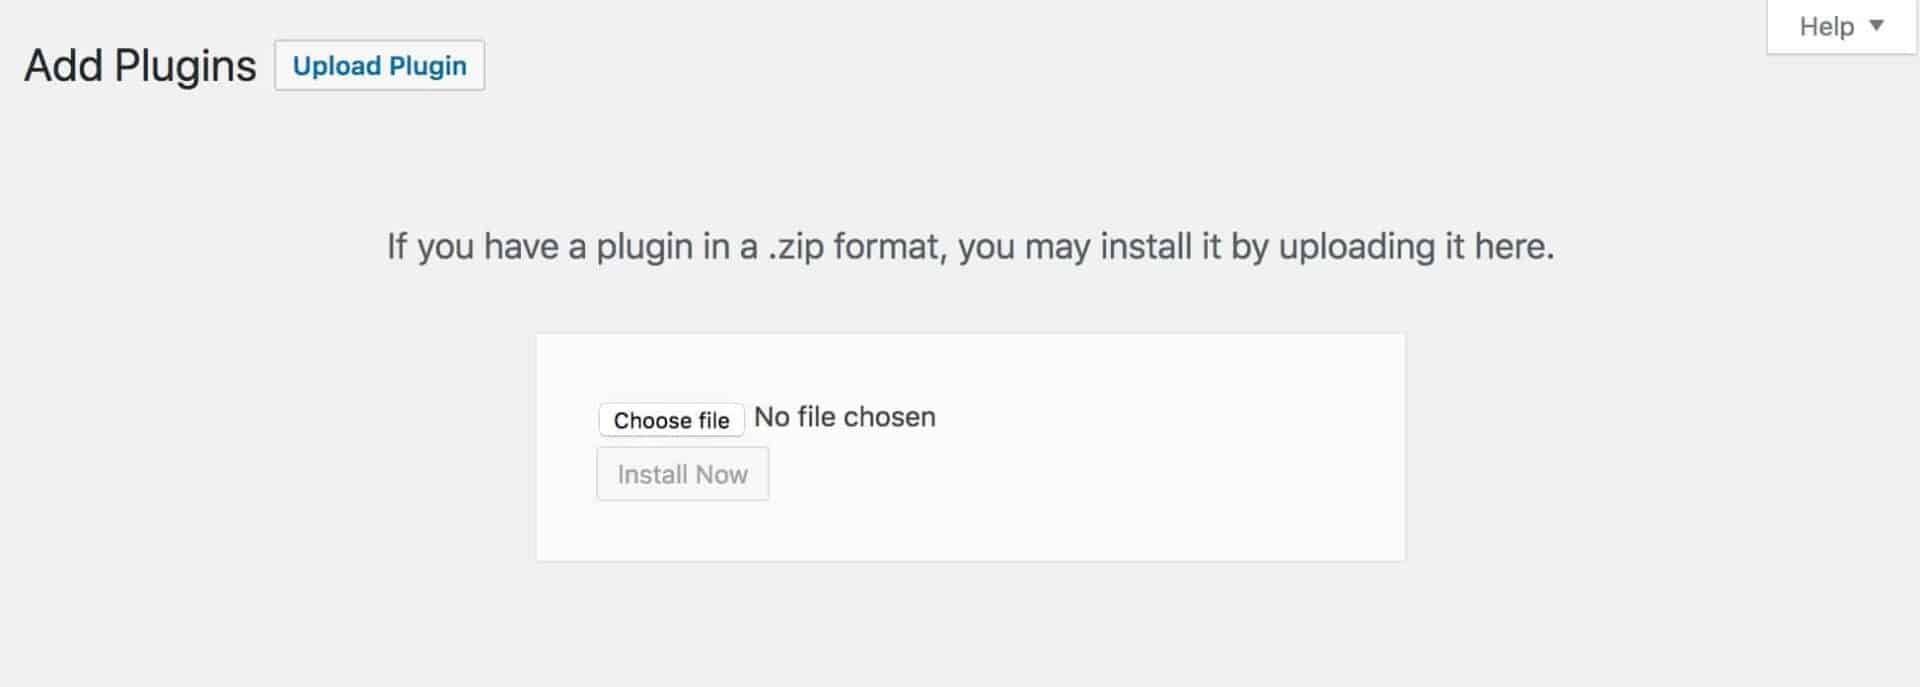
When the file has finished uploading, click the ‘Activate’ button.
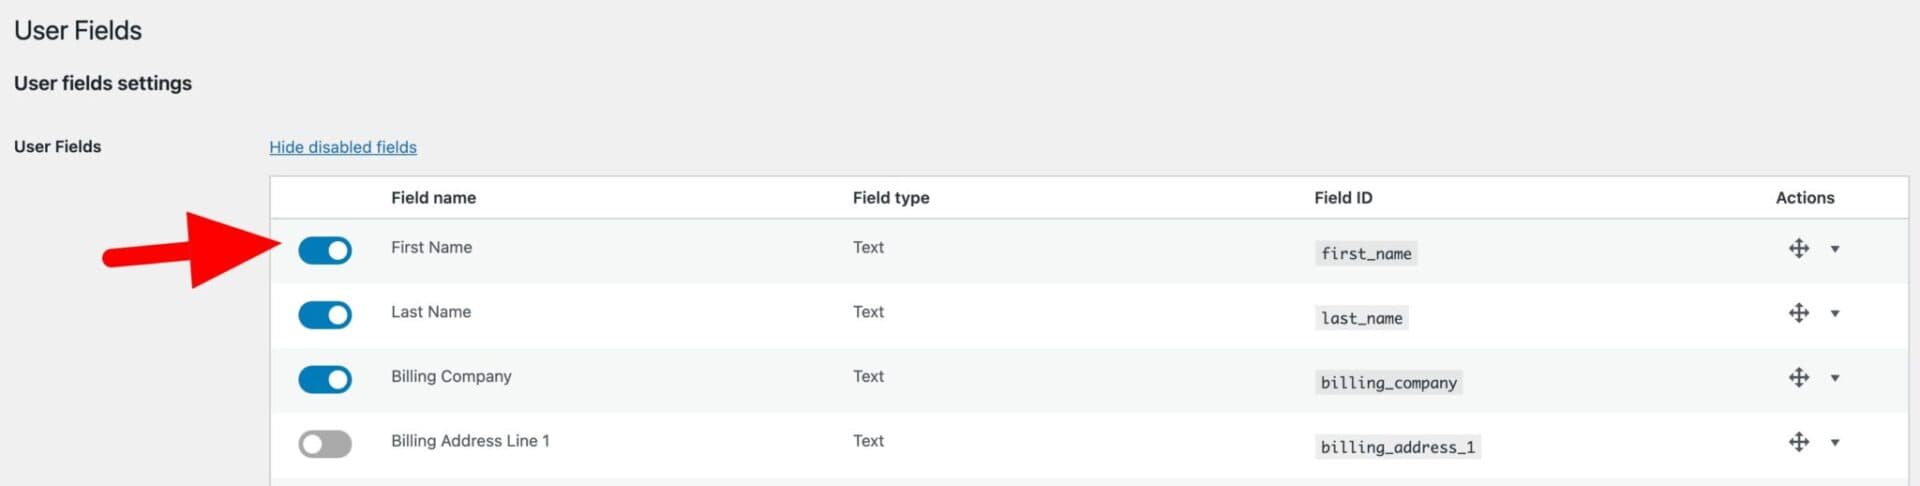
Step #2: Add standard billing or shipping fields
WooCommerce has a number of default fields for each user to capture billing and shipping details. These include address fields and other contact details, like phone numbers.
If you’d like to add standard billing or shipping fields to the registration form:
- Go to Members Only > User Fields. You’ll see a list of all the default WooCommerce billing and shipping fields
- Enable the fields that you’d like to include on the registration form
- You can drag and drop fields into any order you like
- Save the settings
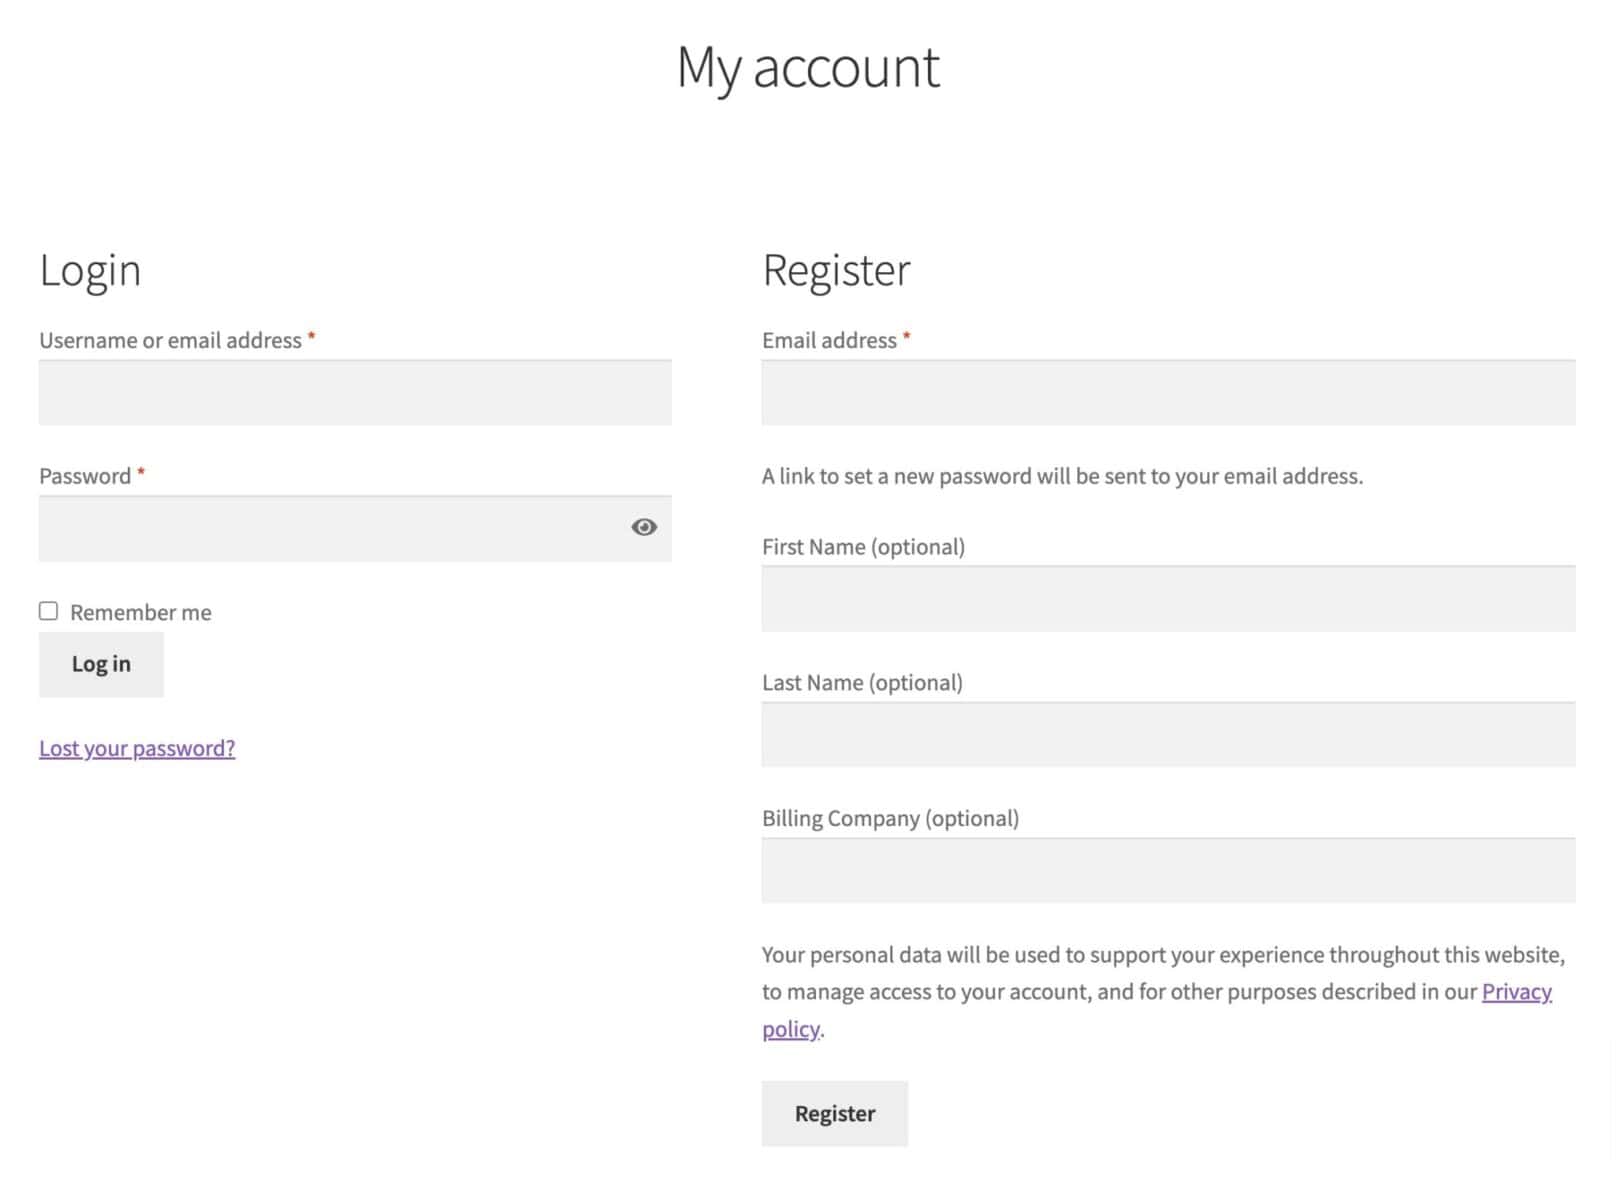
Now your fields will appear on the registration form. Here’s a simple example – your version may look differently depending on your theme:
Step #3: Create custom user registration fields in WooCommerce
In Step 2, we added some of the default WooCommerce billing and shipping fields. In this step, we’ll look at creating our own custom fields and adding them to the WooCommerce registration form.
To create a customer user registration field in WooCommerce:
- Go to Members Only > User Fields
- At the bottom of the list of standard fields, enter the name of your new field and choose the field type, e.g. ‘text’, ‘select’, ‘upload’. We’ll look at how to add an upload field to your registration form below
- Click the ‘Add Field’ button
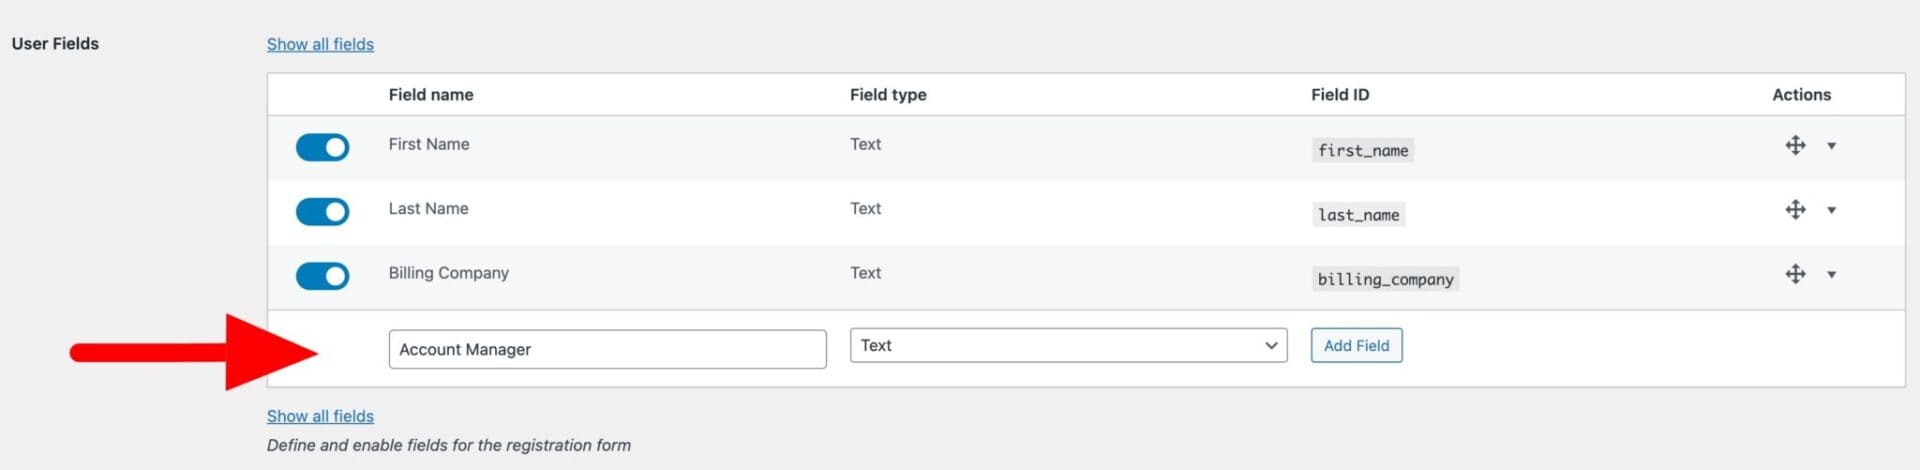
Your new field will be added to the bottom of the list of user fields. You can click the ‘down arrow’ icon on the right to expand the field and view further settings.
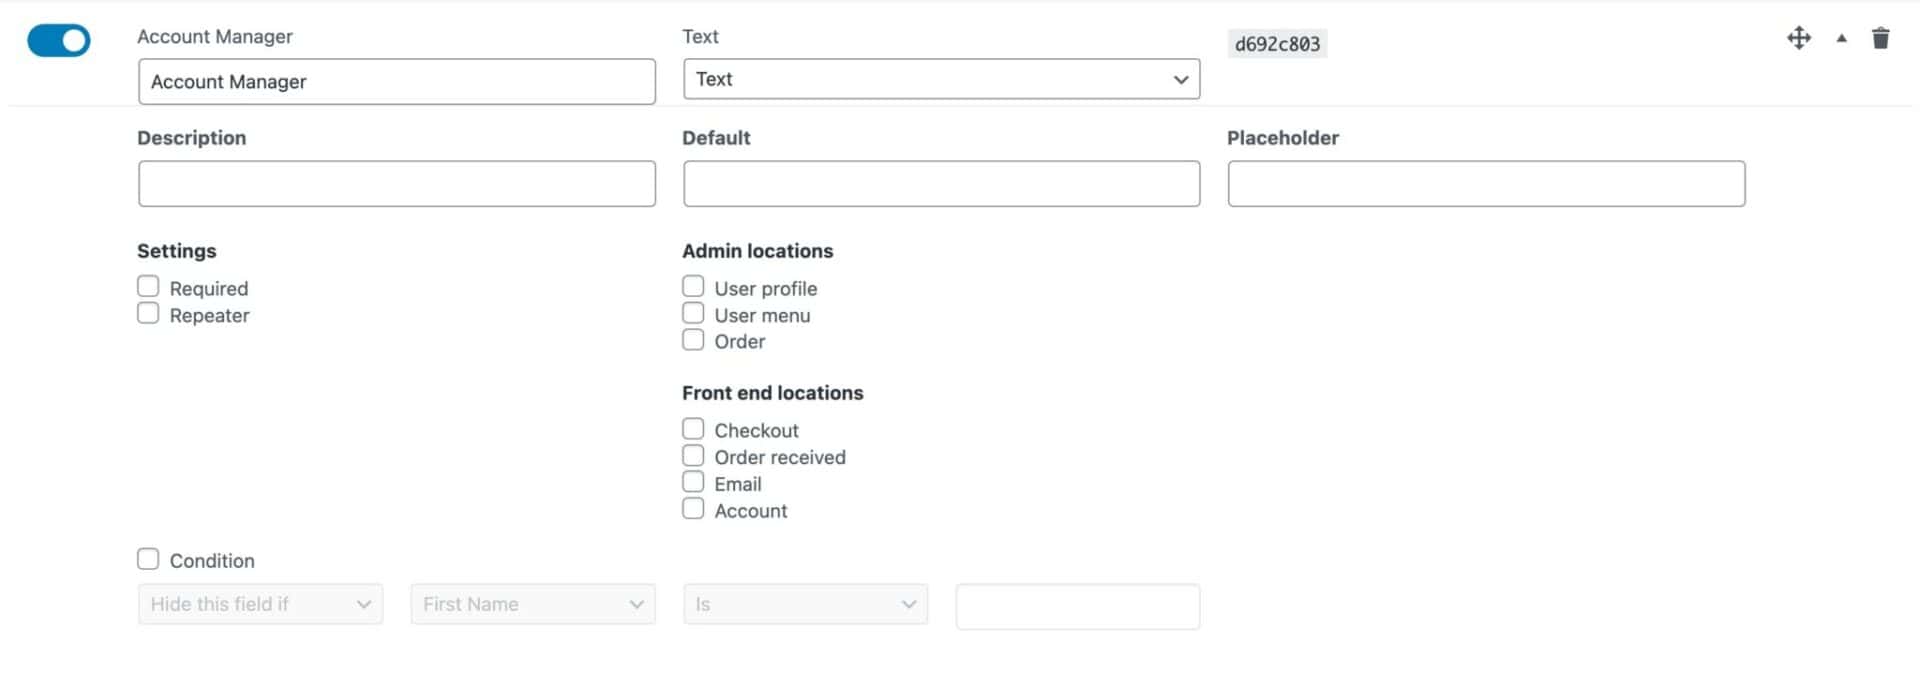
We can take a look at each of these settings:
- Description: enter some optional text here to accompany the field and provide further context to the user
- Default: enter a default value that will populate the field before the user updates it
- Placeholder: alternatively, enter placeholder text (for text fields)
Make the custom user field required
If you want to make your custom user field required, enable the ‘Required’ option. This means that the user will be required to enter or choose a value for the field when registering. They won’t be able to leave the field empty.
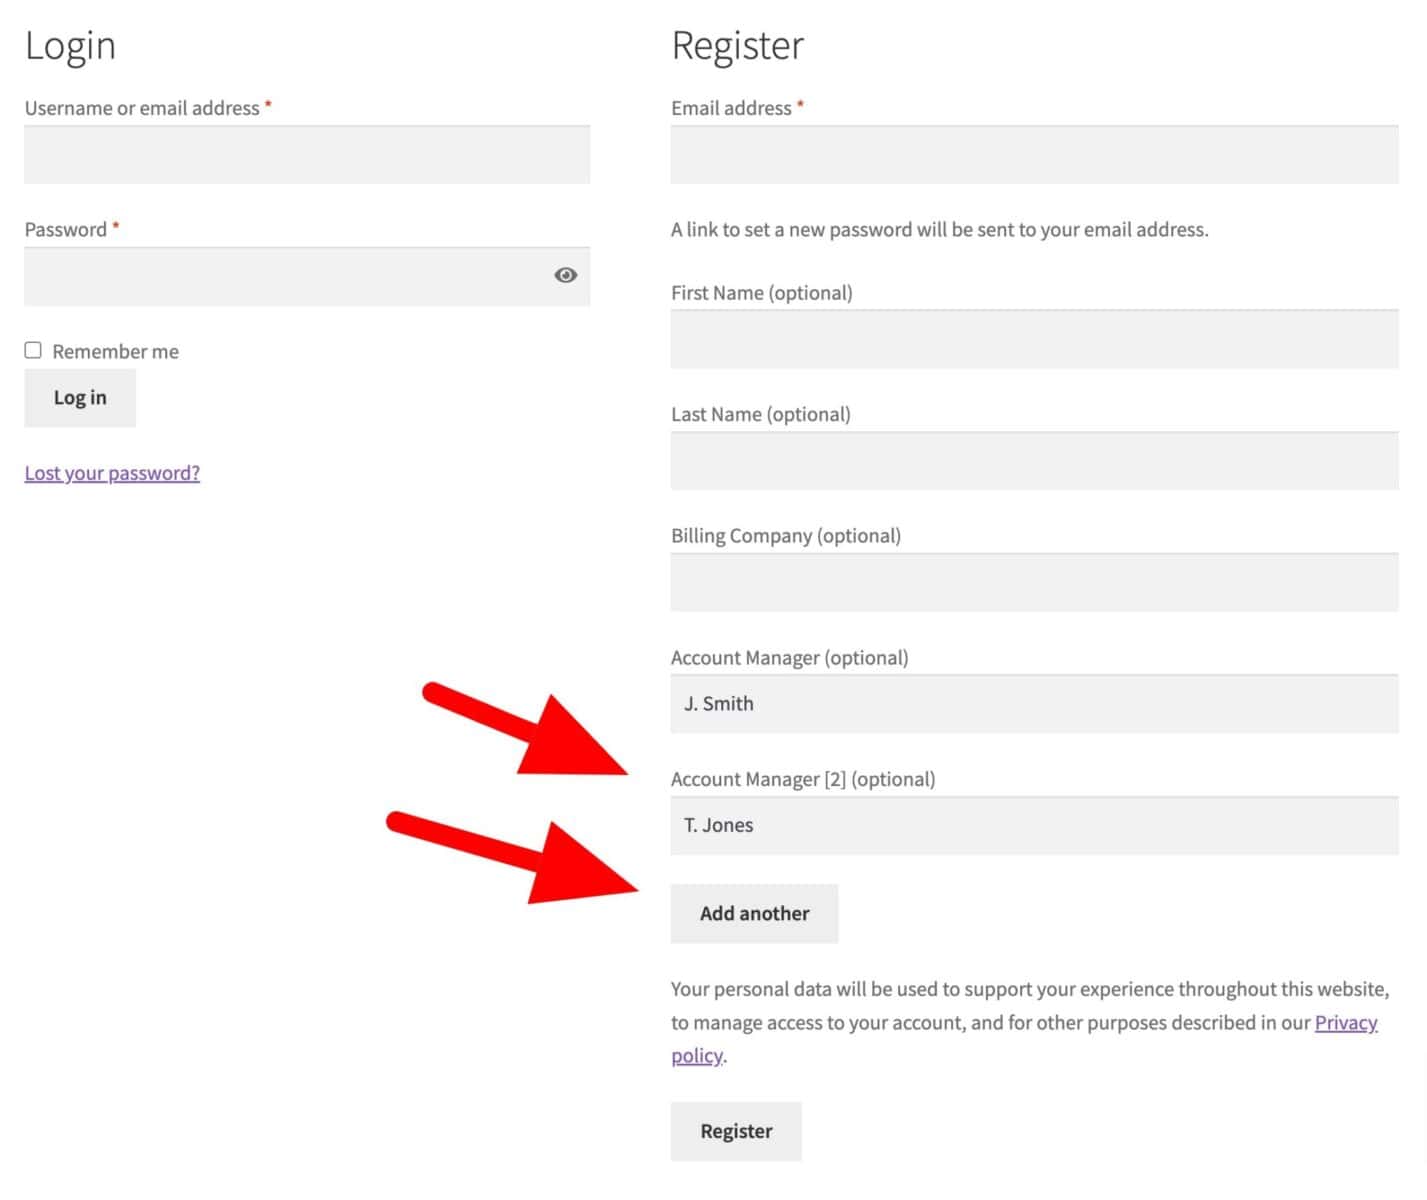
Make the custom user field repeatable
Repeatable fields allow the user to duplicate the field. This is ideal if you need to collect a set of names, for instance. The user can enter the first name, click a button to duplicate the field, then enter the next name. And so on.
Admin locations
Select where to display custom field values in the back end of your site:
- User profile: display the custom field values in the user profile screen
- User menu: display the custom field values in the table of users
- Order: display the custom field values in the order screen
Front end locations
Use these settings to define where custom fields are displayed on the front end of your site:
- Checkout: display custom fields on the checkout form
- Order received: display on the order received page
- Email: display on the confirmation email after an order is placed
- Account: display on the ‘My account’ page where the user can edit the custom field values
See below for some examples of how to use these settings.
Add conditional custom user fields to the registration form
One final option is to enable the ‘Condition’ option. You can set a condition that will either hide or show this field based on the value of another user field.

Let’s look at how to use custom user fields in a few scenarios.
Scenario #1: How to add an upload field to the WooCommerce registration form
You might want to view certain documents from your customers. For example, if you have a B2B store, you might want to see copies of a company’s legal status. Or you might require a photo of the user.
To add an upload field to your WooCommerce registration form:
- Go to Members Only > User Fields
- Enter a name for your upload field and choose ‘Upload’ as the field type
- Click ‘Add Field’

Now an upload field will be displayed in the registration form:
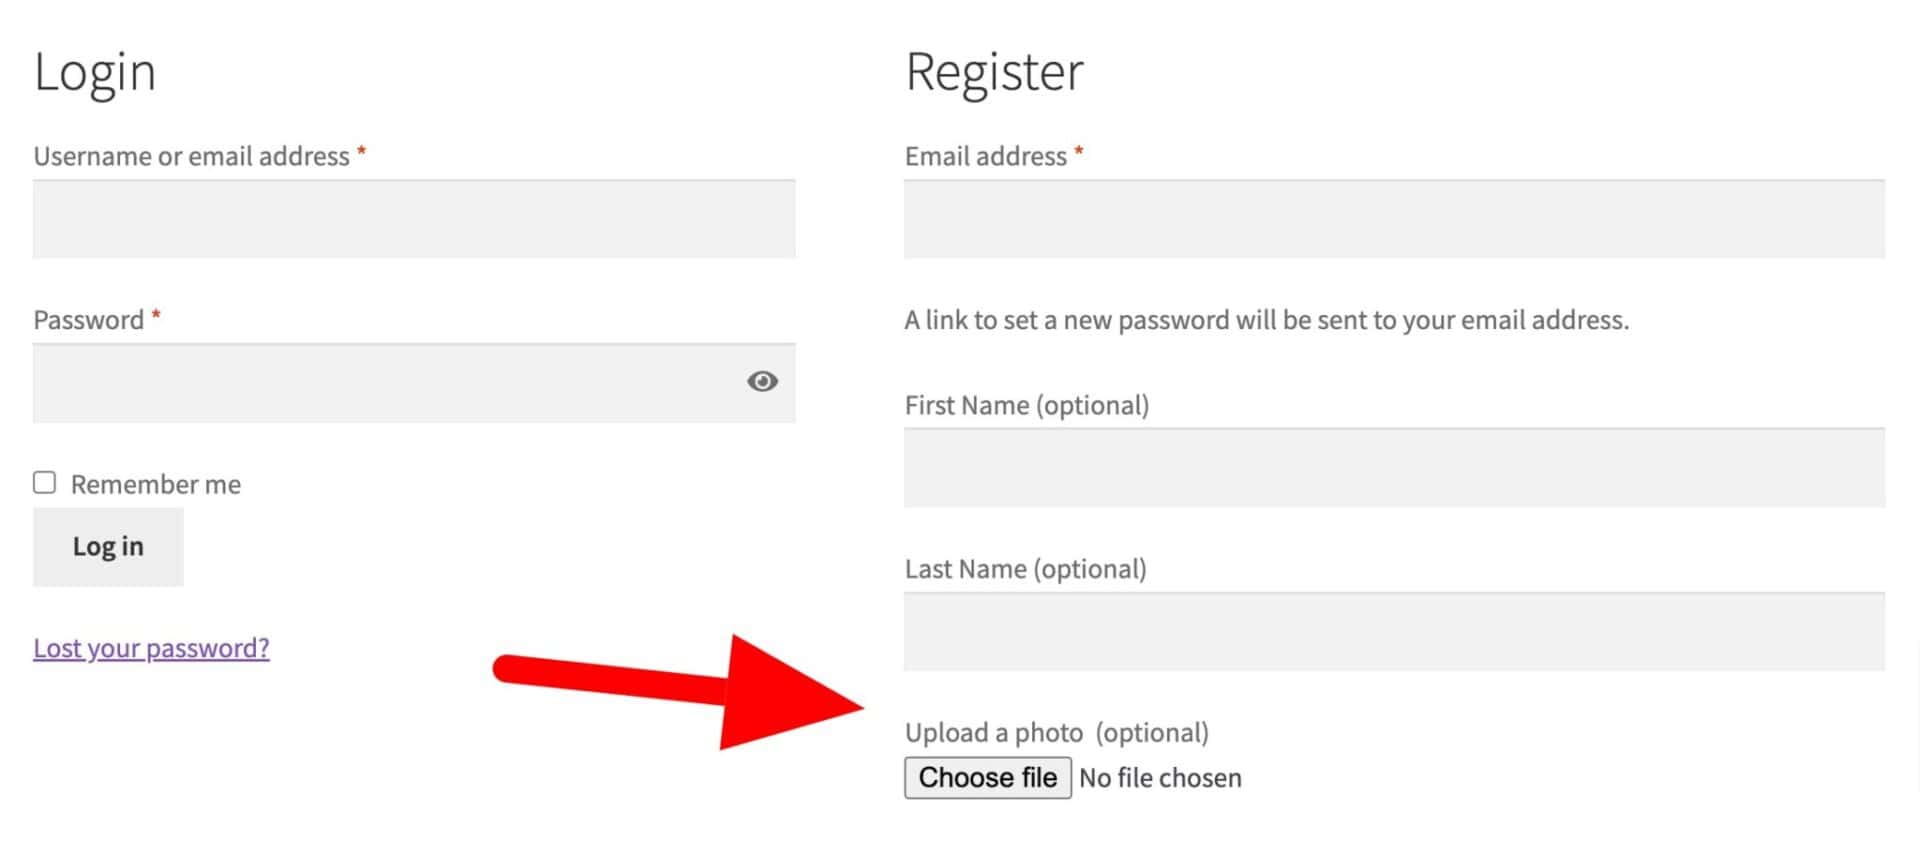
You can add as many upload fields to your registration form as you like.
Scenario #2: How to let the user select their user role on registration
You might want to allow the user to specify the user role they should be assigned on registration. This would be particularly relevant if you’re operating a wholesale store where you might want to differentiate between retail and wholesale customers.
To add a role selection field to your registration form:
- Go to Members Only > User Fields
- Select the ‘Enable Roles Field’ option
- Enter a name for the field in ‘Roles Field Name’
- Select which roles to include as options in the field by selecting them in the ‘Include’ column
- If you require new users to be approved for certain roles, select those roles in the ‘Needs Approval’ column
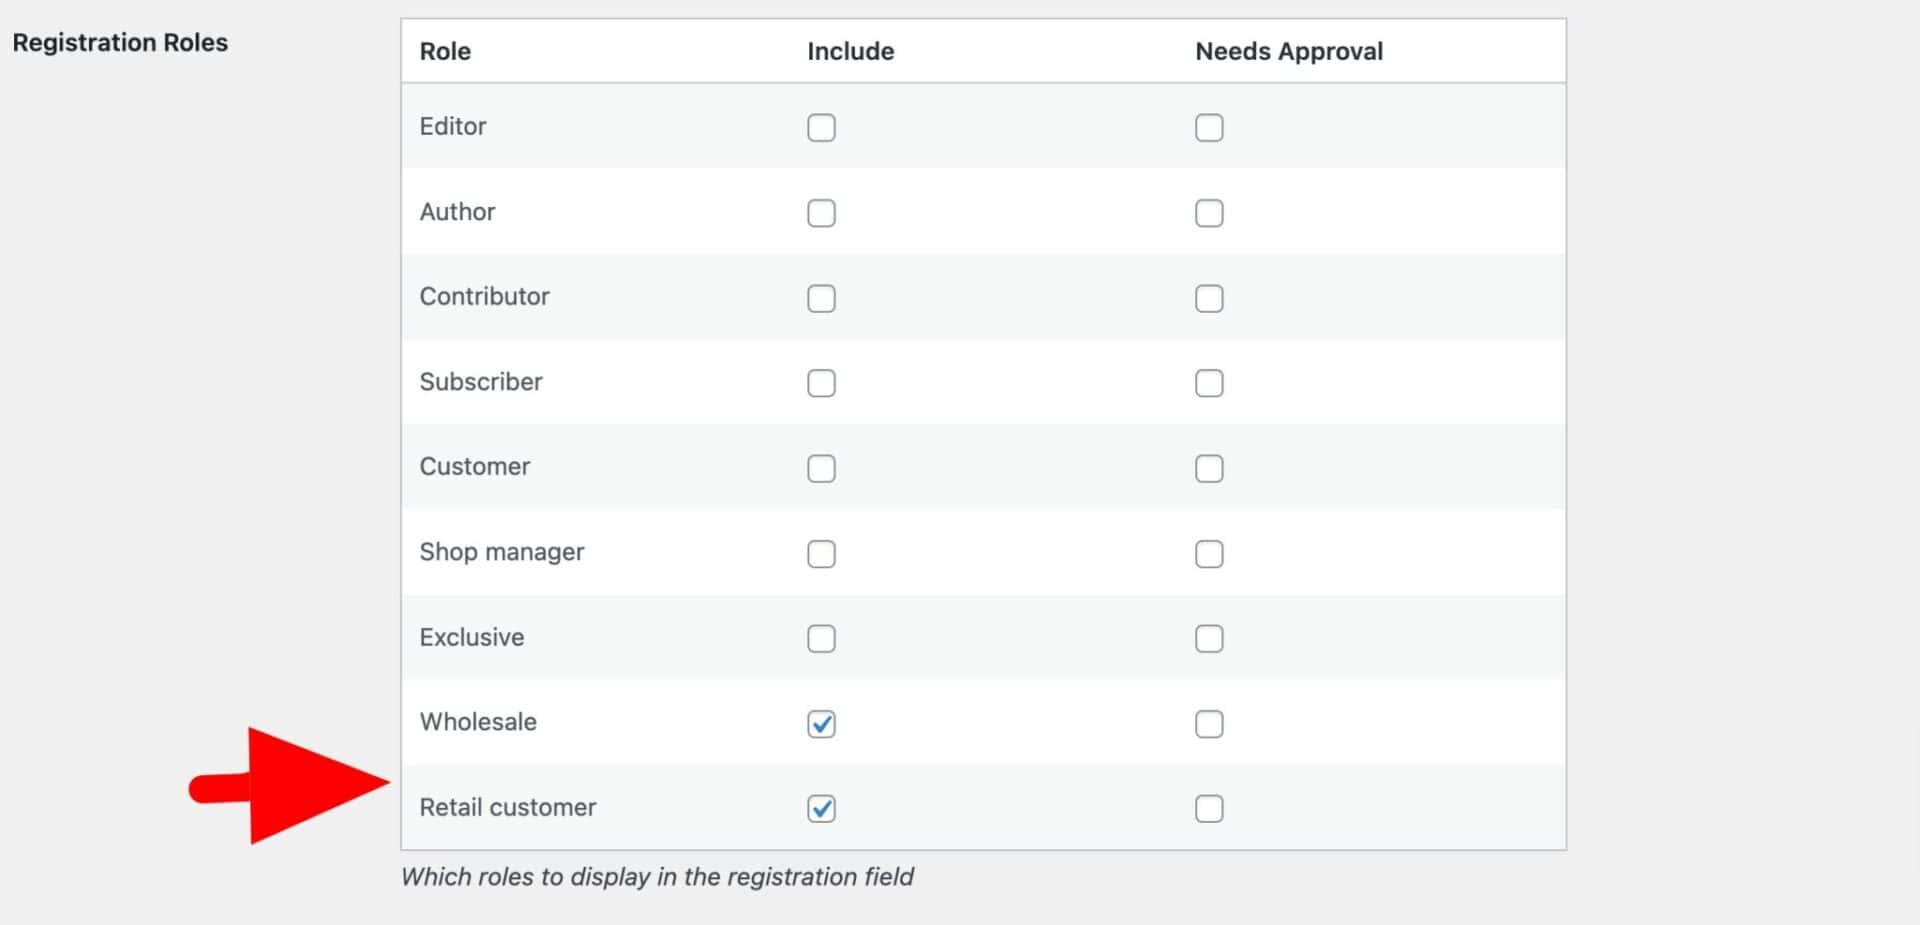
Now, new users can select their role when they register on your site. If you need to create new user roles, you can do so from the Members Only > User Roles screen.
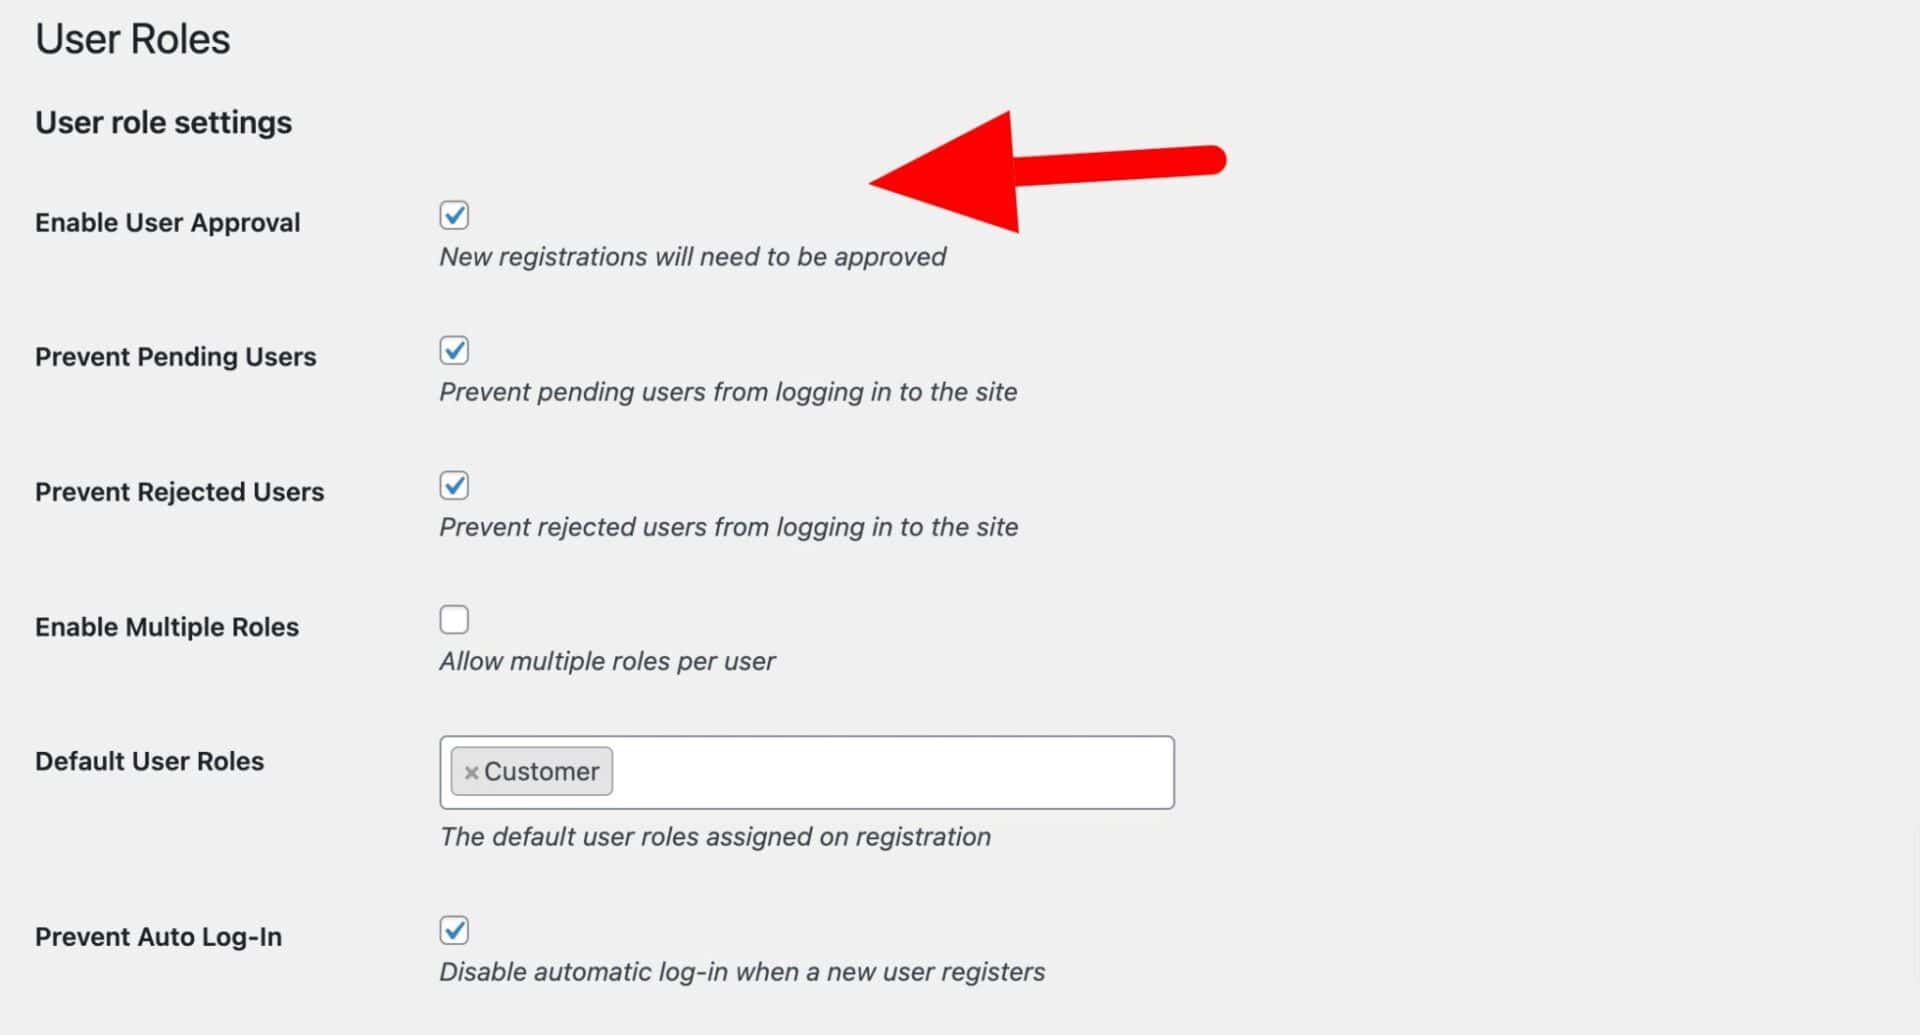
Scenario #3: Approve or reject new user registrations
Certain stores might want to have the option to approve or reject new users when they register. To enable user approval in WooCommerce:
- Go to Members Only > User Roles
- Select the ‘Enable User Approval’ option. When a new user signs up, they will be assigned the role of ‘Pending’ and you’ll receive an email asking you either to approve or reject their registration
- Optionally, select ‘Prevent Pending Users’ and/or ‘Prevent Rejected Users’. This will prevent users who are still waiting for approval or who have already been rejected from logging in
- Enable the ‘Prevent Auto Log-in’ option so that new users don’t automatically get logged into the site when they register
See this article for full details of how to enable user approval in WooCommerce.
Scenario #4: How to add a VAT field to your WooCommerce registration form
Members Only has a built-in VAT field option. To add a VAT field to your registration form:
- Go to Members Only > User Fields
- Enable the ‘VAT Number’ field
- You can rename this by updating the text field
- Enable the ‘Required’ option if you want to ensure that the user completes this field

Scenario #5: How to add custom registration fields to the checkout page in WooCommerce
We saw above that it’s possible to select different locations to display the custom fields – so not just on the registration form but also in the checkout and account pages if required.
To add a custom field to the WooCommerce checkout page:
- Go to Members Only > User Fields and create or edit a field
- Select ‘Checkout’ in the ‘Front end locations’ setting
- Select other options as needed, e.g. enable ‘Required’ if the user must enter a value in the field at checkout. You can even make the fields conditional if you like
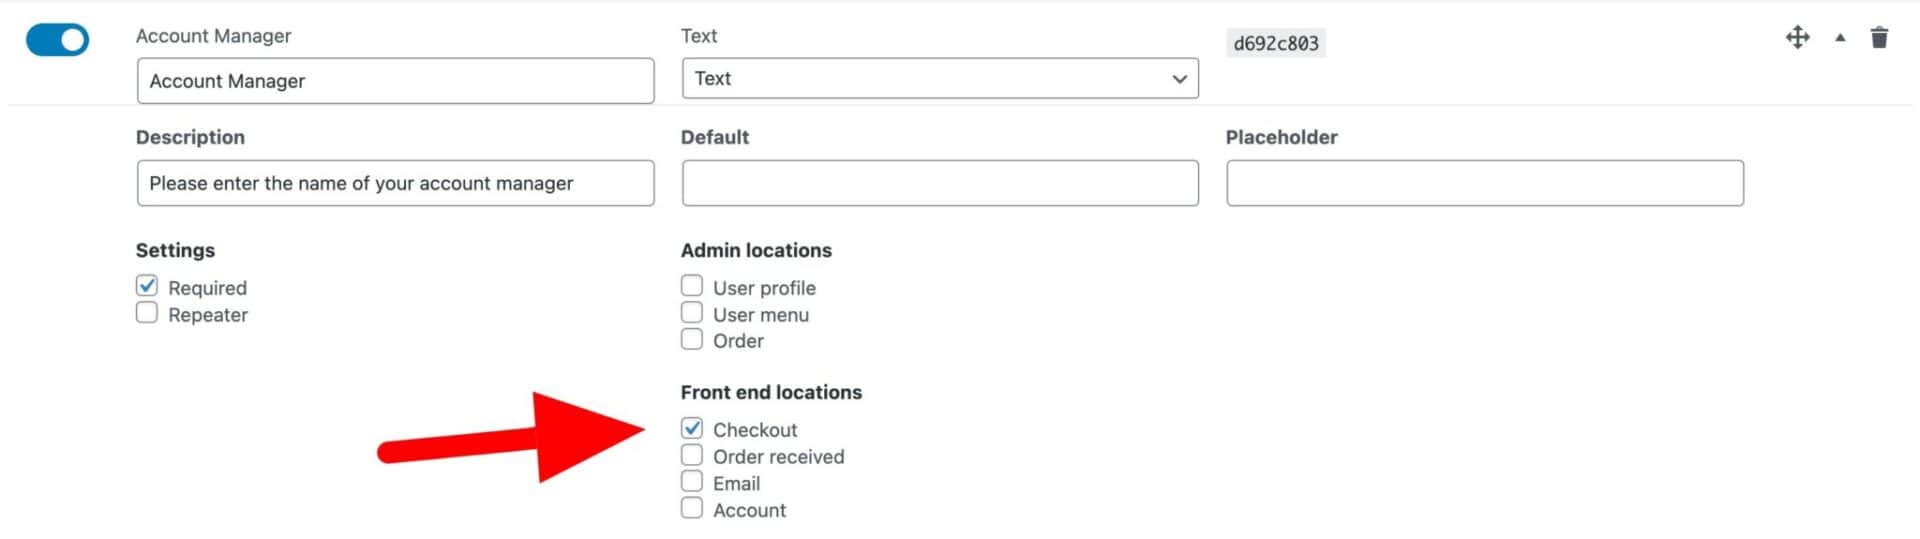
Now, the custom field will appear on the checkout page as well.

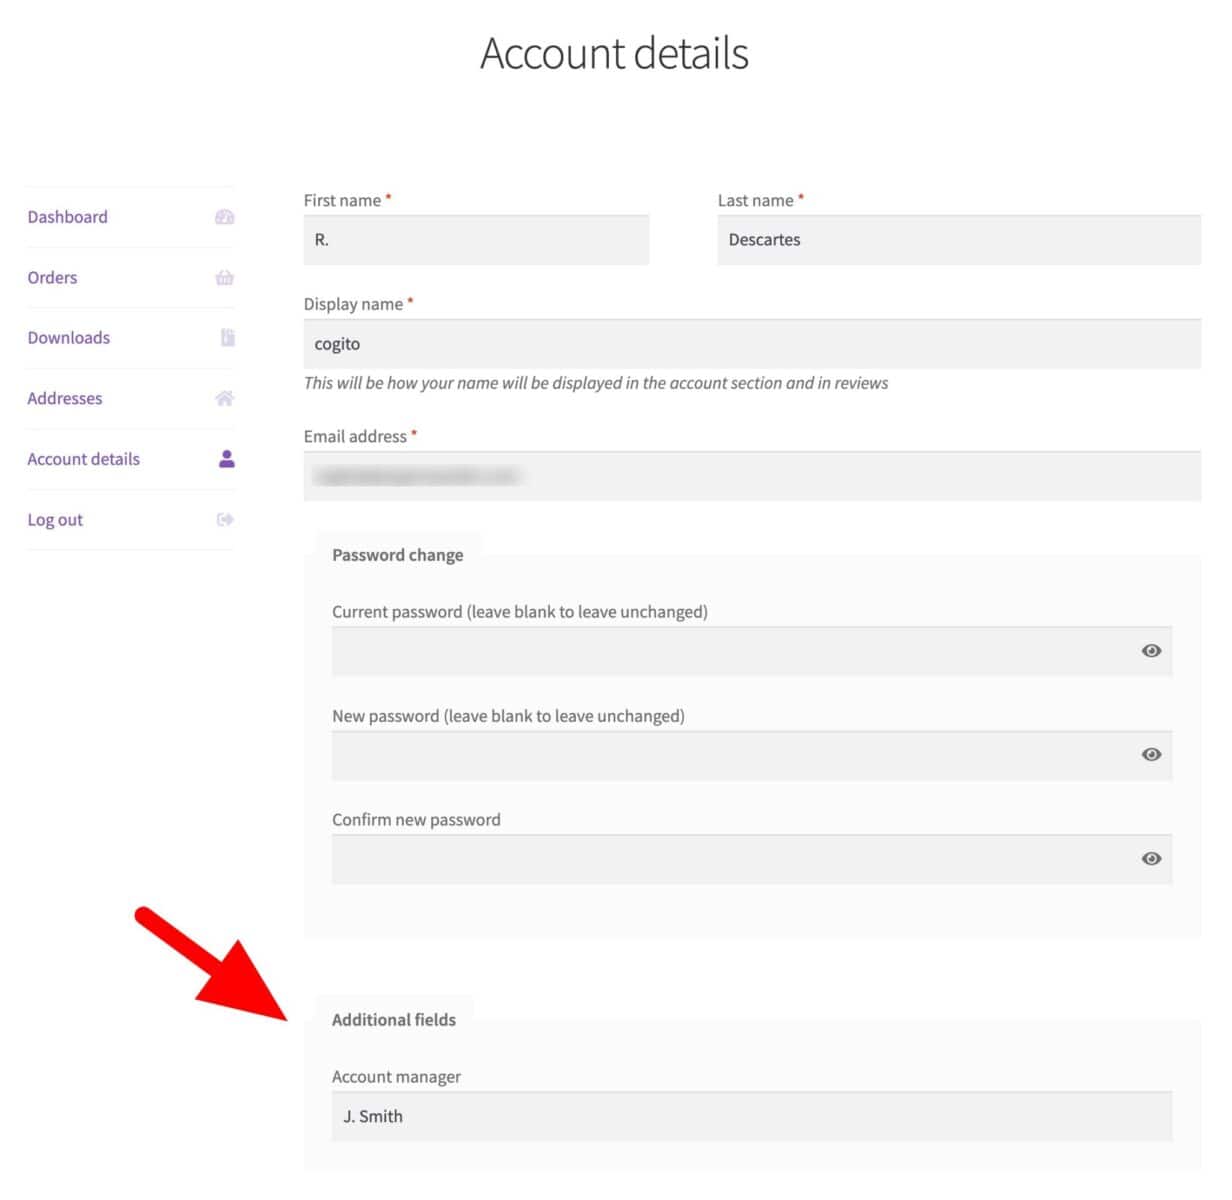
Scenario #6: How to let the user edit custom fields in their account page
You can also choose to display the custom registration fields in the user’s profile in their account page. This will allow them to edit any values they entered when they first registered.
To add custom fields to the user’s account profile page:
- Go to Members Only > User Fields and create or edit a field
- Select ‘Account’ in the ‘Front end locations’ setting
- Select other options as needed, e.g. enable ‘Required’ if the user must enter a value in the field at checkout. You can also make the fields conditional if you like
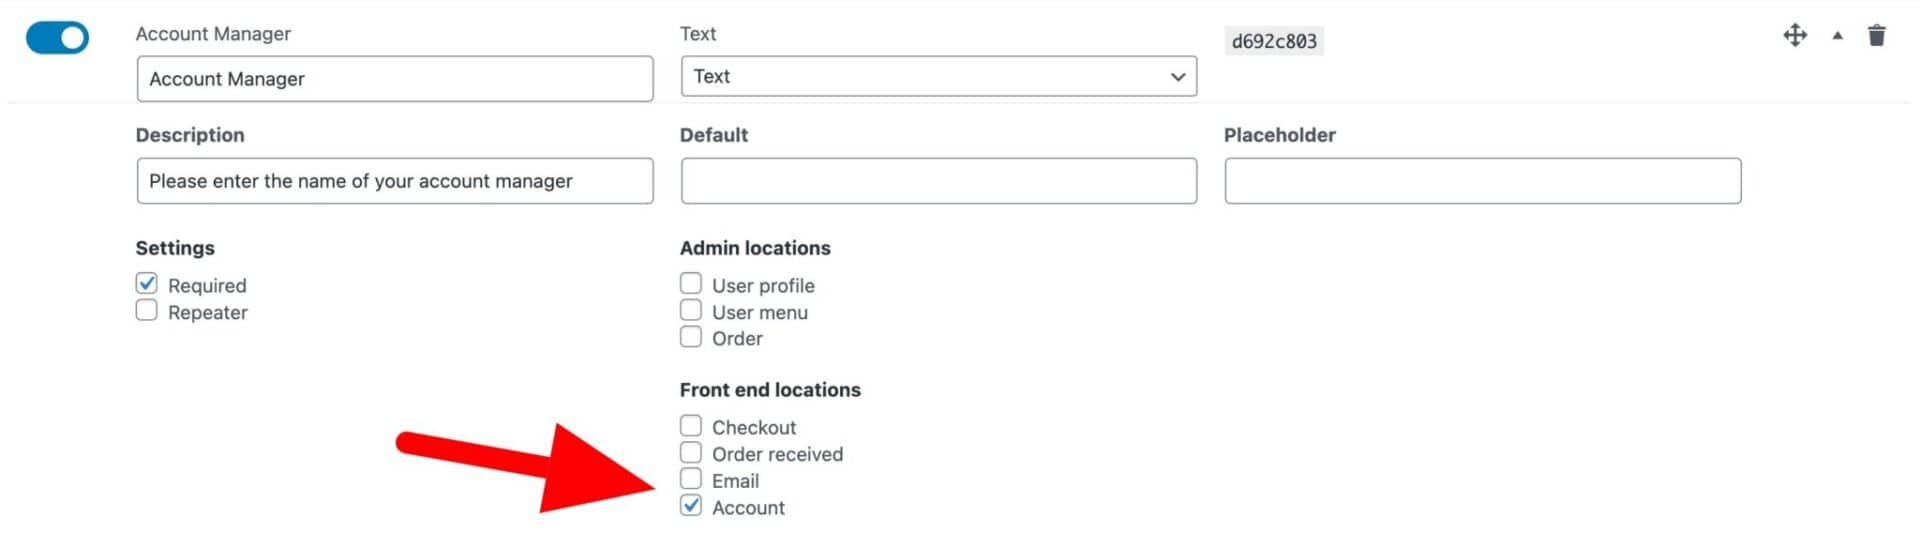
The custom field will now be visible and editable from the ‘Account details’ tab on the ‘My account’ page.
FAQs
The easiest way to customize the registration form in WooCommerce is with the Members Only plugin. Once activated:
– Go to Members Only > User Fields
– Create a new custom field (or edit an existing one)
– Save your settings
The custom field will now appear in the registration form. You can create as many custom fields as you like and use advanced features like conditional logic.
Custom user registration fields WooCommerce: recap
In this tutorial, we looked at:
- The default WooCommerce registration form functionality and how to define where users can sign up to your site
- How to add standard WooCommerce billing and shipping fields
- How to create and add custom fields to the registration form
- Advanced features like conditional fields
- Displaying custom fields in other locations, like the checkout and account pages
- Allowing the user to select their own role when registering
- Approving or rejecting new registrations
To achieve all this, you’ll need the WooCommerce Members Only plugin. Our plugins are backed by our 14-day money-back guarantee so you can purchase them without any risk. We also have a world-class support team to help you with any questions.