How to add a custom field to a WooCommerce product programmatically

In this article we look at how to add a custom field to a WooCommerce product programmatically.
Add a custom field to a WooCommerce product with a plugin
But first: the easiest way to add WooCommerce custom fields to a product page is with a plugin. The Product Add-Ons Ultimate plugin allows you to add any type of custom field to WooCommerce products quickly and easily.

However, if you prefer to code this yourself, read on.
Add WooCommerce custom fields using code
If you’d like to find out more about coding custom fields from scratch and adding them programmatically, then read on. By the end, you will have learned to build your own custom field plugin for WooCommerce. The plugin will:
- Create a custom field in the Product Data section of a WooCommerce product
- Use the value saved in that field to display a text input field in the product single page
- Save the user input in the custom field to cart meta data
- Pass the value of the custom field to the order object
In this section you can learn about:
- Adding a custom field in the back-end
- Saving the custom field value
- Displaying custom fields in WooCommerce
- Validating custom values
- Adding custom values to the cart
- Updating the product price programmatically
- Displaying custom fields in the cart and checkout
- Displaying custom fields in the WooCommerce order and confirmation emails
All the code used in the article is included at the end.
Adding a custom field in the back-end
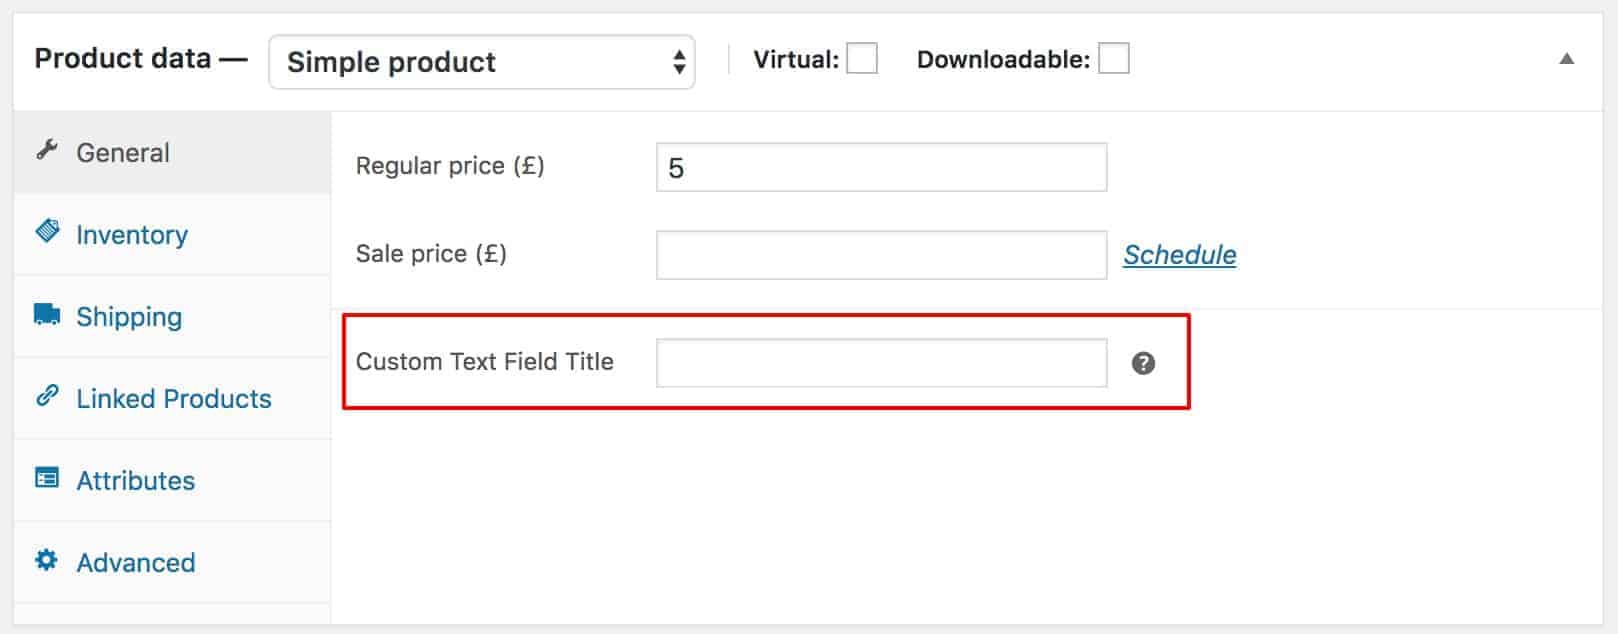
Let’s start by looking at some code to add a custom field to the back-end of WooCommerce. This will add a new field in the Product Data section of a WooCommerce product.
| /** | |
| * Display the custom text field | |
| * @since 1.0.0 | |
| */ | |
| function cfwc_create_custom_field() { | |
| $args = array( | |
| 'id' => 'custom_text_field_title', | |
| 'label' => __( 'Custom Text Field Title', 'cfwc' ), | |
| 'class' => 'cfwc-custom-field', | |
| 'desc_tip' => true, | |
| 'description' => __( 'Enter the title of your custom text field.', 'ctwc' ), | |
| ); | |
| woocommerce_wp_text_input( $args ); | |
| } | |
| add_action( 'woocommerce_product_options_general_product_data', 'cfwc_create_custom_field' ); |
This short function uses a standard WooCommerce function, called woocommerce_wp_text_input, to display a text field in the Product Data section.
You’ll notice that woocommerce_wp_text_input accepts several parameters, like ID, label and class.
You can find a complete list of the parameters in the wc-meta-box-functions.php file. There are several cognate functions, all with nice self-explanatory names, like:
woocommerce_wp_hidden_inputwoocommerce_wp_textarea_inputwoocommerce_wp_checkbox
These functions greatly simplify the task of adding custom fields to WooCommerce products.
Hooking the custom field function
To ensure that the custom field displays in the correct place – in this case, it’s just on the General tab – we need to hook our function to the correct action: woocommerce_product_options_general_product_data.
If you wanted to add your custom field to a different tab, you could try actions like:
woocommerce_product_options_inventory_product_datawoocommerce_product_options_shipping
Saving the custom field value
Now we need to save the value of the field when the product is updated.
| /** | |
| * Save the custom field | |
| * @since 1.0.0 | |
| */ | |
| function cfwc_save_custom_field( $post_id ) { | |
| $product = wc_get_product( $post_id ); | |
| $title = isset( $_POST['custom_text_field_title'] ) ? $_POST['custom_text_field_title'] : ''; | |
| $product->update_meta_data( 'custom_text_field_title', sanitize_text_field( $title ) ); | |
| $product->save(); | |
| } | |
| add_action( 'woocommerce_process_product_meta', 'cfwc_save_custom_field' ); |
This function runs when the product is first published or when it’s updated. It looks for a value in our custom field, sanitizes it, then saves it as product metadata using the CRUD methodology.
The function hooks to the woocommerce_process_product_meta action.
Displaying the custom field on the front-end
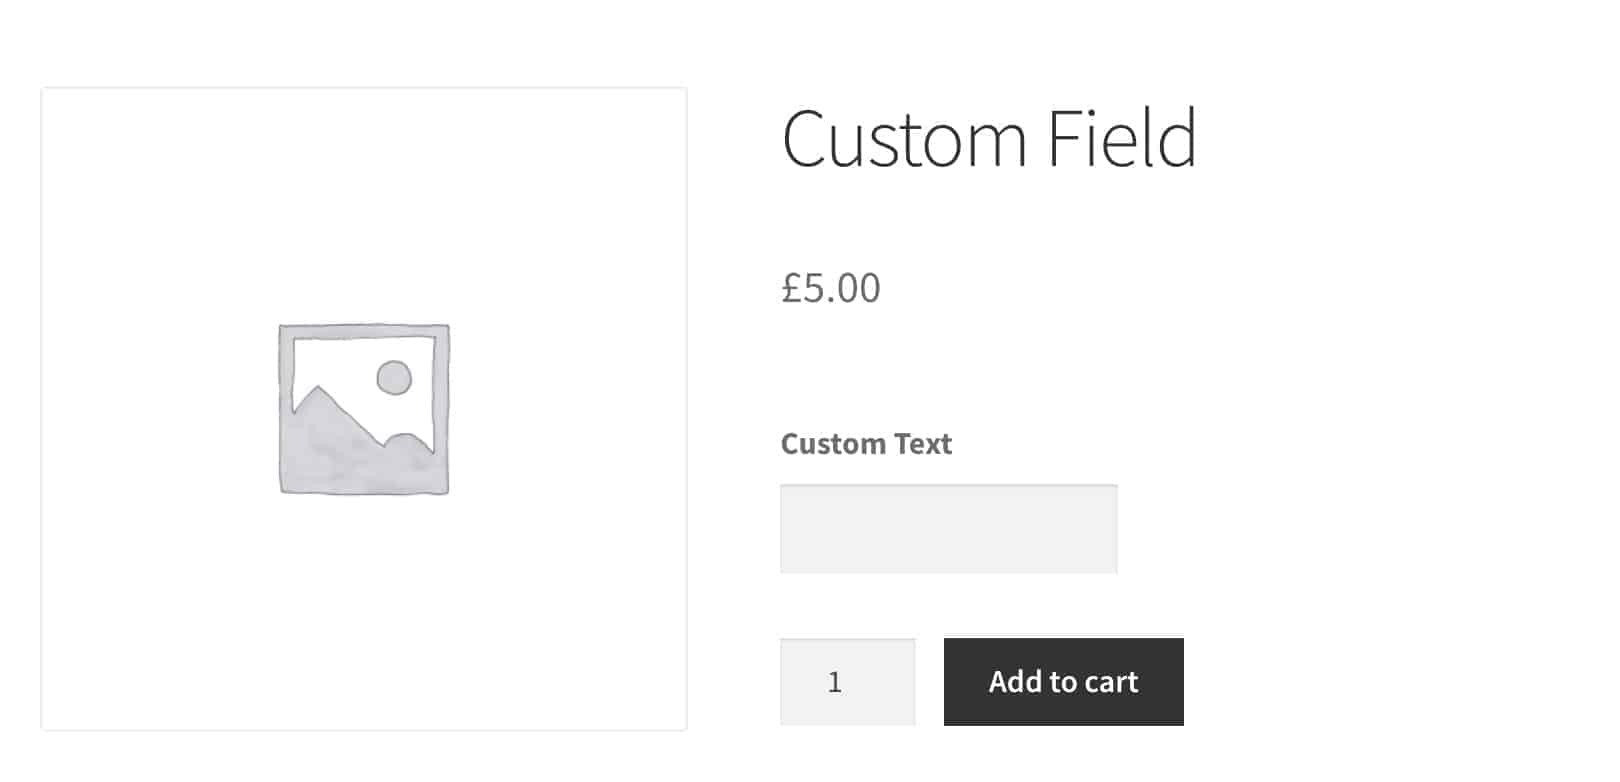
Now we can add the custom field to the single product page.
We will check if the custom field has a value. If it does, we’ll use that value as the title of the input field on the front end. The user will be able to enter some text, which will get saved as part of the cart meta data when they add the product to the cart.
Here’s the code to display the custom field on the product page:
| /** | |
| * Display custom field on the front end | |
| * @since 1.0.0 | |
| */ | |
| function cfwc_display_custom_field() { | |
| global $post; | |
| // Check for the custom field value | |
| $product = wc_get_product( $post->ID ); | |
| $title = $product->get_meta( 'custom_text_field_title' ); | |
| if( $title ) { | |
| // Only display our field if we've got a value for the field title | |
| printf( | |
| '<div class="cfwc-custom-field-wrapper"><label for="cfwc-title-field">%s</label><input type="text" id="cfwc-title-field" name="cfwc-title-field" value=""></div>', | |
| esc_html( $title ) | |
| ); | |
| } | |
| } | |
| add_action( 'woocommerce_before_add_to_cart_button', 'cfwc_display_custom_field' ); |
This function creates a $product object based on the product ID so that it can look in the product meta data for a value for the custom_text_field_title field. If it finds a value, then it will display a text input field and label.
Note that the function is hooked to the woocommerce_before_add_to_cart_button action. Hooking it to this action ensures that the input field is included in the cart form, which means that its value will be available when the product is added to the cart. Which is what we’ll look at next.
Validating WooCommerce custom field values
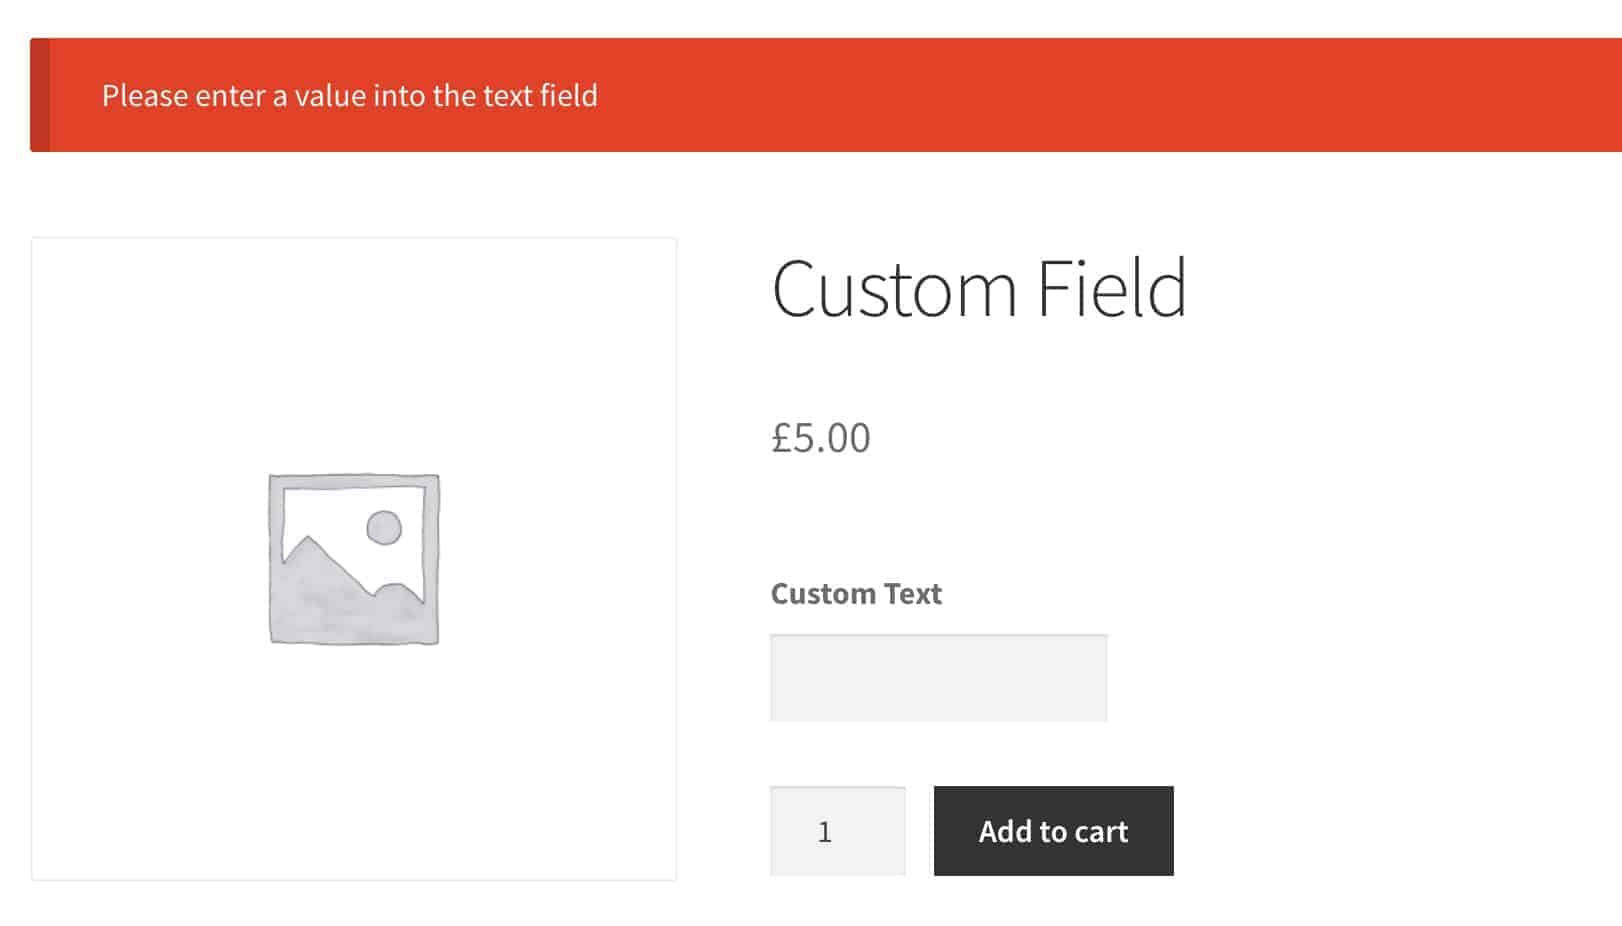
When a user enters some text into our custom field, we might want to check that the text conforms to some criteria we’ve laid down before we allow the item to be added to the cart. We do that using the woocommerce_add_to_cart_validation filter.
The code below performs a simple check when the user clicks ‘Add to Cart’ to ensure that they have entered some text in the custom field. Essentially, this makes the field required in order for the user to add it to their cart.
| /** | |
| * Validate the text field | |
| * @since 1.0.0 | |
| * @param Array $passed Validation status. | |
| * @param Integer $product_id Product ID. | |
| * @param Boolean $quantity Quantity | |
| */ | |
| function cfwc_validate_custom_field( $passed, $product_id, $quantity ) { | |
| if( empty( $_POST['cfwc-title-field'] ) ) { | |
| // Fails validation | |
| $passed = false; | |
| wc_add_notice( __( 'Please enter a value into the text field', 'cfwc' ), 'error' ); | |
| } | |
| return $passed; | |
| } | |
| add_filter( 'woocommerce_add_to_cart_validation', 'cfwc_validate_custom_field', 10, 3 ); |
The woocommerce_add_to_cart_validation provides you with three parameters:
$passed– a boolean value to indicate whether validation is successful or not$product_id– the product ID$quantity– the value of the quantity field
In this function, we simply get the value of the cfwc-title-field, which we added to the cart form in the previous step. If it’s empty, we display a message to the user and set the $passed parameter to false. Because this is a filter, we need to return a value.
How to add a message if the product fails validation
The function uses wc_add_notice to add a message to the WooCommerce notice. This function accepts two arguments:
- Message – the text to display
- Status – can be ‘error’, ‘success’, or ‘notice’. Most themes that support WooCommerce would style these notices differently
Adding custom values to the cart
Assuming the product successfully validates, it’ll get added to the WooCommerce cart object. We can add our own metadata to this object so that we can use it later in the process, e.g. on the cart and checkout pages and for orders and emails.
| /** | |
| * Add the text field as item data to the cart object | |
| * @since 1.0.0 | |
| * @param Array $cart_item_data Cart item meta data. | |
| * @param Integer $product_id Product ID. | |
| * @param Integer $variation_id Variation ID. | |
| * @param Boolean $quantity Quantity | |
| */ | |
| function cfwc_add_custom_field_item_data( $cart_item_data, $product_id, $variation_id, $quantity ) { | |
| if( ! empty( $_POST['cfwc-title-field'] ) ) { | |
| // Add the item data | |
| $cart_item_data['title_field'] = $_POST['cfwc-title-field']; | |
| } | |
| return $cart_item_data; | |
| } | |
| add_filter( 'woocommerce_add_cart_item_data', 'cfwc_add_custom_field_item_data', 10, 4 ); |
This function hooks to woocommerce_add_cart_item_data, which filters the data passed to the cart object when a product is added to the cart. So here we check that the cfwc-title-field has a value then add that to $cart_item_data.
Bonus: If you want to update your product price programmatically, use our guide here: How to update product price programmatically on WooCommerce.
Displaying custom fields in the cart and checkout
Let’s look at how to display the custom field value in the cart and the checkout. We can use the same filter for both pages, so we only need to write one function:
| /** | |
| * Display the custom field value in the cart | |
| * @since 1.0.0 | |
| */ | |
| function cfwc_cart_item_name( $name, $cart_item, $cart_item_key ) { | |
| if( isset( $cart_item['title_field'] ) ) { | |
| $name .= sprintf( | |
| '<p>%s</p>', | |
| esc_html( $cart_item['title_field'] ) | |
| ); | |
| } | |
| return $name; | |
| } | |
| add_filter( 'woocommerce_cart_item_name', 'cfwc_cart_item_name', 10, 3 ); |
The function checks each item in the cart for our title_field parameter. If it’s set, then it adds the title field to the product name as displayed in the cart.
Note that the woocommerce_cart_item_name filter works on the cart and checkout forms.
Displaying custom field values in the WooCommerce order and email confirmations
Having ensured that our custom field is visible to the user in the cart and checkout forms, we now need to pass its value to the order when the user checks out.
| /** | |
| * Add custom field to order object | |
| */ | |
| function cfwc_add_custom_data_to_order( $item, $cart_item_key, $values, $order ) { | |
| foreach( $item as $cart_item_key=>$values ) { | |
| if( isset( $values['title_field'] ) ) { | |
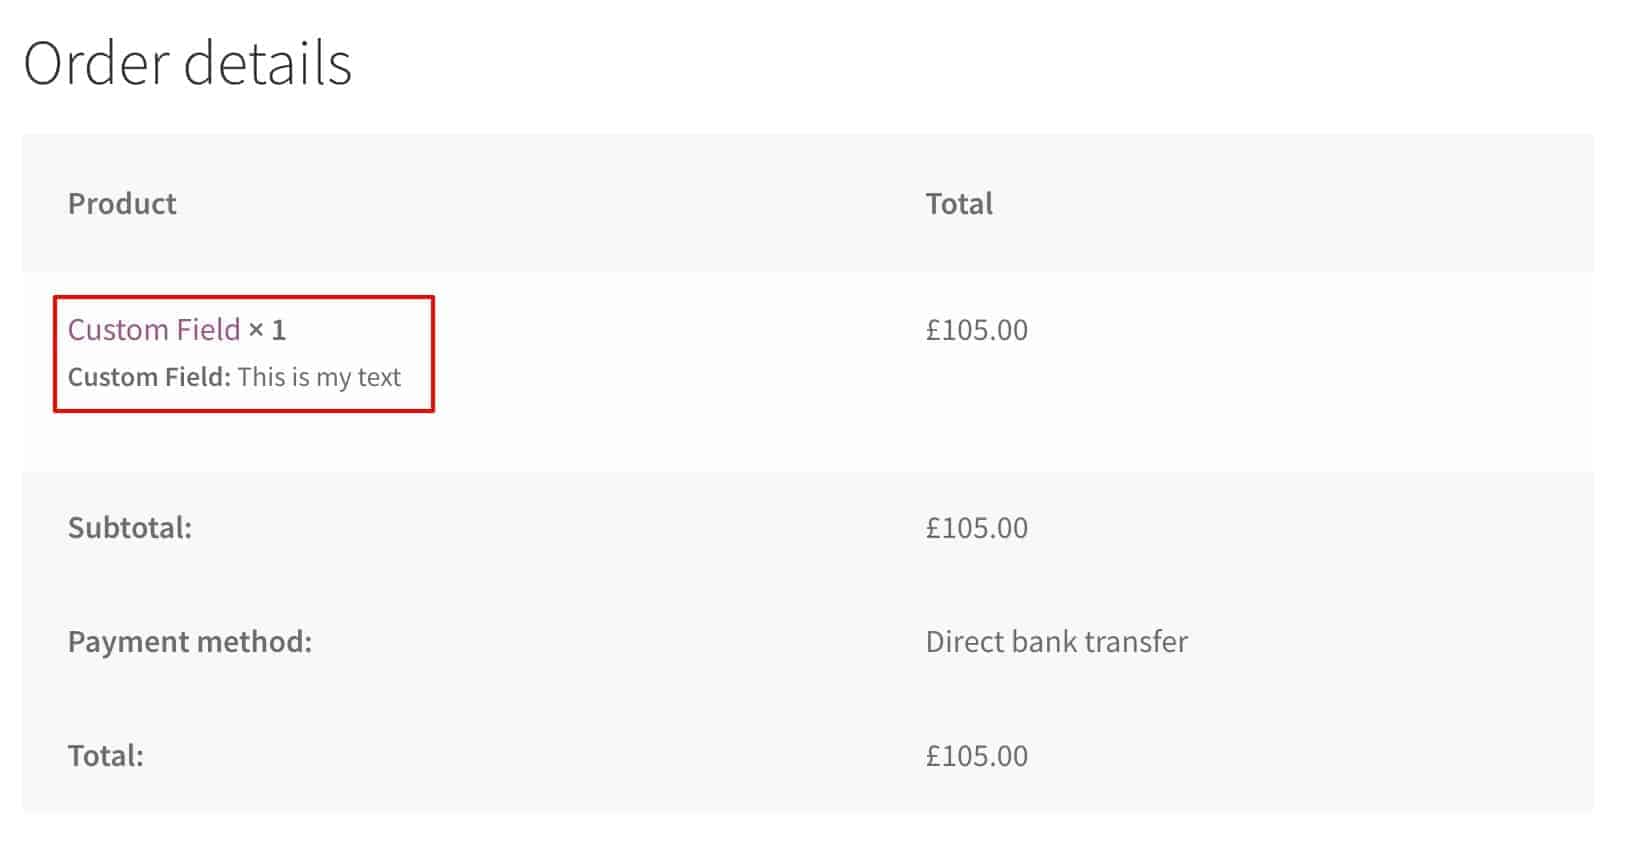
| $item->add_meta_data( __( 'Custom Field', 'cfwc' ), $values['title_field'], true ); | |
| } | |
| } | |
| } | |
| add_action( 'woocommerce_checkout_create_order_line_item', 'cfwc_add_custom_data_to_order', 10, 4 ); |
We can do this very easily using the woocommerce_checkout_create_order_line_item action. Like the filter for the product name in the cart, we just check the cart item for the title_field parameter. If it’s present, we add its value as meta data to the $item object.
This will ensure that our custom field value is displayed on the order confirmation field that the user sees once they have checked out, the order in the backend, and on the confirmation email to the admin and to the customer.
The code for the complete plugin can be found on GitHub.
WooCommerce custom checkout fields
What if you want your custom fields to appear on the checkout page?
The standard checkout fields built-in WooCommerce by default work great. These include check fields for the name, phone number, email address, billing address and shipping address, and payment information.
Displaying custom fields on the checkout page in WooCommerce can help you deliver a better user experience. It’s also a great way to gather information from the customer before they checkout.
Let’s go over a few examples of custom checkout fields for WooCommerce:
- Delivery date field: You can add a delivery date field to the checkout page to let customers select a delivery date. For instance, florists and bakeries can let customers choose when they’d like to have the goods delivered.
- Email newsletter opt-in: When the customer is done with their order and is ready to leave your site, you can offer an email newsletter opt-in using a custom field. This is great for deal sites and stores that offer services such as photography.
- Delivery days (subscription products): You can also let customers choose when they want to have the product delivered over multiple days. For instance, you can let customers select from either 3 delivery days a week or 5 delivery days for meal subscription boxes or vegetable subscription boxes.
Adding checkout fields programmatically
It’s also possible to add checkout fields to your WooCommerce store programmatically. All you need to do is add a little code to your WooCommerce store. It’s a great option for developers as it offers tons of flexibility and customizability.
For more information, you can take a look at this guide on WooCommerce Checkout Fields.
Adding WooCommerce checkout fields using a plugin
People who aren’t familiar with coding can add checkout fields to their WooCommerce store using a plugin. This is a good option for all types of users as there is no need to code to add custom checkout fields.
Here are some of the plugins we recommend for adding checkout fields to your WooCommerce site:
- Checkout Field Editor: The Checkout Field Editor lets you optimize the checkout process on your WooCommerce site and helps take your WooCommerce store to the next level. You can add, remove, or modify custom fields based on your requirements.
- Checkout Field Editor (Checkout Manager) for WooCommerce: The Checkout Field Editor for WooCommerce plugin is an all-in-one solution for creating, managing, and customizing checkout fields on your WooCommerce store.
Further reading
If you want to know even more about adding custom cart item data in WooCommerce, including details on the woocommerce_add_cart_item_data and woocommerce_add_to_cart_validation filters, check out our guide to adding custom cart item data in WooCommerce which explains how to add custom text fields using a plugin and how to add and validate cart item data using code.
Final thoughts
In this article we looked at how to create custom WooCommerce fields programmatically. Don’t forget to check out the WooCommerce Product Add Ons Ultimate plugin if you want to make life simpler for yourself.