How to create a WooCommerce product from different components
In this tutorial, we’ll look at how to create WooCommerce products from different components. Some types of product are composed of different elements or components. For example, a laptop is built from a CPU, graphics chip, RAM, and so on. These components could be standalone products in their own right and you might need to set inventory, SKUs and prices for each component independently of the main product.
WooCommerce doesn’t give you the ability to create products from components so you’ll need an extra plugin. The WooCommerce Product Add-Ons Ultimate plugin allows you to create products from components quickly and easily.

To build your products out of components, you’ll need Add-Ons Ultimate. This has a unique “child product” feature which allows you to use products in your store as components in other products.
Product Add-Ons Ultimate main features
If you’re selling products built from components in WooCommerce, then Product Add-Ons Ultimate offers you a number of great features:
- Use simple products or variations as components for the main configurable product. This allows you to track stock levels, define SKUs and update prices per component, independently of the main product. You can also choose whether to sell the components separately on your site or keep them hidden
- Display your components in different layouts – e.g. with or without thumbnail images, in select fields, or in specially designed cards
- Components can be priced separately – so that the overall price of the main product is based on the selected component prices
- Decide whether users can choose quantities for their components or if quantities are linked to the main product
- Display your product form in different formats, e.g. tabs or accordion, to help the user through the configuration process
- Update the main product image based on what components the user has selected. For more information on how to update the main image, see this article on creating configurable products in WooCommerce
Examples of products built with components
Components are a core feature of WooCommerce composite products. Some examples of products built with components include:
- Product kits – e.g. for remote control cars where customers can pick their own body style, wheels, RC unit
- Sofas or other modular furniture – components include arm rests, leg styles, cushion fills, and other modular pieces
- Build your own PCs and laptops – components include CPU (e.g. Intel, AMD), GPU (e.g. NVIDIA, AMD), RAM (size and speed), storage (SSD vs. HDD), motherboard, cooling systems and even case design
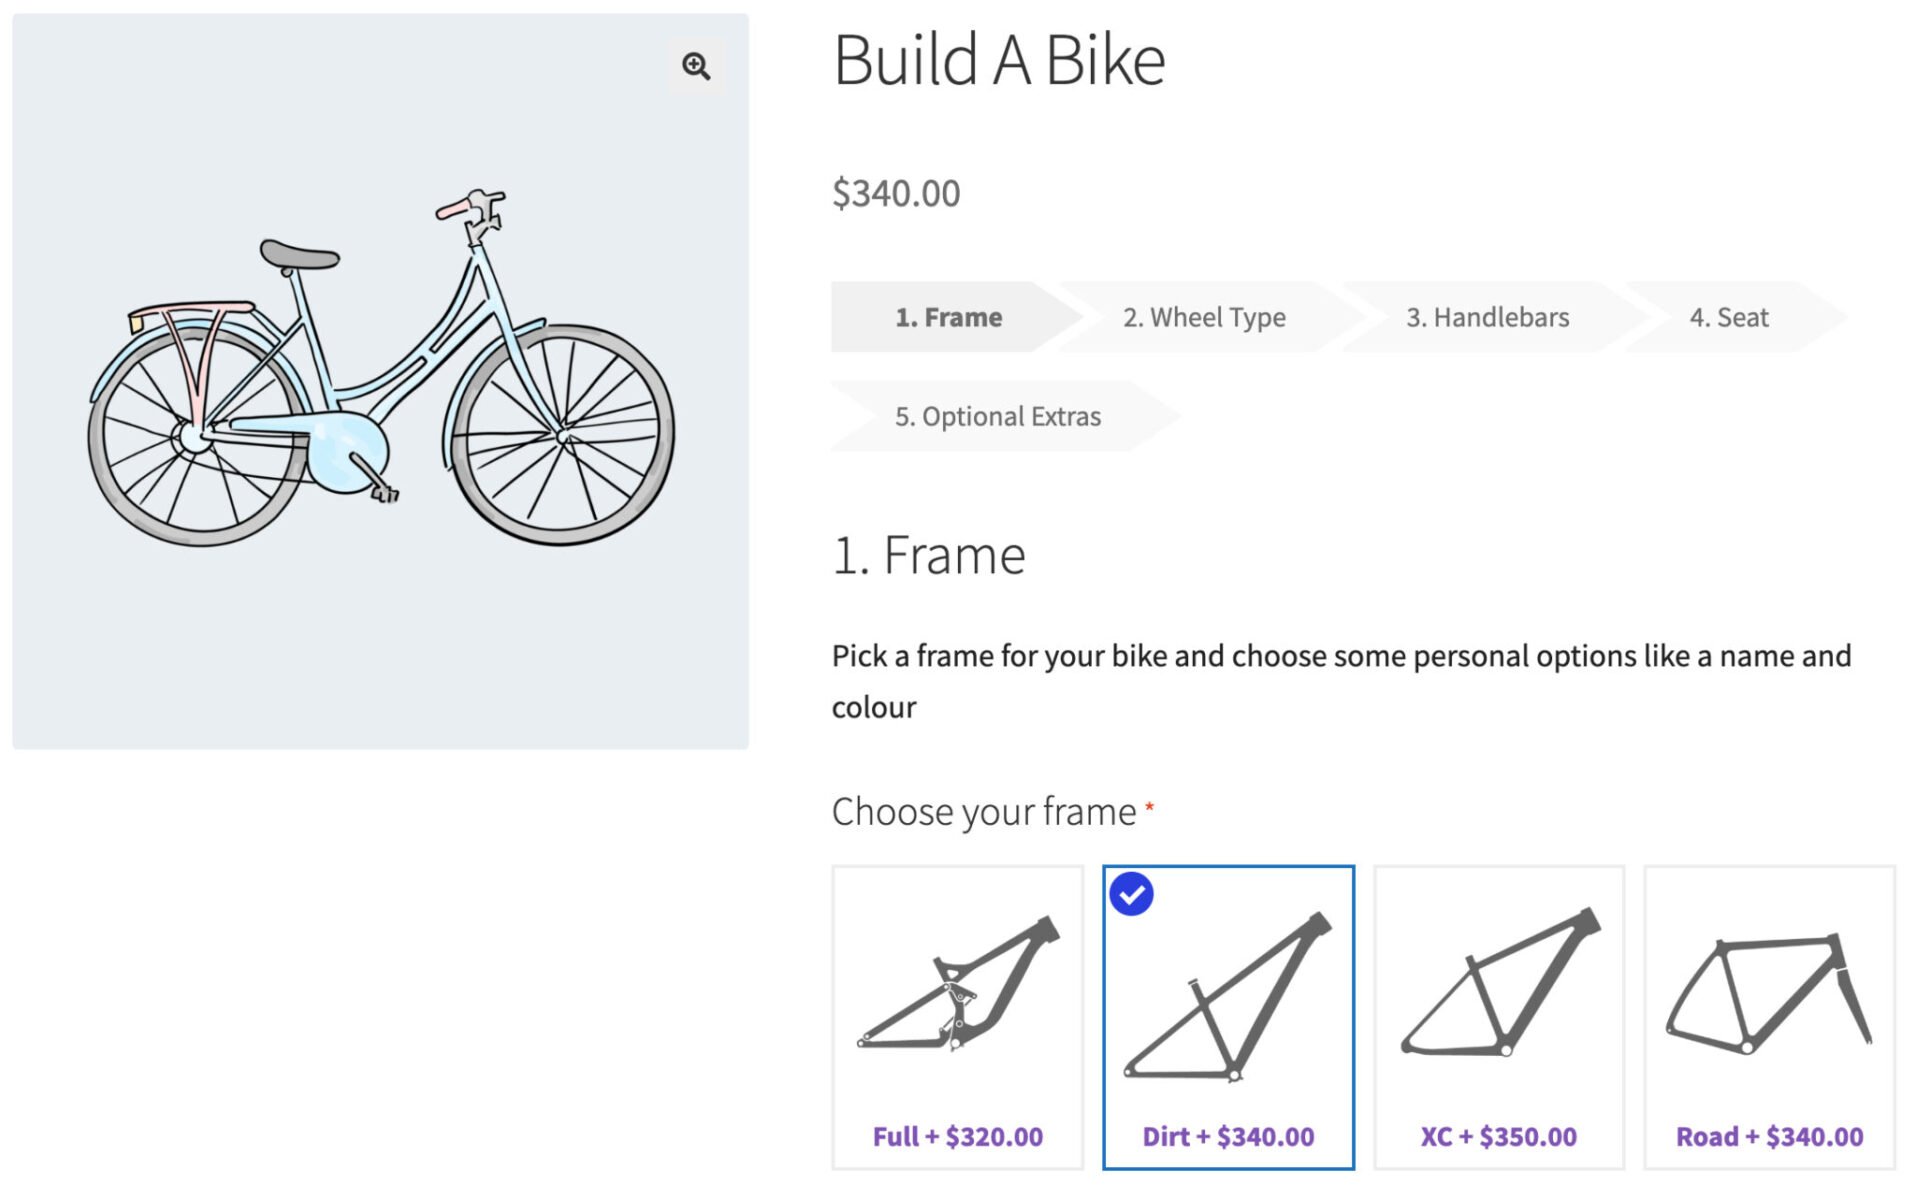
- Build your own products, like bikes – components include wheels, handlebars, seat, pedals, suspensions, brakes and more
- Skateboards – components include the board, wheels and bearings
- Surfboards – components include the board, tail shape and fin design
WooCommerce product components tutorial
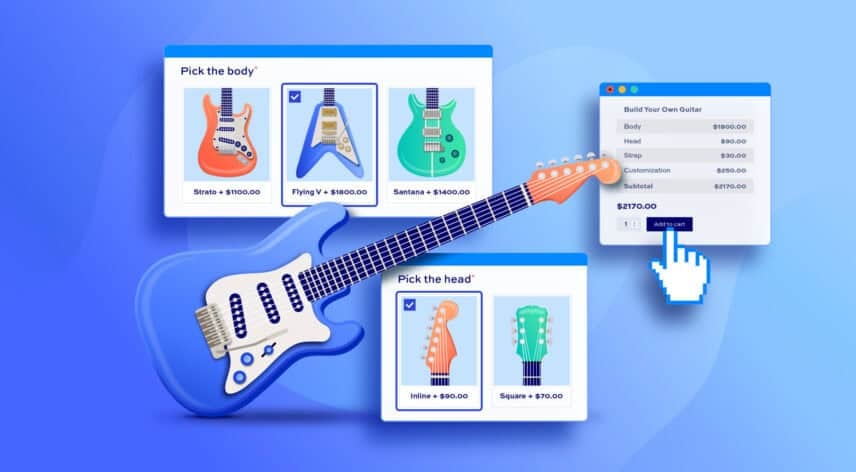
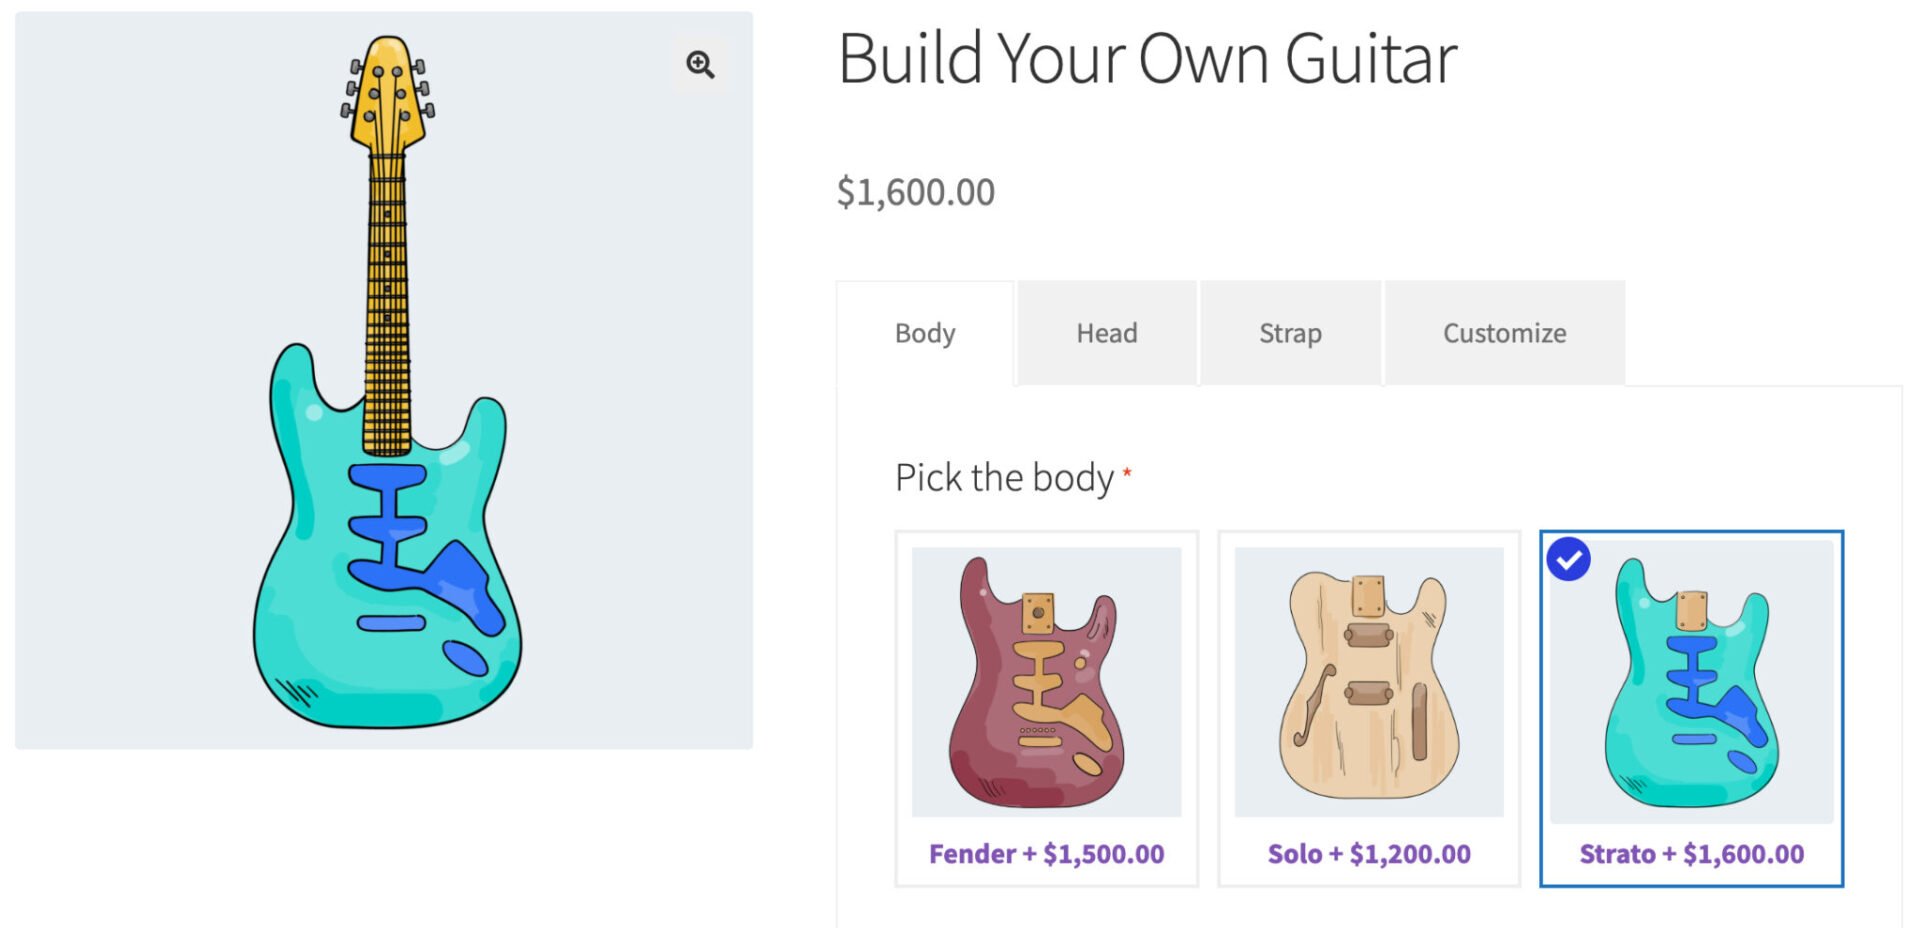
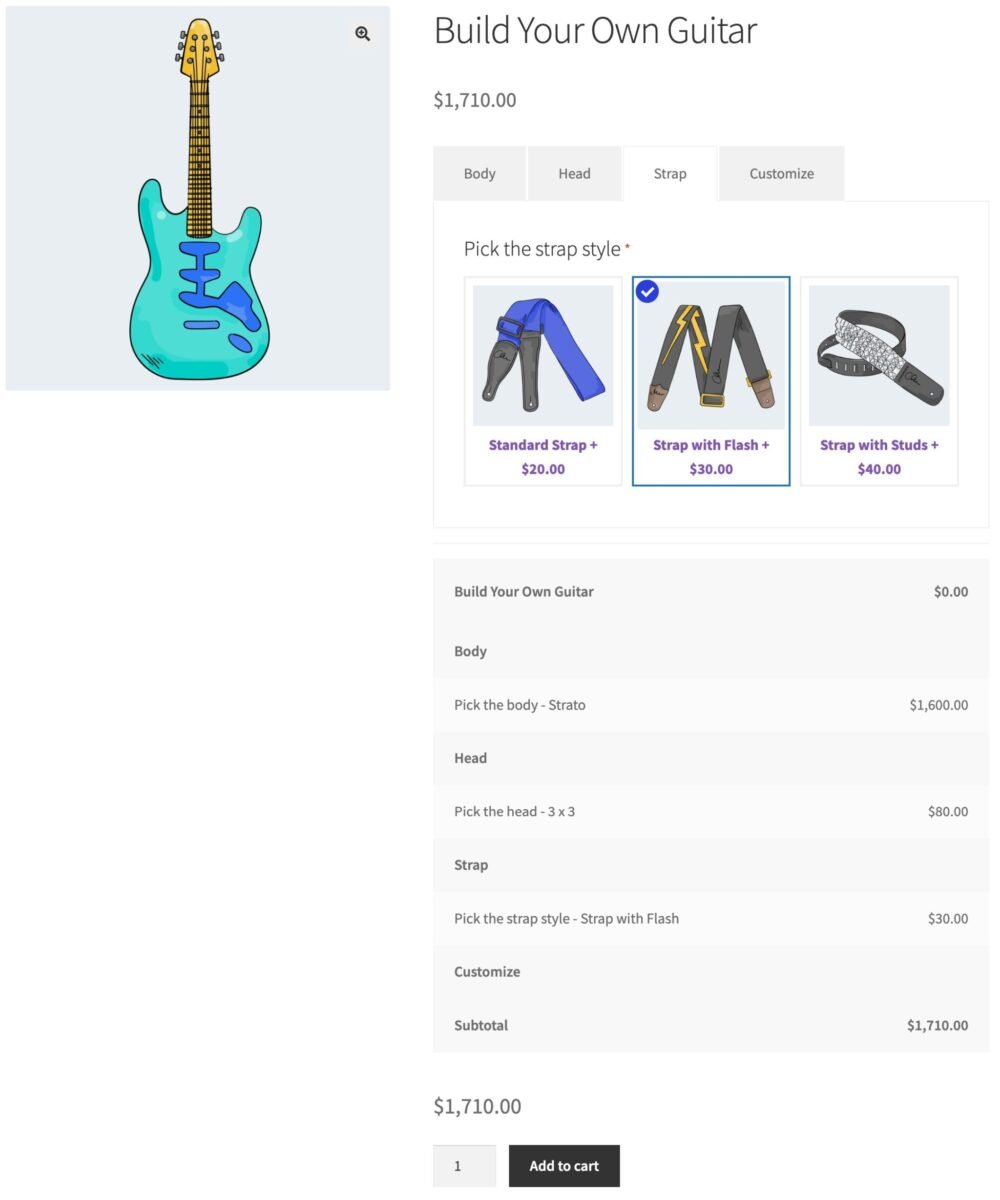
In this tutorial, we’ll look at how to create a guitar product where users can select different components, like the body, head and strap, to create their own unique product. We also give the option to add some extra customization, like custom text or image.
It’s a simple example – but you can adapt and extend this for your own products. There’s a working demo product here.
Let’s look at how to create products with components in WooCommerce.
Step #1: Install and activate Product Add-Ons Ultimate
The first step is to purchase Add-Ons Ultimate then you can:
- Download its zip file by clicking on the link on your order confirmation screen or in your welcome email. You’ll receive this email automatically a few seconds after you’ve completed the purchase
- Go to Plugins > Add New in your WordPress dashboard
- Click on the ‘Upload Plugin’ button
- Drag and drop the plugin’s downloaded zip file into the ‘Choose File’ area and click ‘Install Now’
- When the plugin has uploaded, click the ‘Activate Now’ button
Step #2: Create products to use as components
Using products as components to build another product allows you to manage the inventory and pricing of your components, separately from the main product itself. So the first step is to add components to your site as standard products.
- Go to Products > Add New to create your first component product
- Give it a name, a price, an image (if necessary), and any other details you like – including descriptions and categories
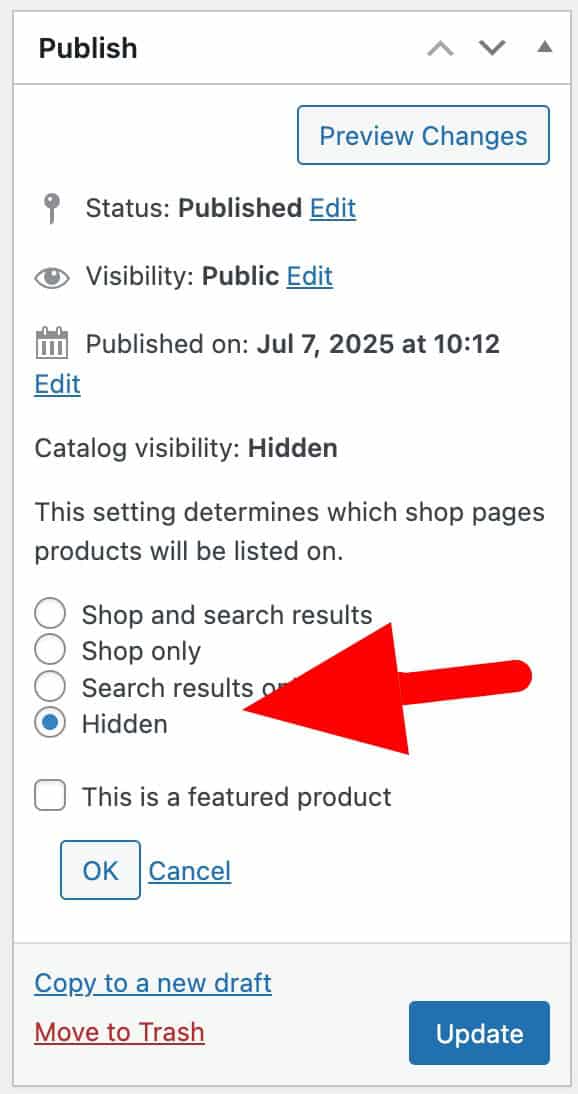
- If you want to ensure that users can’t buy the component individually from your site, select ‘Hidden’ in the ‘Catalog visibility’ setting in the ‘Publish’ panel. This will hide the product from the shop and other archive pages but it will still be accessible to anyone with the URL. To ensure that users can’t access the product page at all, go to WooCommerce > Settings > Product Add-Ons > Products and select the option to ‘Redirect hidden products’.
Publish your product and add as many component products as you wish.
Step #3: Create the main product
With all your component products created, you can now create the main product itself. In our example, this a build-your-own guitar product – but you can use this method for any product that is built with components.
To create your main product:
- Go to Products > Add New and create a new product
- Give the product the name, image, and other details as necessary. Note that you must assign a price to this product. If your price is calculated based totally on the price of the selected components, then you can just enter 0 as the price for the main product
Step #4: Add your components as options
With your main product created, you can now add your components as options. To add a product as a component to another product in WooCommerce:
- Go to the Product Add-Ons tab in the ‘Product data’ section
- Click ‘Add Group’. A group can contain multiple options and in our example we’re going to organize our components into groups to make it easier for the user
- Give the group a name and an optional description
- Click ‘Add Field’ to add your first set of components
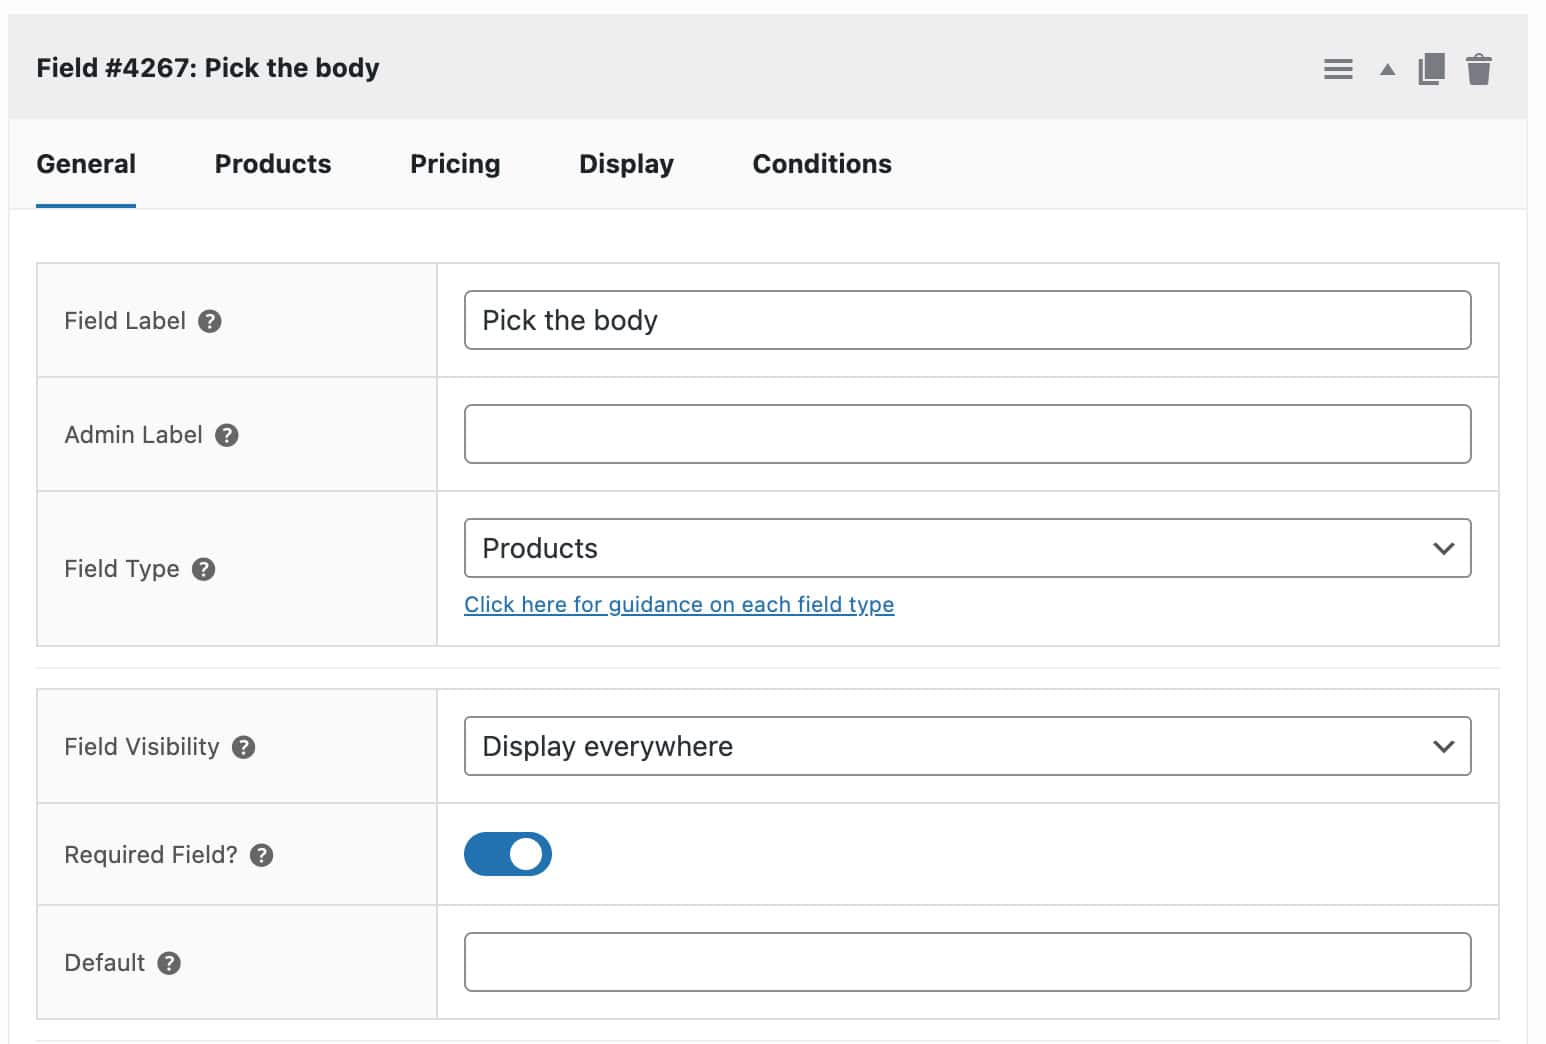
- Give the field a name, e.g. ‘Body’, select ‘Products’ as the field type, then enter your components in the ‘Child products’ field
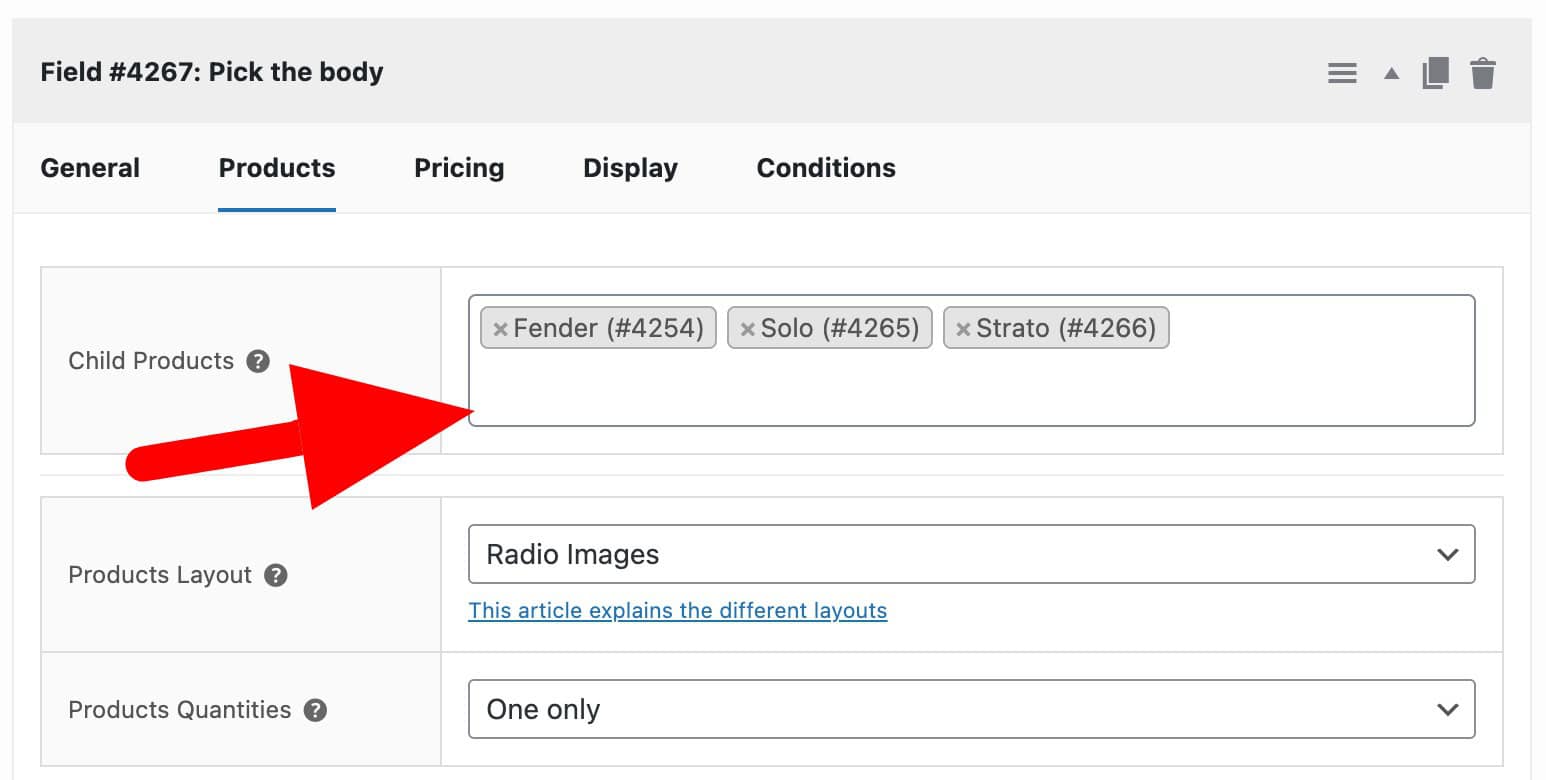
Now you can choose some options for the components:
- Products Layout: this setting allows you to choose how to display the components in this field. You have several options to choose from – some allow you to display thumbnails, others just display components as a list; some allow the user to select multiple components from the same field, others allow only one component per list. There are examples for each layout in this article.
- Products Quantities: this setting allows you to define whether the user can choose a quantity for the component
- Discount: if you like, you can set a discount or extra fee for components
- Required Field: enable this option if the user must select a component from this field
- Default, enter a default component if you wish
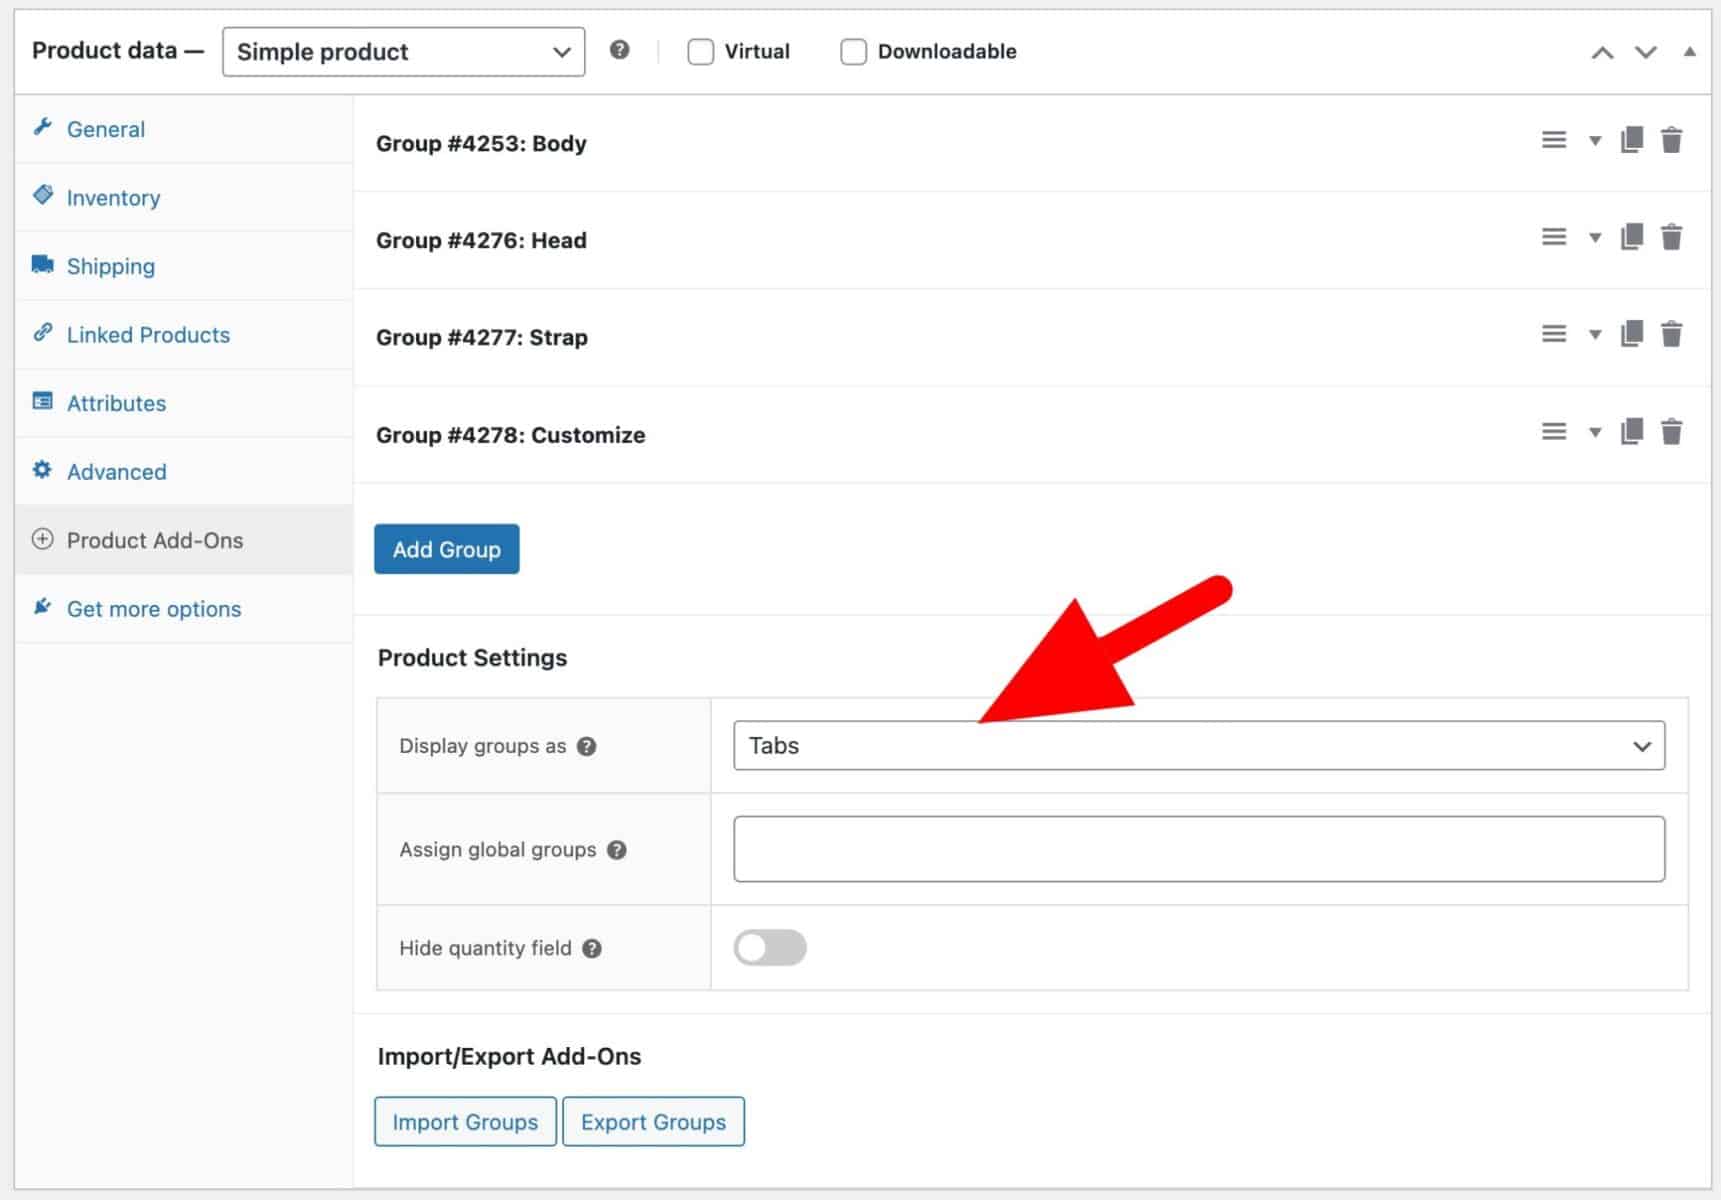
Step #5: Select a layout for your groups
If you’re organizing your components fields into groups, you can choose to display those groups in different layouts:
- Standard list view where all fields are displayed in a single vertical column
- Accordion: where the fields for each group are displayed in an expandable section
- Lightbox: where groups are displayed in a pop-up lightbox window
- Steps: where each group is a separate step, along with ‘Next’ and ‘Previous’ buttons
- Tabs: where fields for each group are organized into tabs
To choose a layout, select an option from the ‘Display groups as’ setting.
Once you’ve added all your components, you can publish your product.
WooCommerce product components – recap
In this article we looked at what kinds of products are built using components and how to utilise the Product Add-Ons Ultimate plugin to achieve this. Product Add-Ons Ultimate allows you to use products as components of other products – so you can manage inventory, SKUs and pricing for all the different components of your products.
The plugin is backed by a 14-day money-back guarantee so you can purchase risk-free. It’s compatible with all themes and page builders – and we have a world-class support team on hand to help you with any questions.