WooCommerce Deposits and Part Payments - Plugin
Provide flexible payment options on products and orders
Incentivize your customers to purchase by offering a variety of payment options with WooCommerce deposits and part payments

Make payments easier for your customers - accept part payments on products or orders
Flexible payment options for your customers
- Accept deposits and part payments
- Apply to specific products or whole orders
- Accept percentage or fixed amounts
- Optional discount for paying in full

Make life easy for your customers
- Let customers choose - or require a deposit only
- Add discounts for payment in full
- Automatically schedules final payment order
- Optionally allow users to pay final payment in chunks
Flexible and easy to use
- Perfect for non-coders and developers alike
- Simple and intuitive settings
What customers say about our WooCommerce Deposits and Part Payments plugin
This single WooCommerce extension for accepting deposits and partial payments is pretty perfect.

WooCommerce Deposits and Part Payments plugin features
The best plugin for creating deposit and partial payment options on products and orders

Flexible payments
Allow customers to purchase with a deposit payment or part payment and pay the remaining amount later

Total pricing control
You decide which products and the amounts - either a percentage payment or fixed price.

Intuitive, easy set up
No tech or coding knowledge required

Add discounts for payment in full
Make paying in full more attractive with discounts

Boost your sales & offer a superior shopping experience
Create more sales opportunities & increase customer satisfaction

Auto reminders to pay
The plugin will send out payment reminders to ensure customers settle up on time.
Pricing
All purchases are covered by a 14 day money back guarantee. Prices are in US Dollars.
Yearly licences renew annually - cancel anytime
Lifetime licences are a one-time payment
Basic
$49.00 + VAT *
Use on a single siteUse this plugin on one production site
Renews annuallyThis plugin will automatically renew every year. If you cancel it, you can continue to use the plugin but will not receive support or updates
14 day money back guaranteeIf the plugin isn't what you want, just drop us a line within 14 days for a full refund
Pro
$89.00 + VAT *
Use on unlimited sitesUse this plugin on as many sites as you like
Renews annuallyThis plugin will automatically renew every year. If you cancel it, you can continue to use the plugin but will not receive support or updates
14 day money back guaranteeIf the plugin isn't what you want, just drop us a line within 14 days for a full refund
Basic
$129.00 + VAT *
Use on a single siteUse this plugin on one production site
One-time paymentThis is a single one-time charge. You'll recieve support and updates for the lifetime of the product
14 day money back guaranteeIf the plugin isn't what you want, just drop us a line within 14 days for a full refund
Pro
$229.00 + VAT *
Use on unlimited sitesUse this plugin on as many sites as you like
One-time paymentThis is a single one-time charge. You'll recieve support and updates for the lifetime of the product
14 day money back guaranteeIf the plugin isn't what you want, just drop us a line within 14 days for a full refund

A full refund if you're not happy
I built this plugin myself and my team and I are available to support you personally. We want you to be 100% satisfied with your purchase so if, for any reason, this plugin doesn't meet your expectations over the next 14 days, let us know and we'll give you a full refund.
Your customer support team is absolutely superb. I have worked with Collins and Clint, and they have been helpful, patient, and incredibly easy to work with.

Why buy the WooCommerce Deposits and Part Payments plugin?
By installing the WooCommerce Deposits and Part Payments plugin, you are helping your customers by making expensive purchases more manageable allowing the cost to be spread over time. This flexibility can reduce financial strain, increase purchasing power, and make high-ticket items more accessible, leading to a more satisfying shopping experience.
FAQs
Changelog for WooCommerce Deposits and Part Payments
= 1.4.15, 25 June 2025 =
* Added: wcdpp_payable_later_text filter
* Fixed: deposit options on the Checkout page sometimes do not work on Safari browser
= 1.4.14, 28 May 2025 =
* Added: wcdpp_apply_fixed_custom_deposit_as_discount filter
= 1.4.13, 15 April 2025 =
* Fixed: compatibility script for WC Blocks is not loaded on the Checkout page
* Fixed: JS functions sometimes do not work on the Checkout page when using WC Blocks
= 1.4.12, 1 April 2025 =
* Added: wcdpp_use_outstanding_balance_without_tax filter
= 1.4.11, 21 January 2025 =
* Fixed: Make Part Payment button not working on the Pay for order page
= 1.4.10, 14 November 2024 =
* Added: validate user-defined deposit for a product before it is added to the cart
* Fixed: custom amount not working if Deposit Type is Percentage
* Updated: better compatibility with WooCommerce Cart and Checkout Blocks
= 1.4.9, 1 August 2024 =
* Added: View Parent Order link in the admin order page
* Fixed: display issues if User Defined Minimum Amount or Optional Part Payment Minimum Amount is in the thousands
* Fixed: deposit amount entered by user is not checked against the User Defined Minimum Amount
= 1.4.8, 1 May 2024 =
* Added: wcdpp_wcfad_apply_discount_before_deposit filter
* Fixed: PHP error if Due date unit is month or year
* Fixed: Due date and Reminder date on Order page show timestamp instead of date if Due date unit is month or year
* Fixed: Part payment is not applied correctly for orders with more than 1 item
* Fixed: compatibility issue with Fees and Discounts' bulk pricing if Deposit is applied on Entire Order
= 1.4.7, 27 March 2024 =
* Fixed: PHP deprecated warnings
* Updated: a blank deposit amount in the admin settings now triggers an error notice
= 1.4.6, 28 February 2024 =
* Fixed: adjusted price from WooCommerce Fees and Discounts is applied twice on some orders created when checking out using PayPal
= 1.4.5, 25 September 2023 =
* Added: wcdpp_display_outstanding_balance_with_tax filter
* Added: wcdpp_adjust_tax_fixed_paid_amount_entire_order filter
* Fixed: order total reverts back to full price when a deposit order is updated
* Fixed: scheduled orders for products with due date are duplicated repeatedly when updating status of parent order
* Fixed: incorrect calculation if deposit type is Entire Order
* Fixed: a scheduled order is created if part payment is equal to the order total
* Fixed: a scheduled order still has the full price if the deposit is a custom amount
* Updated: compatibility with WooCommerce High-Performance Order Storage
= 1.4.4, 24 May 2023 =
* Added: wcdpp_apply_part_payment_before_tax filter
= 1.4.3, 16 May 2023 =
* Added: exclude Product Add-Ons Ultimate fields from deposits
= 1.4.2, 20 February 2023 =
* Added: wcdpp_remove_tax_from_fixed_discount filter
* Fixed: float issue in PHP 8
* Fixed: part payments are taxed even if Apply Tax Scheduled Order is disabled
* Fixed: discount on full payment does not work if deposit is applied on Entire Order
= 1.4.1, 6 December 2022 =
* Added: Per-product due date and reminder date
* Added: Pay remaining now link on front-facing scheduled orders
* Fixed: PHP 8 warnings
* Updated: check $product is object in wcdpp_calculate_deposit_amount
= 1.4.0, 16 June 2022 =
* Added: option to set customer-defined deposit
* Added: option to make part payments on outstanding amount
* Fixed: incorrect totals on scheduled order if discount is entire order and percentage
* Updated: renamed translation files to match text domain
= 1.3.7, 5 July 2021 =
* Fixed: scheduled payment not available for out of stock items
= 1.3.6, 28 June 2021 =
* Fixed: correctly calculate scheduled order amount for deposits on entire order with multiple items
* Updated: don't reduce stock when a scheduled order is paid
= 1.3.5, 25 November 2020 =
* Added: wcdpp_apply_tax_scheduled_order setting
* Updated: improved compatibility with Fees and Discounts
= 1.3.4, 24 September 2020 =
* Fixed: don't create unnecessary scheduled order
* Fixed: removed HTML tags from deposit text on checkout page
* Fixed: use float value instead of wc_price when adding product subtotals to new order
= 1.3.3, 20 September 2020 =
* Fixed: product specific deposit amounts not honoured for variations
= 1.3.2, 18 September 2020 =
* Added: wcdpp_automatically_create_scheduled_order filter
* Added: product specific deposit amounts
= 1.3.1, 16 July 2020 =
* Fixed: scheduled orders created for orders paid in full
= 1.3.0, 7 July 2020 =
* Added: option to pay by deposit only
* Added: wcdpp_section_tabs filter
* Added: option to send email to admin when balance paid
* Fixed: ensure scheduled orders don't create additional scheduled orders when paid
* Updated: scheduled order line item costs and totals
* Updated: only display remaining balance on order screens for initial payments
* Updated: deposit amount for 'entire order' payments include shipping and other fees
= 1.2.1, 16 June 2020 =
* Fixed: update_checkout not triggered at checkout
* Updated: calculate deposit based on variation price not product price
= 1.2.0, 26 May 2020 =
* Added: option to set deposit for entire cart
* Fixed: scheduled order getting set twice on_hold and processing
= 1.1.0, 21 April 2020 =
* Added: option to discount product price when user pays in full
* Added: add link to pay remaining balance to order confirmation and email
= 1.0.1, 15 April 2020 =
* Added: pot file
* Fixed: deposits calculating incorrectly on multiple items
* Updated: include 'Scheduled' orders in 'All' count on Orders page
= 1.0.0, 7 February 2020 =
* Initial commit
Pre-Sales and Licensing
Will this plugin work with my theme?
All my plugins are independent of the theme being used so there shouldn't be any problems. If you do run into any issues, just let us know and we will take a look.
Do you offer refunds?
Yes, there’s a 14 day money back guarantee. The purpose of this guarantee is to give you plenty of time to assess the plugin to see if it will meet your needs.
During the 14 days, if you’ve got any questions about the plugin and what you are hoping to achieve with it, just raise a support ticket and we’ll get back to you.
You can find out how to register your refund request here.
Is there a free trial?
We don’t offer free trials or backend demos but all products are backed by a 14 money back guarantee so if the plugin isn’t what you wanted, we will issue you with a refund.
This allows you to spend time testing the plugin on your own environment, with your own theme and with your own plugins. It’s the best way to help you be sure that the plugin is what you want.
You can also upgrade your licence at any time – so, if you wish, you can purchase a Yearly licence initially then upgrade to the Lifetime licence within the first year and just pay the difference.
If you have any questions during your 14 day refund period, you can raise a support ticket and we will get straight back to you.
How long is the licence valid for?
Yearly licences are valid for a year. During that time you are entitled to receive free updates and support. After 12 months, yearly licences will automatically renew. You can cancel at any time.
Lifetime licences are a single, one-off payment. Lifetime licences do not expire and you are entitled to receive all future updates for the plugin.
You can purchase a Yearly licence then upgrade to Lifetime if you wish. Upgrade within the first year to just pay the difference.
Can I upgrade my licence and just pay the difference?
Yes, you can upgrade your licence any time in the first year and just pay the difference. So if you want to upgrade from Basic to Pro or if you want to upgrade from Yearly to Lifetime, you can do so and only pay the difference in price.
Also, if you wish, you upgrade from one product to a bundle that contains that product and also only pay the difference. So you can buy one or more products then upgrade to the All Access Bundle and only pay the difference in price.
What’s the difference between Basic and Pro licences?
The Basic licence entitles you to updates and support for one site; the Pro licence entitles you to updates and support for unlimited sites.
You can try out the Basic licence first then upgrade to Pro at any time. Here’s how to upgrade your licence.
Is the plugin translatable?
Yes, all our plugins are fully translatable and many come with translations in various languages. If you wish to contribute your own translations, we can add those to the core plugin to ensure they don't get overwritten.
The plugins are also compatible with WPML and other popular multilingual plugins like LocoTranslate.
Features
Can you split payments on WooCommerce?
You can split payments with a WooCommerce partial payment plugin. This allows customers to make a deposit and then pay the rest of the sum through scheduled payments. You decide whether the deposit in question is a percentage or a specific amount.
How do I connect my bank to WooCommerce?
In the Payment settings of WooCommerce, you can choose ‘Direct bank transfer’ as an option, or you can download a WooCommerce payment plugin. The most popular options include PayPal, Stripe, WooPayments, Klarna, and many more. Depending on your choice, you can also add the option to pay with a credit or debit card.
Are WooCommerce payments safe?
WooCommerce payments are completely safe, but you need to make sure you’re using a licensed third party. We recommend thoroughly checking vetted review sites and looking for plugins that are completely transparent about their policies.
How are deposits calculated?
Deposits can be set as a fixed amount or a percentage of the total order value. You can configure this within the plugin settings.
Can I create custom installment plans?
The WooCommerce Deposits and Part Payments plugin allows you to accept an initial deposit for a product or order, then require a final payment at a set period in the future. If you wish, you can allow the customer to split the final payment into multiple payments - you can control the minimum amount they can pay at a time.
How do I manage deposits and track payments?
Users pay a deposit then must pay the remaining balance at a specified point in the future. It is possible to allow users to break up the remaining balance into multiple payments so they can pay over time.
Our products are featured on

Screenshots
See how the plugin looks on the back and front ends. Click the images to enlarge them.
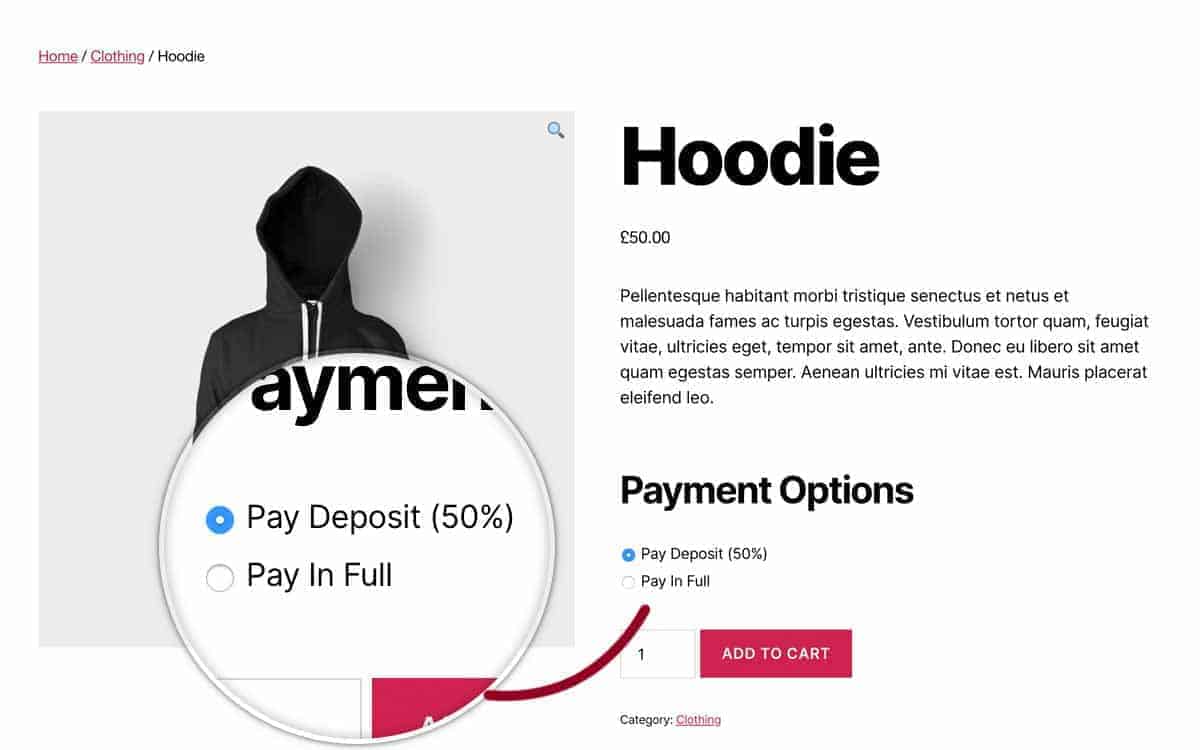
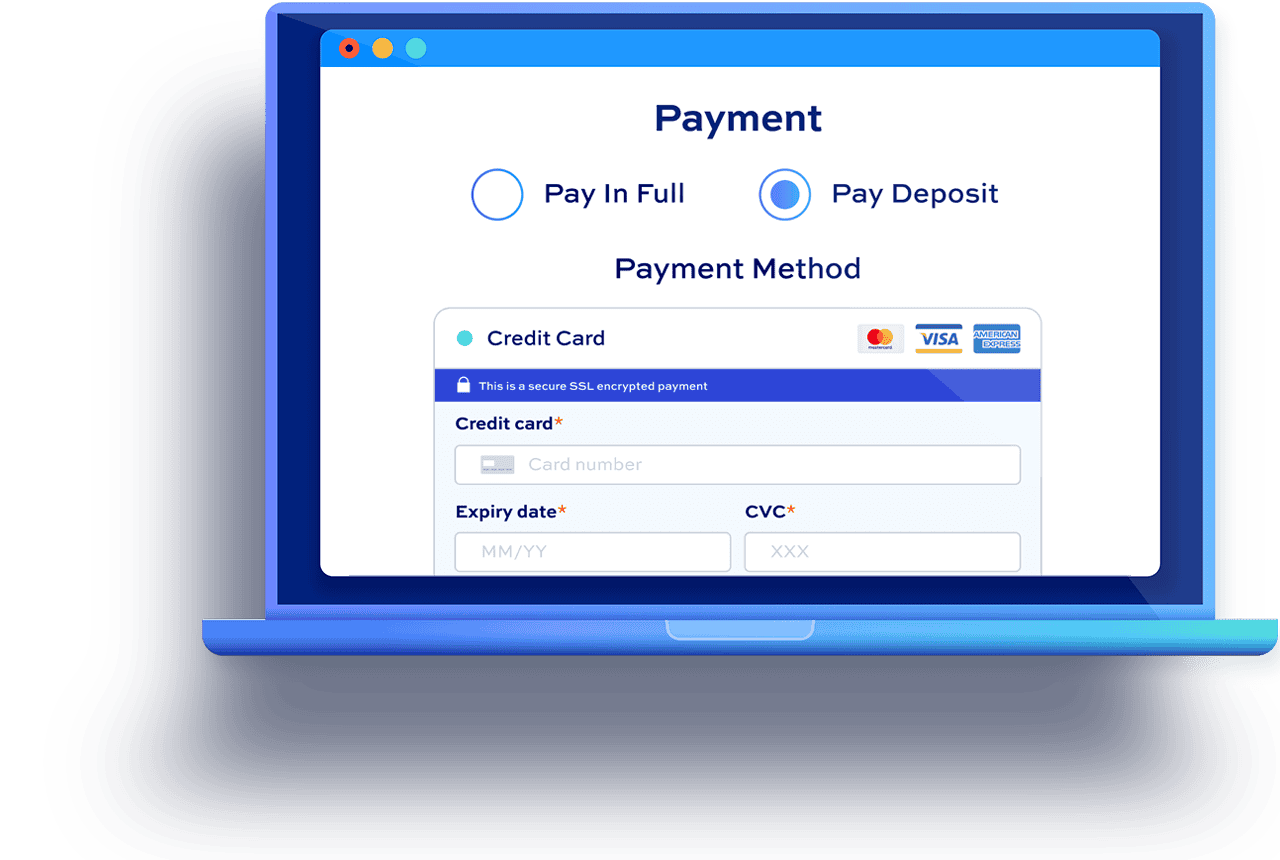
 User can select payment option per product
 Select deposit or full payment
- Compatible with Bookings for WooCommerce
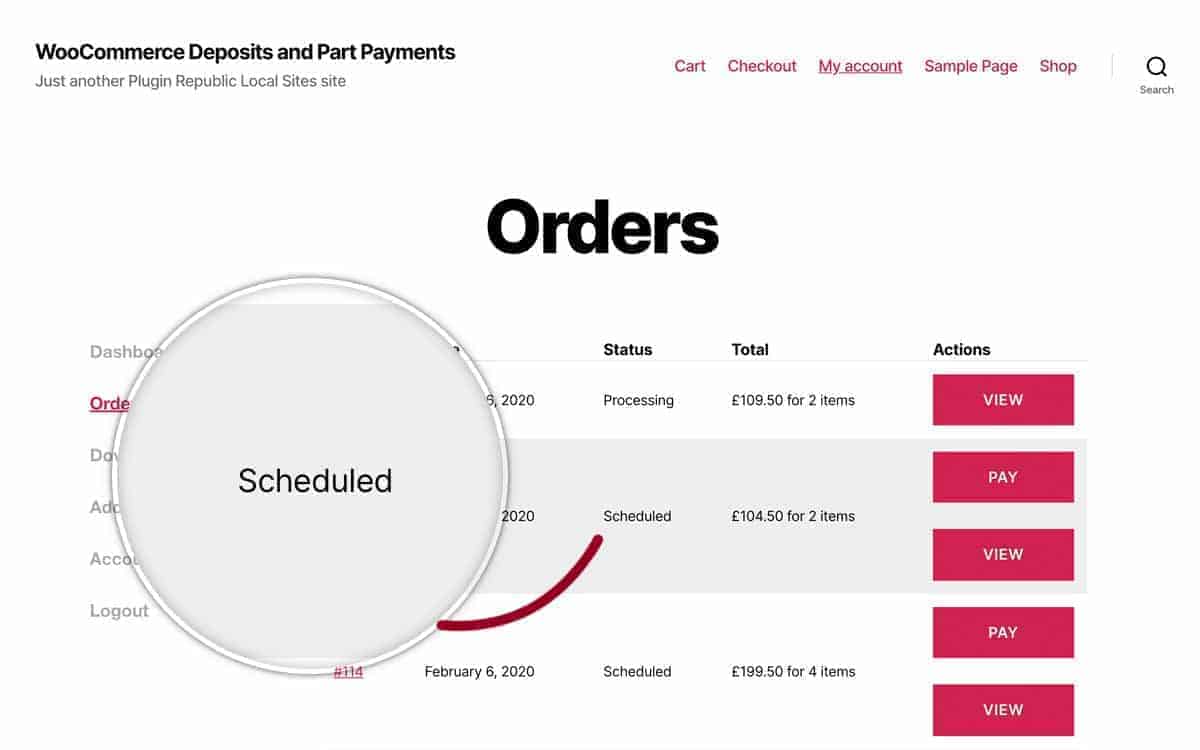
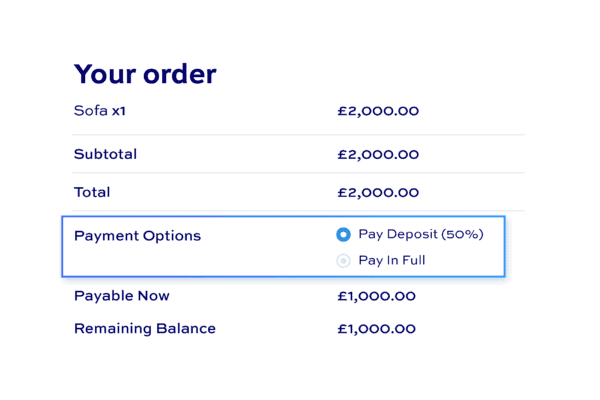
 Allow users to pay deposits on the entire order
- Automatically create second scheduled order
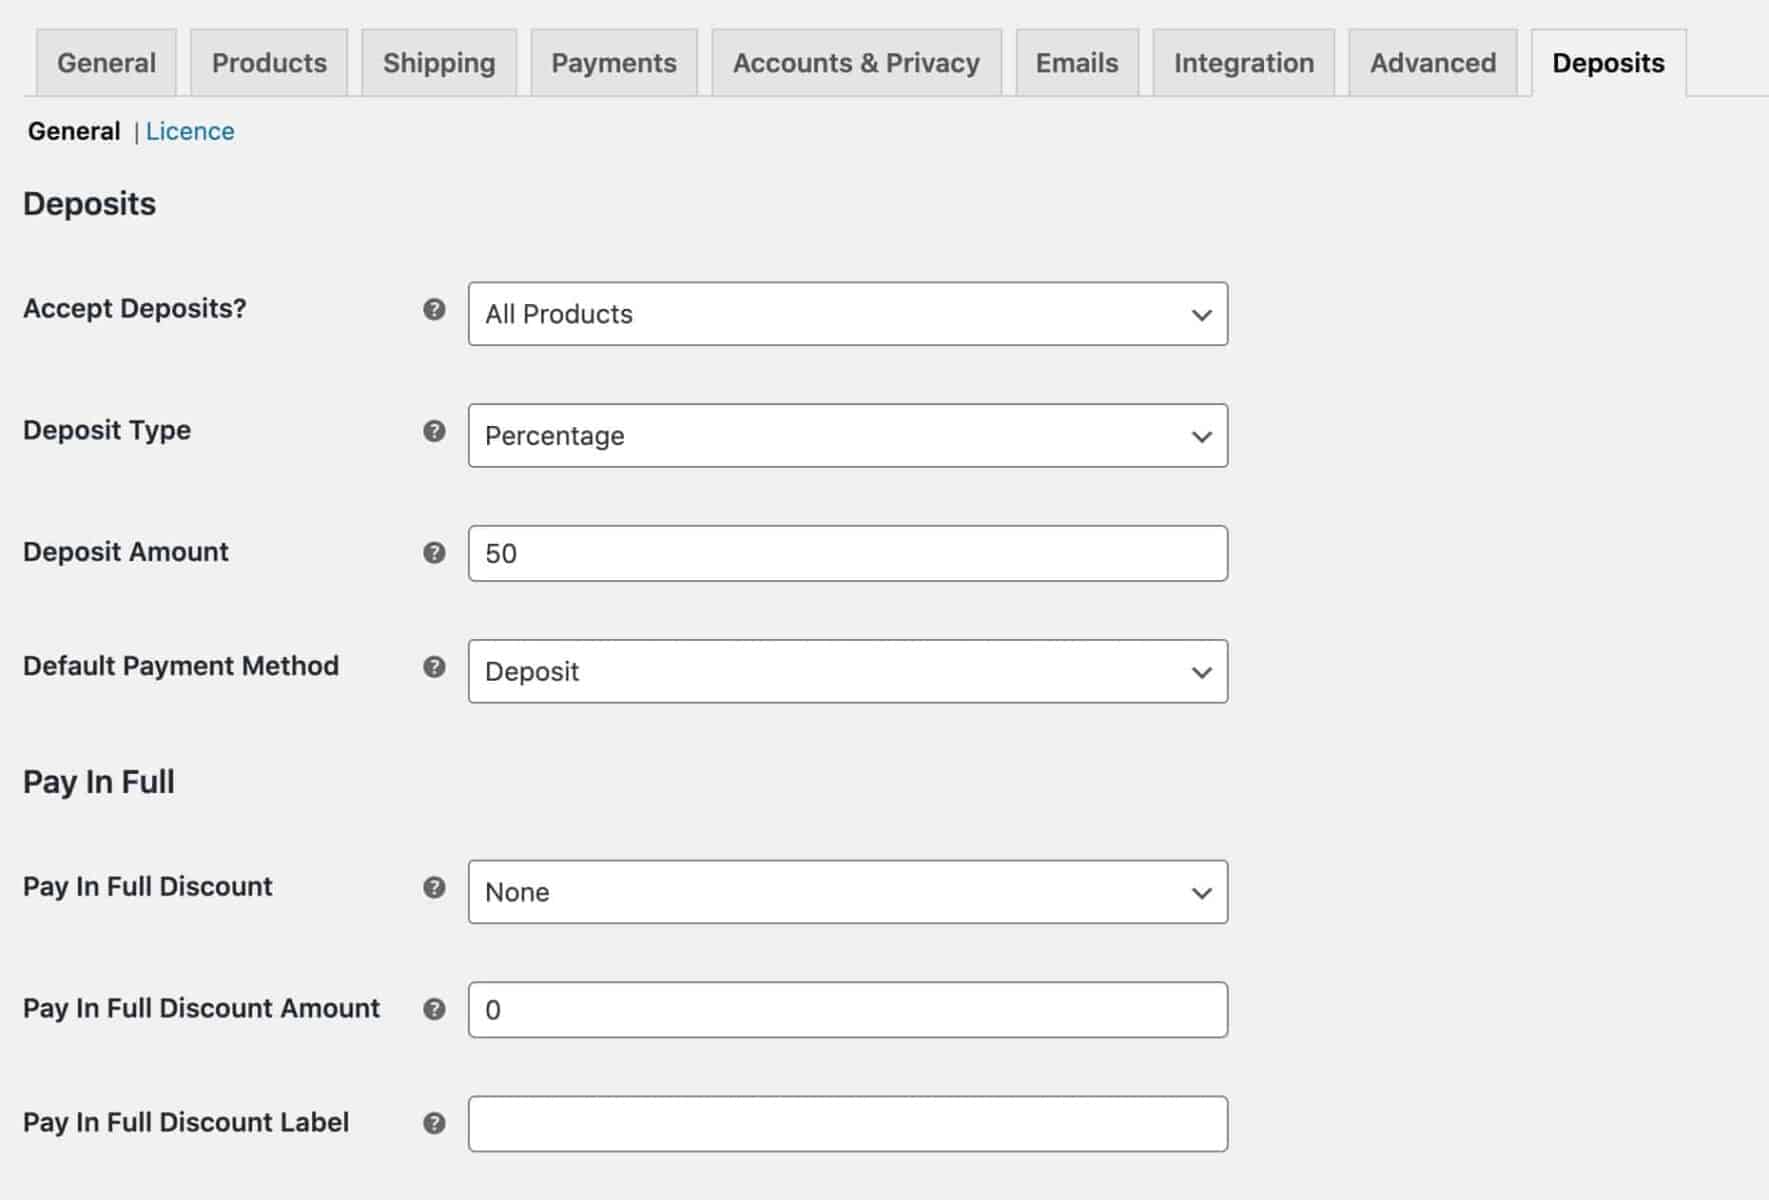
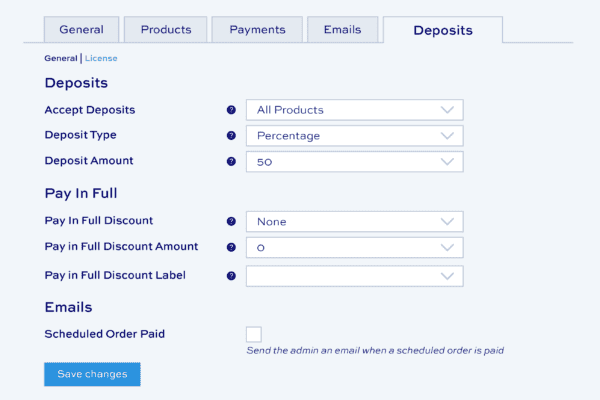
 Easy to use settings
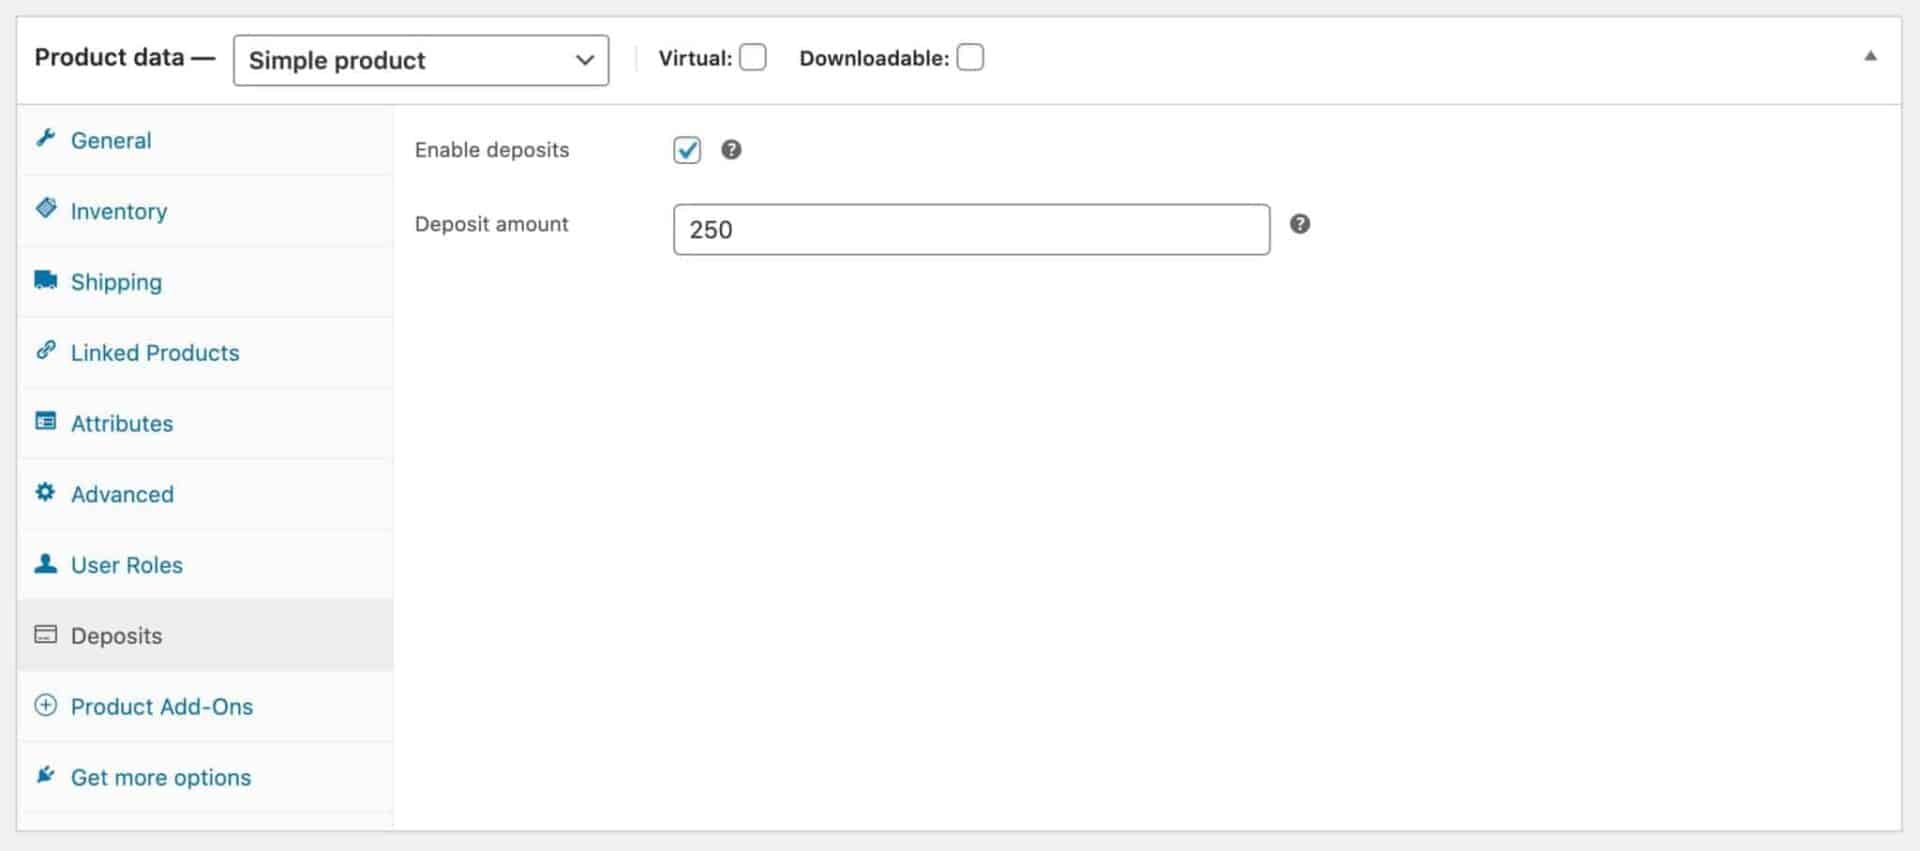
 Set different deposit amounts per product