WooCommerce Add Product – the complete guide
This is your complete guide to adding a new product in WooCommerce – everything that you need to know from the moment you click that ‘Add New’ button.
We’ll look at all aspects of adding WooCommerce products, including product types, pricing, categories and attributes. We’ll look at the ‘Product data’ section where all the key data is entered. And we’ll look at product images and galleries.
Finally, as a bonus, we’ll look at how you can extend your WooCommerce products by adding custom fields.
Related Tutorial
Do you need help installing WooCommerce? Take a look at this comprehensive article on how to set up WooCommerce

How to add a new product to WooCommerce
Let’s start right at the beginning. You’ve installed WooCommerce and you’d like to add a new product. There are a few ways you can do it:
- Hover over the ‘Products’ menu item in your WordPress dashboard. You’ll see a sub-menu appear – just click ‘Add New’
- Click the ‘Products’ menu item in your dashboard then click the ‘Add New’ button at the top of the page
- Hover over the ‘New’ menu in the admin bar and click on ‘Product’ from the sub-menu
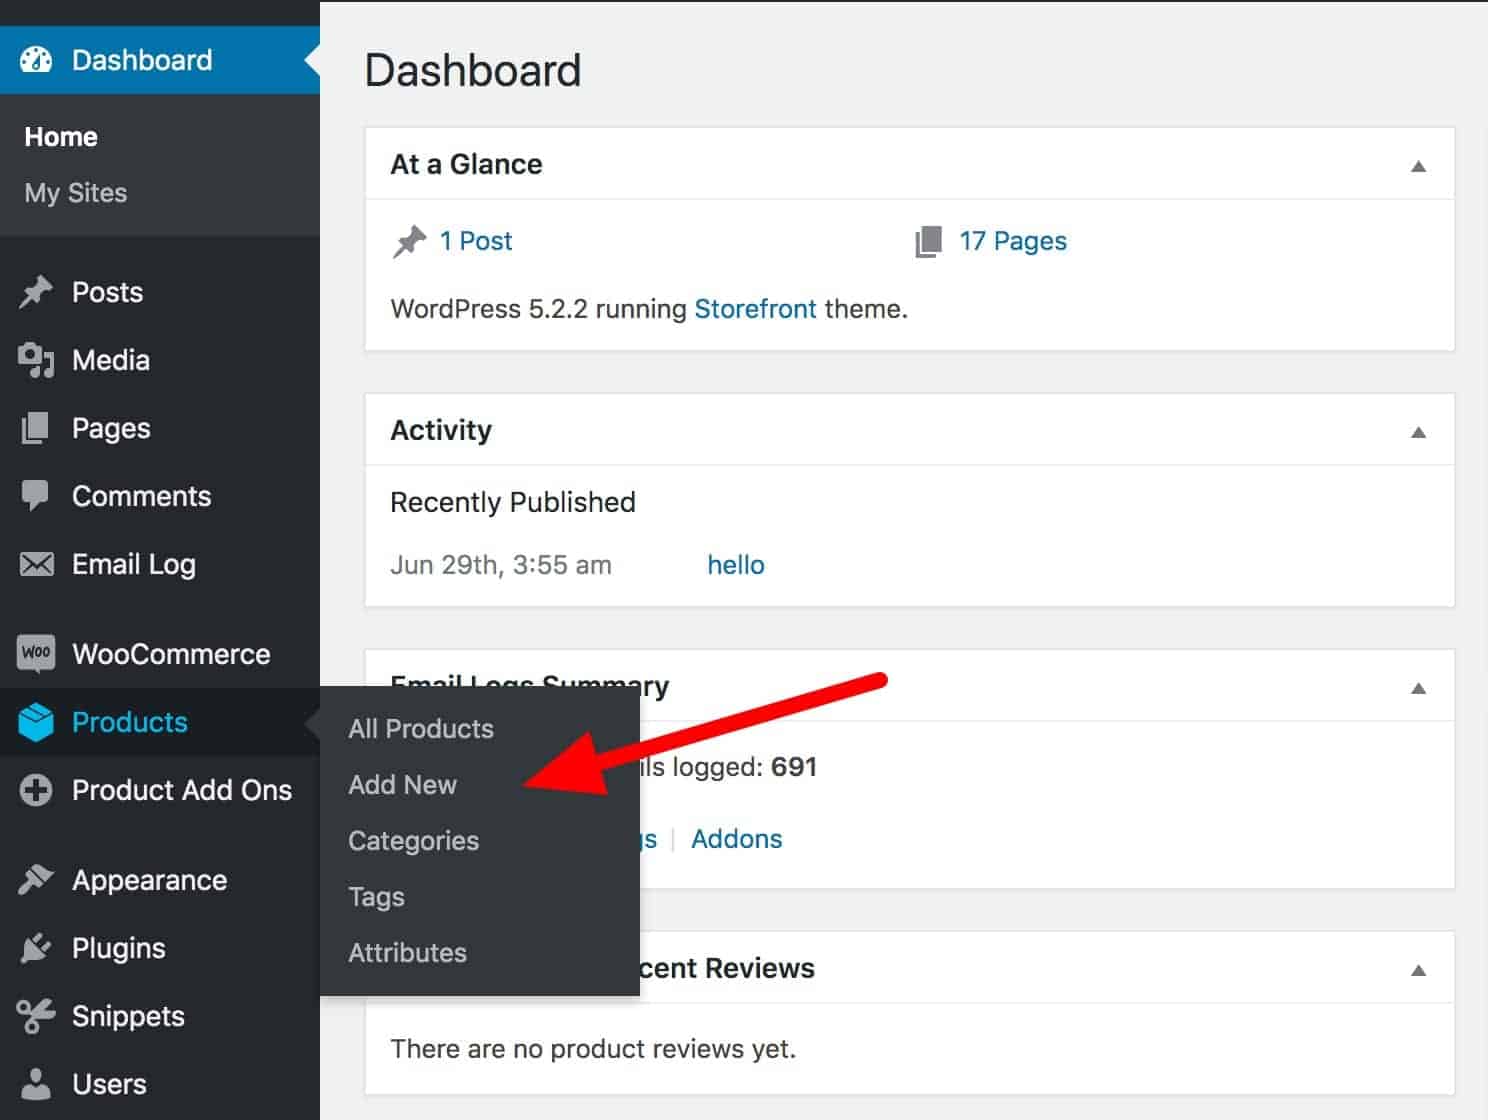
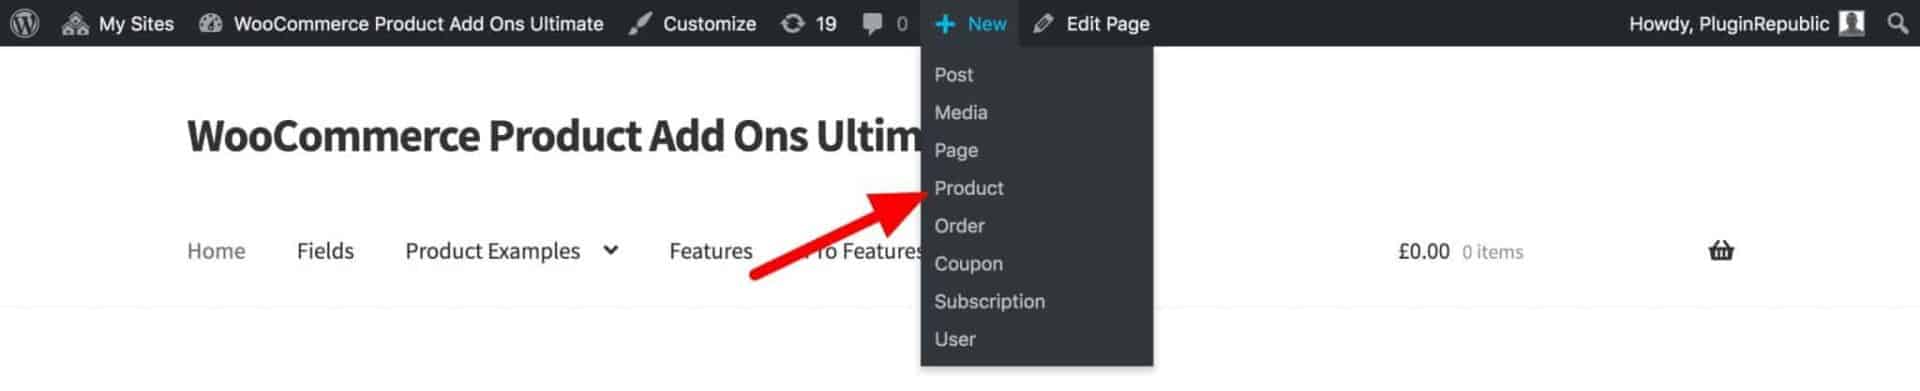
That’s it. You’ve created a new product. All we need to do now is fill in all the details.
The new product page
Let’s take a look at the blank product page you’ve just created. Much of it will be familiar to you from editing pages and posts in WordPress. We’ll concentrate on the sections that are unique to WooCommerce.

I’ve numbered the sections on the page so that we can easily refer back to this image as we discuss the different features.
Let’s get started.
Product title
This is a pretty simple place to start. Just like a new page or post, enter your product title in the field marked ‘1’ in the image above.
In most themes, the product title will appear above or to the side of the product image.

The main content and the product short description
The main content area, marked ‘2’ in the image, is where you would normally enter your content when you’re writing a blog post.
WooCommerce works slightly differently in that it has two content areas: the main product description and the ‘Product short description’ (marked ‘3’).
In most themes, the short description will appear with the product title and price at the top of the page. The main content will actually appear in the product tabs below.
In this image, the content indicated by the top arrow is the ‘Product short description’. The content indicated by the bottom arrow is the main content.
Check out this article if you’d like to know how to display the main content instead of the short description.
WooCommerce product types
Before we can take a detailed look at the next section on our page, we need to examine the different ‘product types’ available in WooCommerce.
You can see in the ‘Product Data’ section, marked ‘4’ in the main image above, that there is a row of fields above the tabs.
These fields allow us to define what type of product we are adding. By default, when you add a new product in WooCommerce you can choose from the following product types:
Simple product
A simple product is the default product type and by far the most common type. It doesn’t have any variations, it’s just a simple object, e.g. a packet of biscuits.
Grouped product
A grouped product is a way of combining sets of simple products, which could still be purchased independently. An example of this might be a case of mixed wine.
External/affiliate product
An external or affiliate product isn’t actually hosted on your site. You can add it as a product via WooCommerce but it’s actually sold elsewhere, e.g. on Amazon.
Variable product
A variable product has multiple variations. Think of a product like a shirt which might come in different sizes and colours.
You can add it as a single product but then define each variation separately with differing prices, stock, etc.
You can also take a look at this article on WooCommerce variable products.
Virtual product
Virtual products don’t require shipping. Consultancy services are a good example of virtual products.
Downloadable product
A downloadable product also doesn’t require shipping; instead the customer will download a file. Typical examples are music files or stock images.
Now we understand the different types of product we can add in WooCommerce, let’s look at defining all our product data.
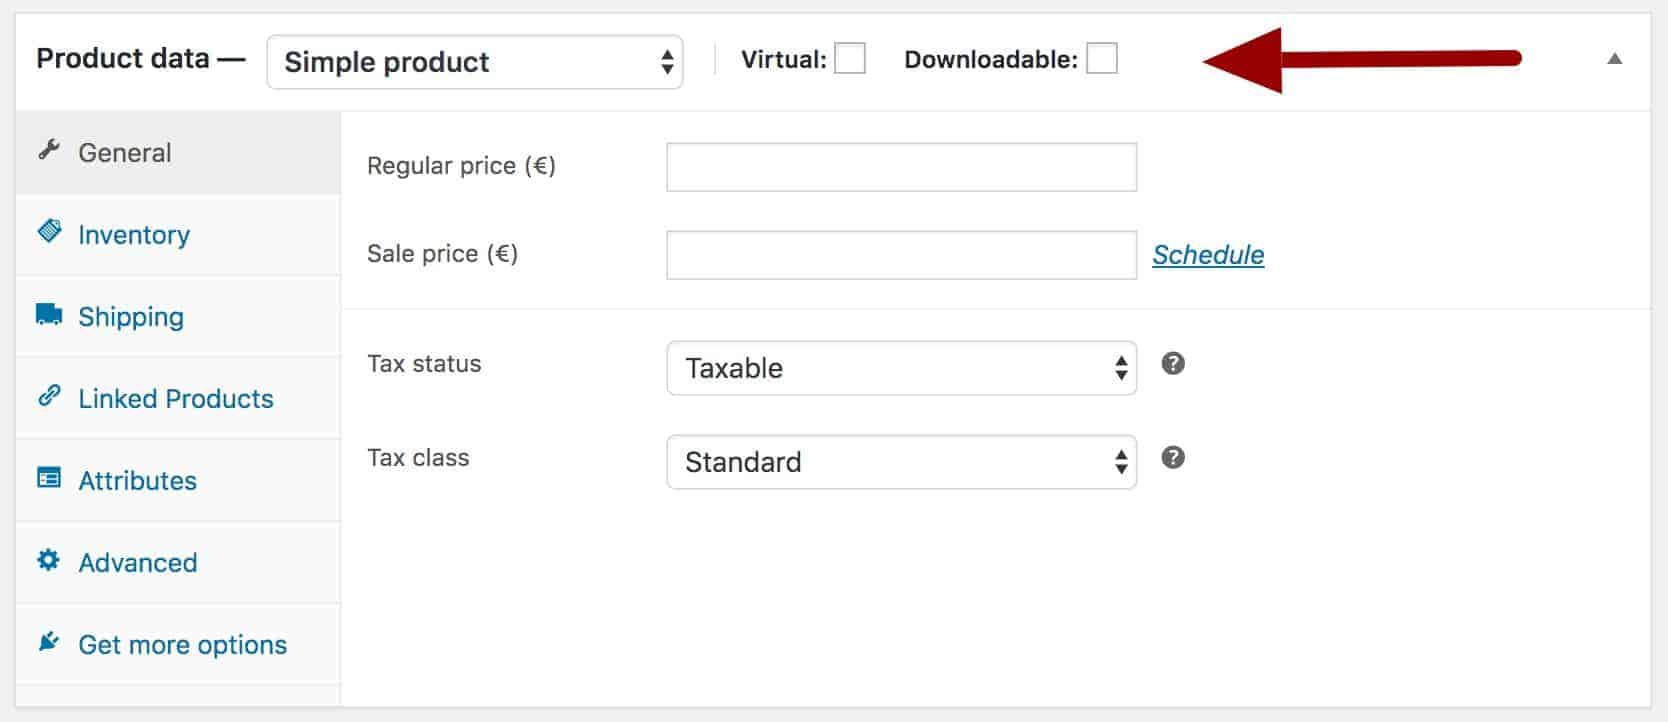
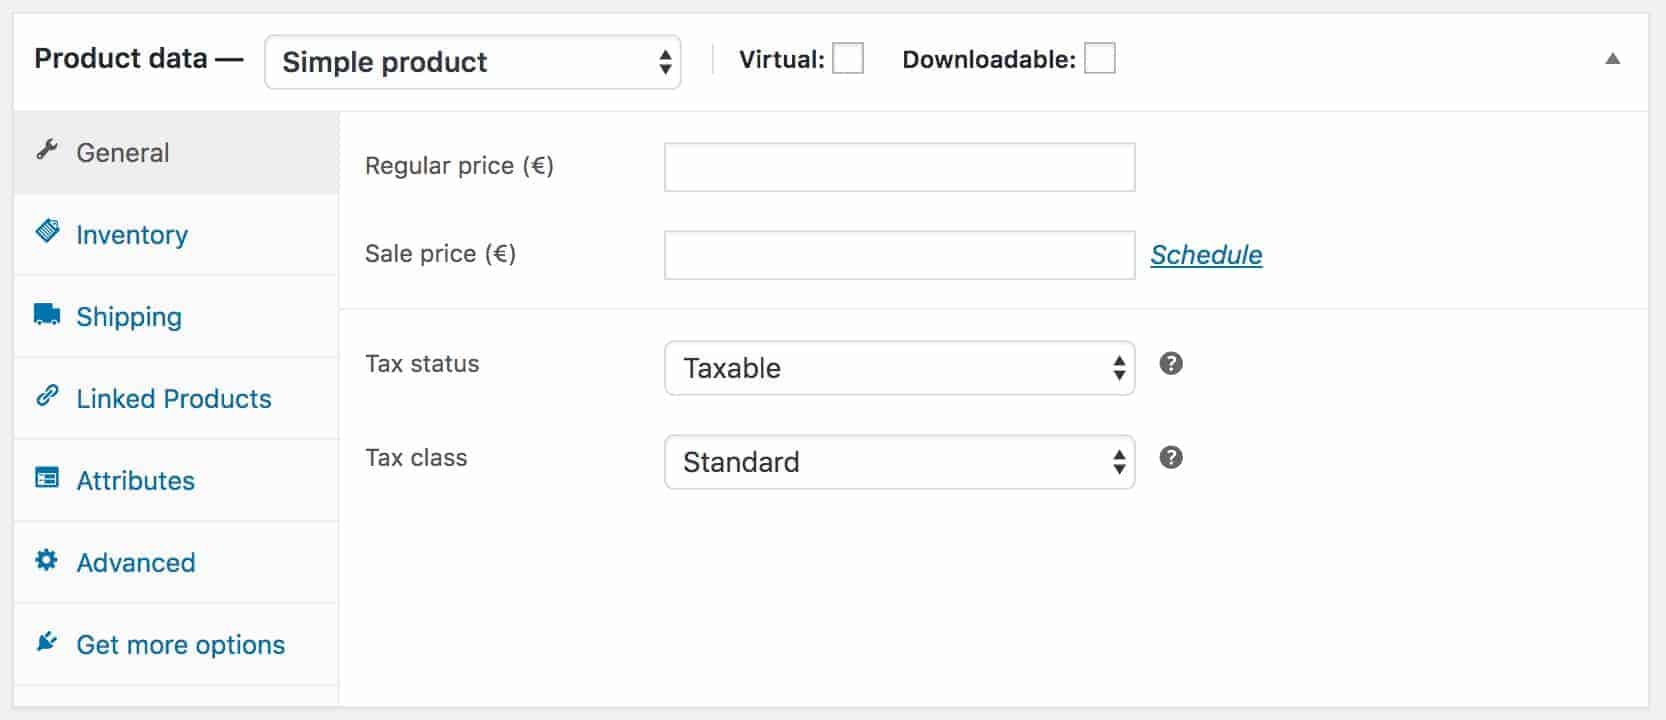
The WooCommerce Product Data section
The ‘Product Data’ section is where you can add all the most important information about your product, including price, stock, SKUs, etc. It’s marked ‘4’ on the main image above.
The ‘Product Data’ section is comprised of several panels, each accessed by the tabs down the left hand side. Note that the tabs and the content of the panels will change slightly depending on the product type you’ve selected.
We’ll look at each tab in turn.
WooCommerce product general settings
When you add a new product in WooCommerce, the product type will be set to ‘Simple product’ by default. On the ‘General’ panel of the Product Data section, you’ll see the following options.
Regular price
The price is maybe the most important single piece of data for your product. When you add a new WooCommerce product, you enter its price in the ‘Regular price’ field.
Sale price
If your product is on sale, enter its reduced price in the ‘Sale price’ field. You can schedule dates for your sale by clicking the ‘Schedule’ link next to the field. This will reveal a calendar where you can set start and end dates.
Tax status
The ‘Tax status’ field allows you to specify whether a product is taxable or not.
Tax class
If the product is taxable, you can define its tax class here.
General settings for variable products
I mentioned above that the Product Data panels change content depending on the product type. If you have chosen ‘Variable product’ as the WooCommerce product type when you add your product, the price fields will disappear from the General panel. Instead, you’ll set the price on the ‘Variations’ panel.
WooCommerce product inventory settings
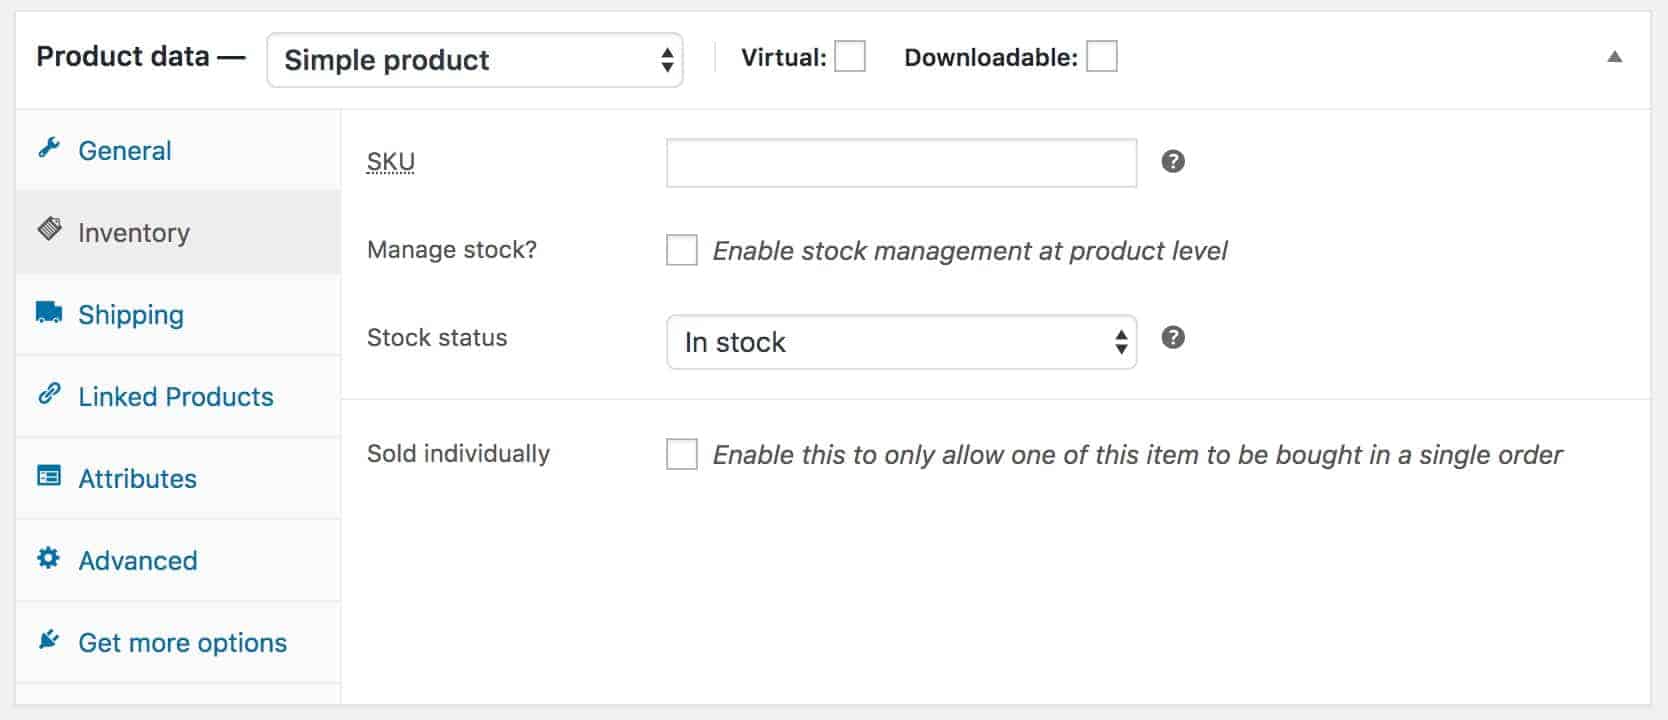
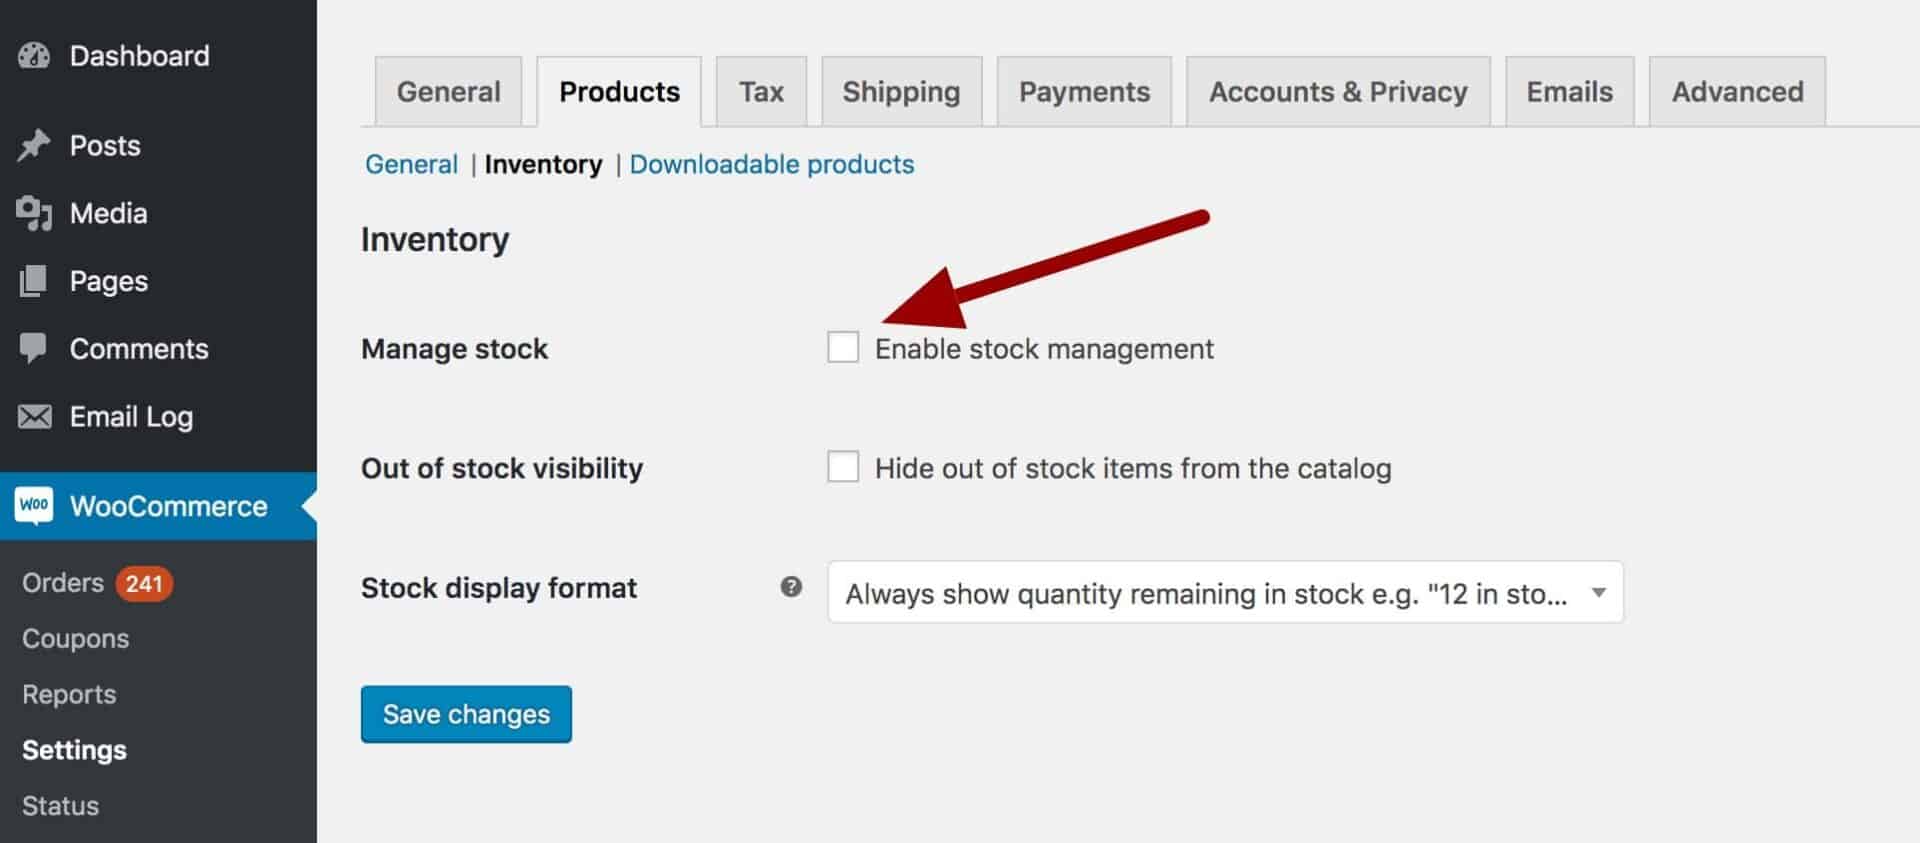
The inventory settings allow you to control and manage your product’s stock.
If you don’t need to worry about stock levels, you can disable the inventory settings in WooCommerce > Settings > Products > Inventory. Just deselect the ‘Manage stock’ option.
However, if you are managing your stock, you have the following settings available to you:
SKU
SKU stands for Stock Keeping Unit. This is a unique code for each product that you can use to track your stock.
Manage stock?
You can check the ‘Manage stock’ option to control your stock at product level. Selecting this option presents you with some further fields, as below:
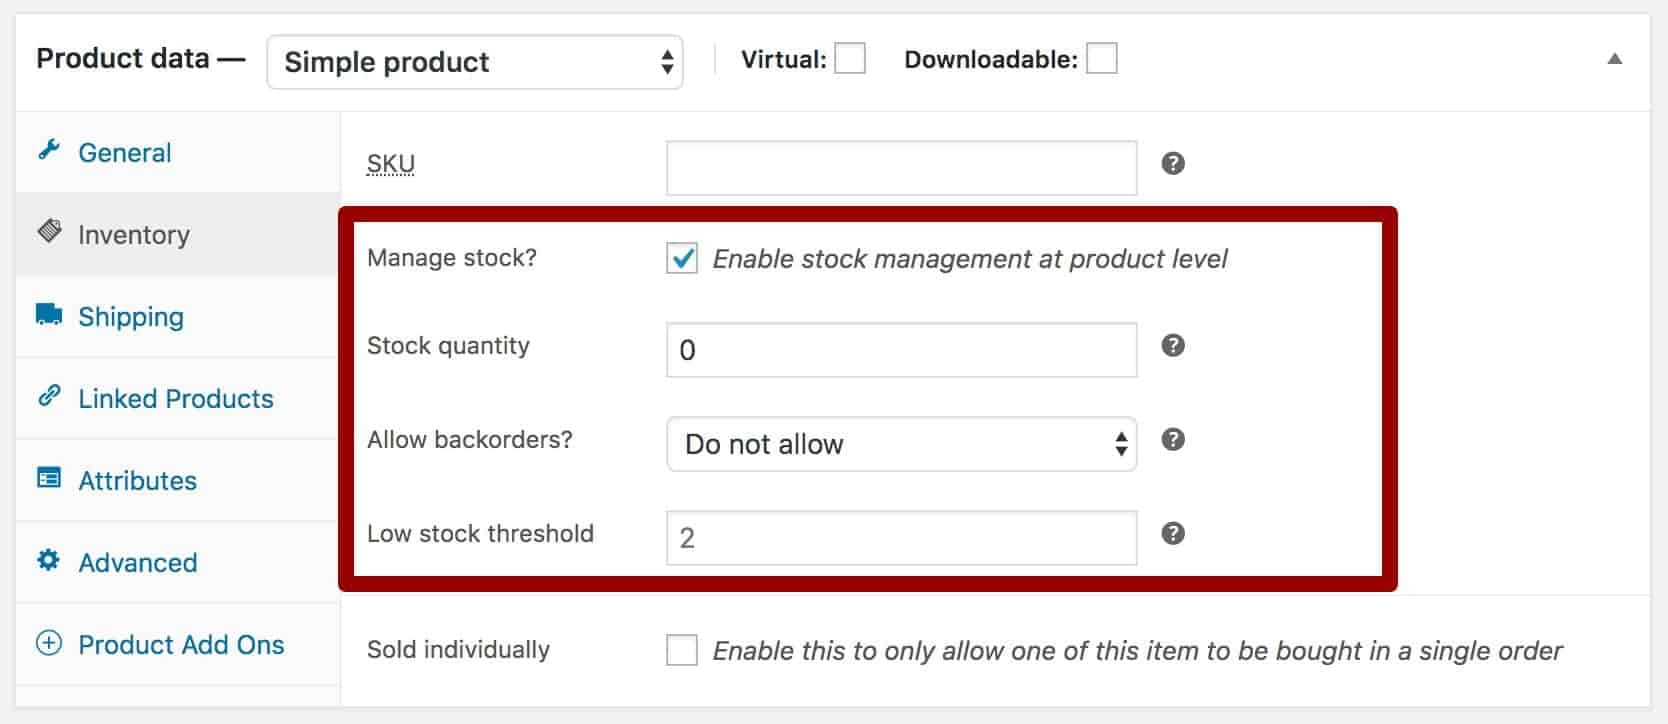
Stock quantity
Enter the number of items you have in stock.
Allow backorders?
If you choose to allow back orders then customers will still be able to purchase your product, even when it’s out of stock. You’ll just supply the order once the product comes back into stock.
If you don’t allow back orders, then customers won’t be able to purchase products that are out of stock. Products will be indicated as out of stock on the front end.
Low stock threshold
You can use the ‘Low stock threshold’ to notify yourself when a product gets low on stock. When the stock level reaches the figure entered here, you’ll receive an email.
Stock status
The ‘Stock status’ field is only displayed if ‘Manage stock’ is deselected. You can use this field to define whether a product is in stock or out of stock, without worrying about actual stock levels.
Sold individually
Finally, you can set a purchasable limit on a item. Check this field if you only want to let a customer buy one item in a single order.
WooCommerce product shipping settings
When you add a new product to WooCommerce, you’ll need to enter some shipping settings – assuming it’s a physical product.
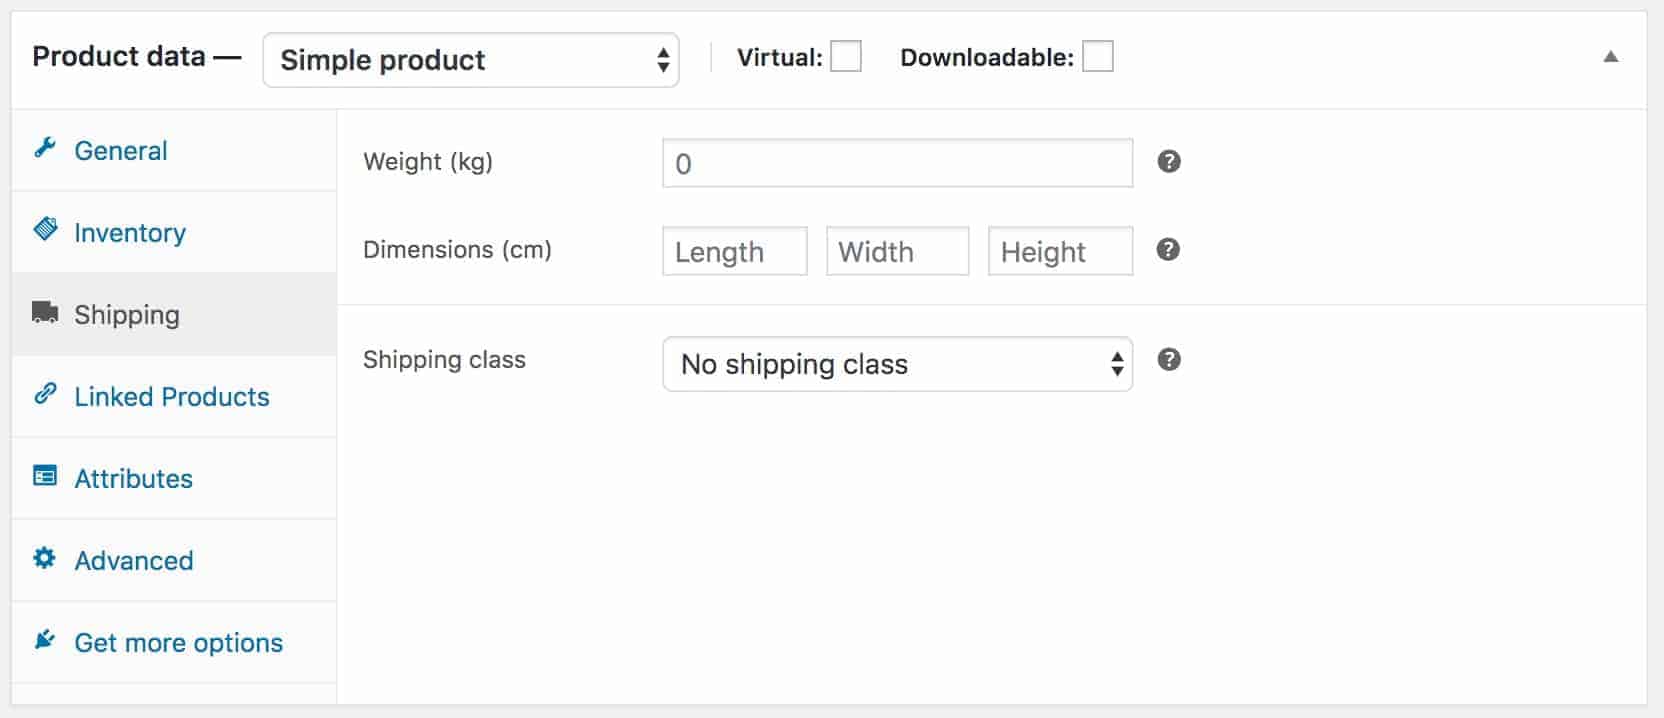
The settings here should be pretty self-explanatory:
Weight
When you set up your store, you will have chosen the units for weight. If your shipping methods are based on weight then just enter the product’s weight in this field.
Dimensions
Again, you’ll have chosen the units for dimensions when setting up your store. If your shipping method is based on the size of products, enter the product’s dimensions here.
Shipping class
You can apply different shipping rules to specific products using ‘shipping classes’. If your new product requires a different shipping class, then set it here.
There’s more information about shipping classes here.
WooCommerce Linked Products settings
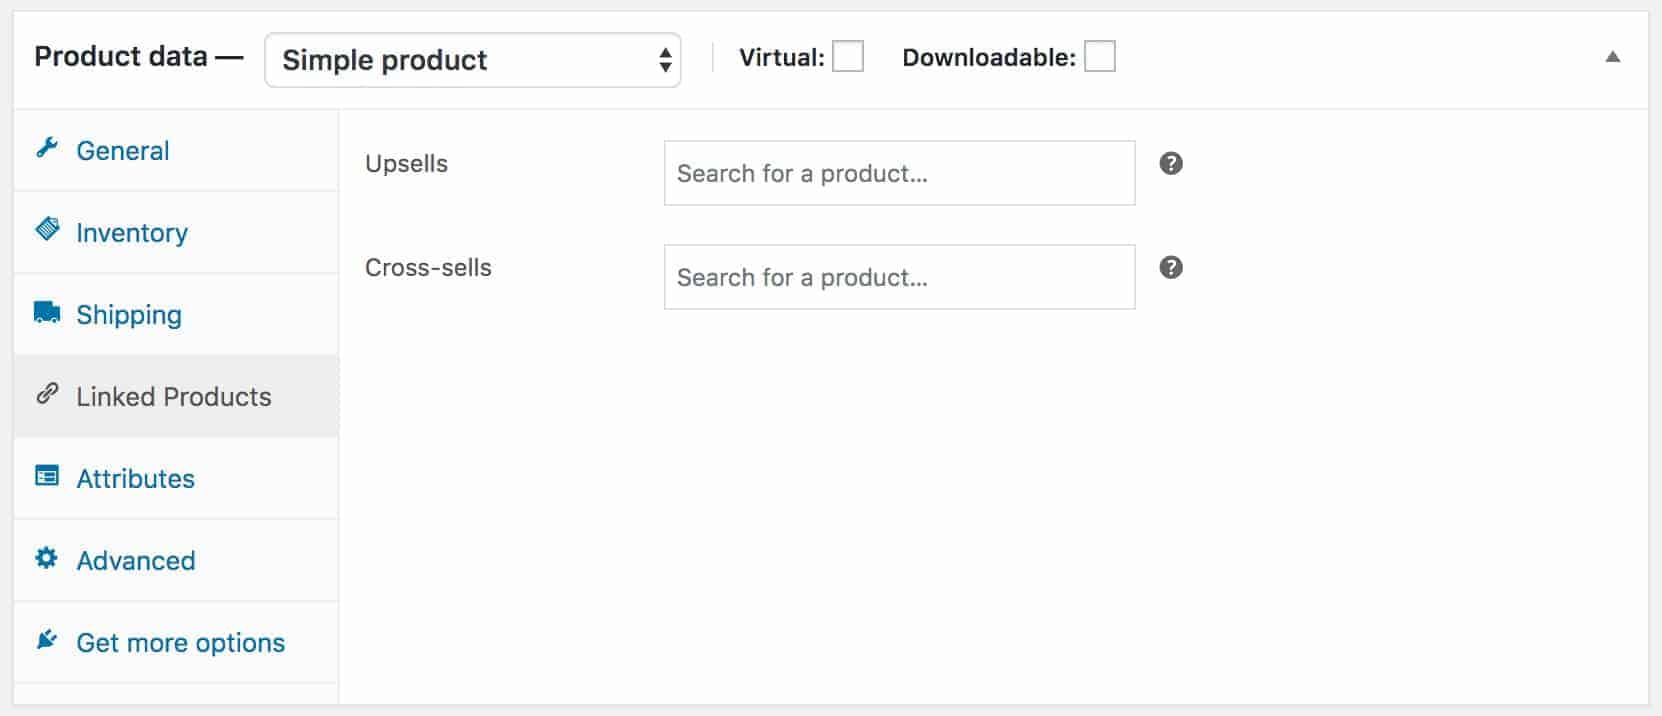
The ‘Linked Products’ settings panel allows you to promote your products to your customers, either by encouraging them to buy more products or to buy other, more expensive products.
Upsells
You can use the ‘Upsells’ field to suggest alternative products to the current product. Typically, the products you recommend would be more profitable.
Upsell products are displayed on the product page. The exact location will depend on your theme but they should be positioned so that the customer can clearly see them.
Cross-sells
Cross-sells are slightly different to upsells. A cross-sells product is a products that complements another product. For example, if the customer has bought a new pair of trainers, you might suggest some laces or cleaning products as a cross-sell.
Cross-sells are displayed on the cart page rather than on the single product page.
In both fields, you can just start typing the name of the product and WooCommerce will find it for you.
WooCommerce product attributes settings

Attributes are a way of grouping products. A typical example of an attribute for a shirt would be ‘Size’.
Each attribute will have terms. So, in the example of the ‘Size’ attribute there would be ‘Small’, ‘Medium’ and ‘Large’ terms.
You can assign attributes to your products. These can be used on the front-end to filter products and/or they can be used for variable products.
Attributes for simple products
If your new product is a simple product, then attributes are just used to provide extra information about the product.
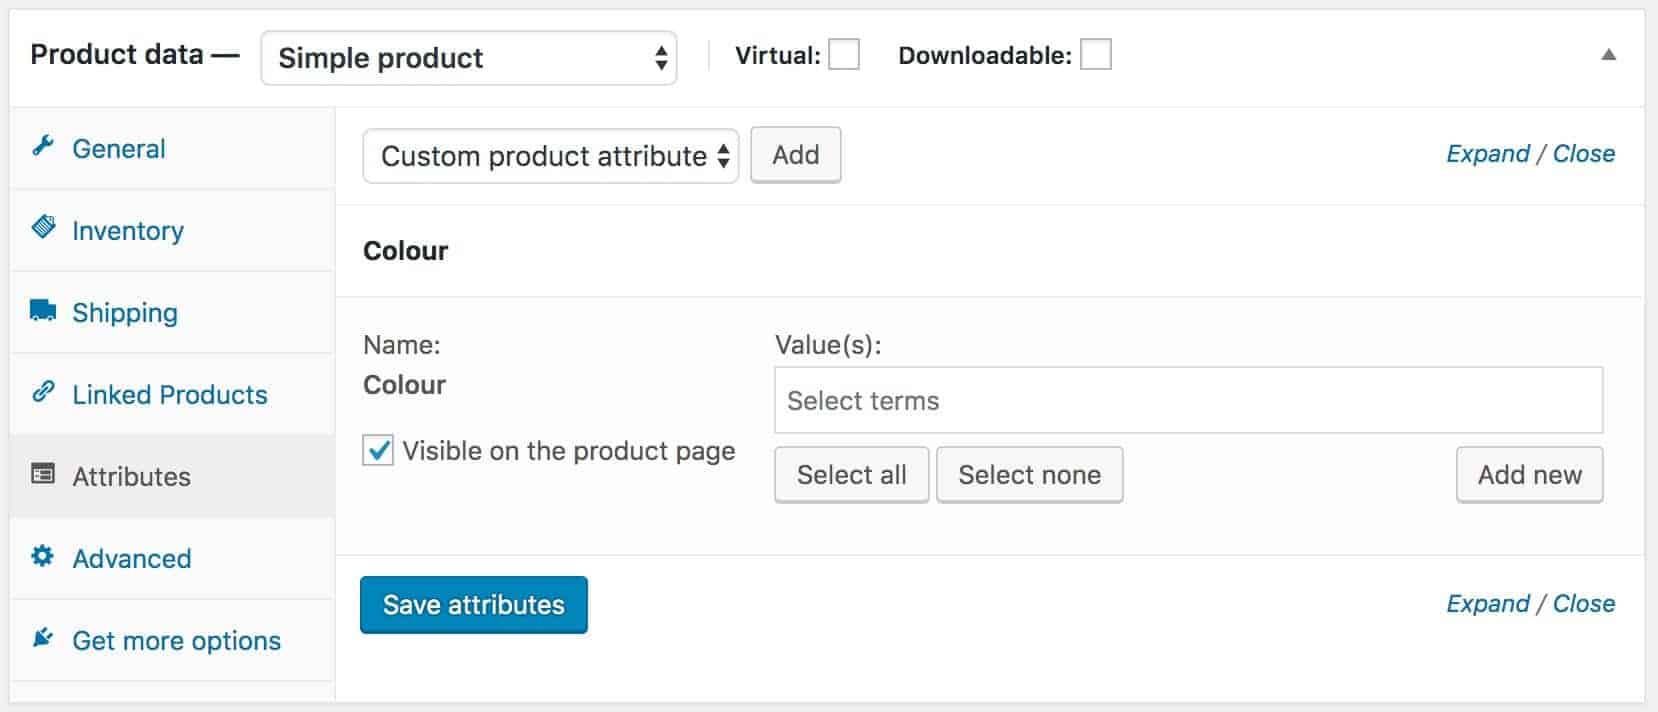
From the ‘Custom product attribute’ field, you can choose a pre-existing attribute or you can create a custom attribute that will be unique for this product. Click ‘Add’.
A new section for the attribute will appear. In the ‘Value(s)’ field, type the terms that will apply to this product.
If you don’t want the attribute’s terms to be displayed on the front end, deselect the ‘Visible on the product page’ field.
Attributes for variable products
If your product is variable, the ‘Attributes’ settings are essential. Note that you will see another field – ‘Used for variations’.
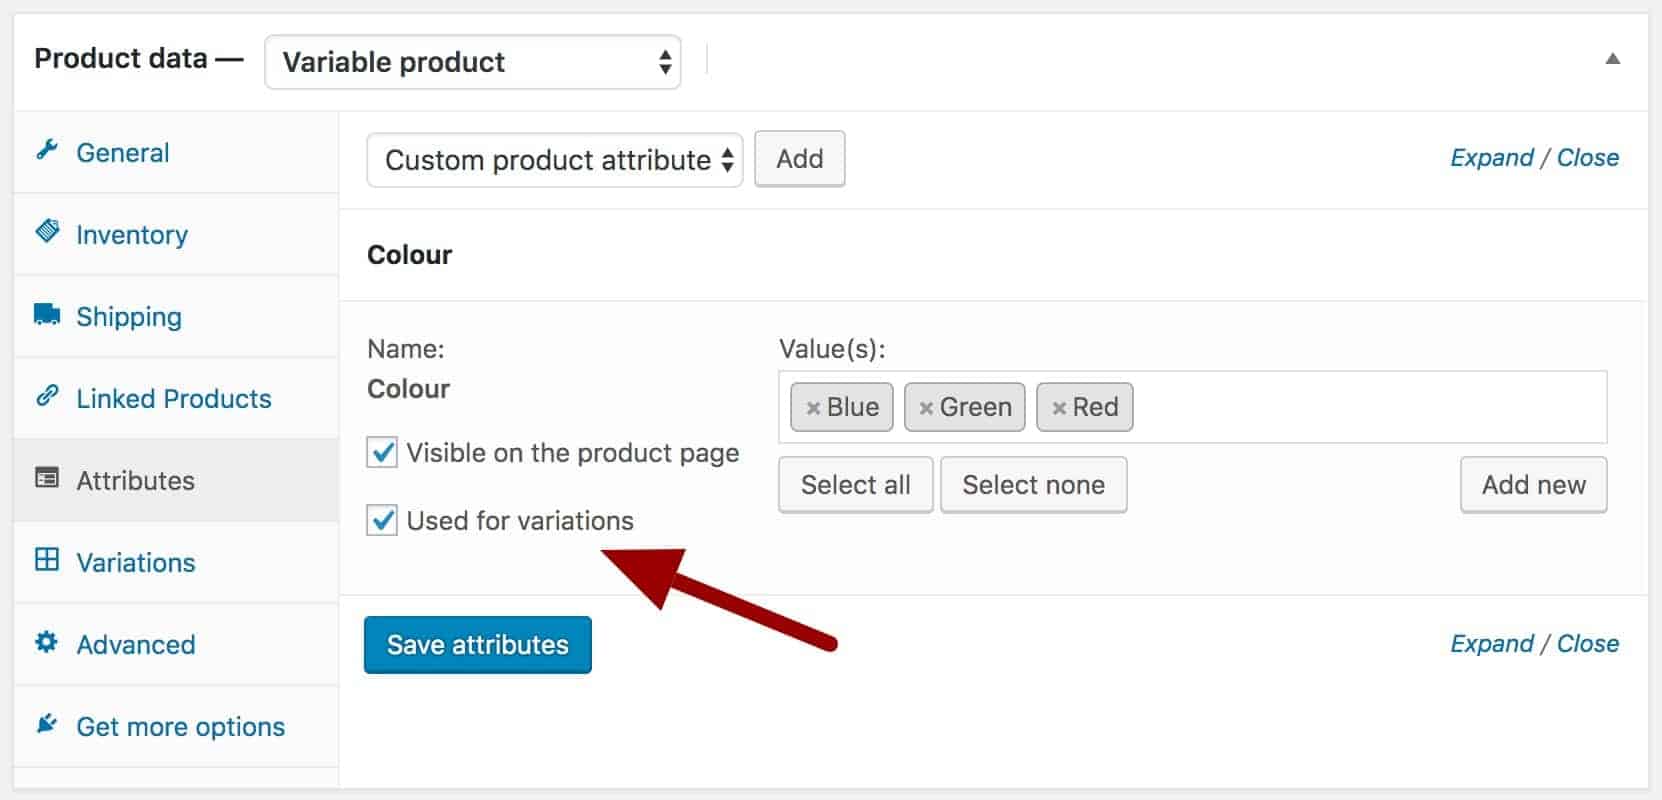
Select this field if you are using this attribute’s terms to define your products variations.
WooCommerce Variations settings
As I mentioned, there’s a dedicated article on variable products in WooCommerce here.
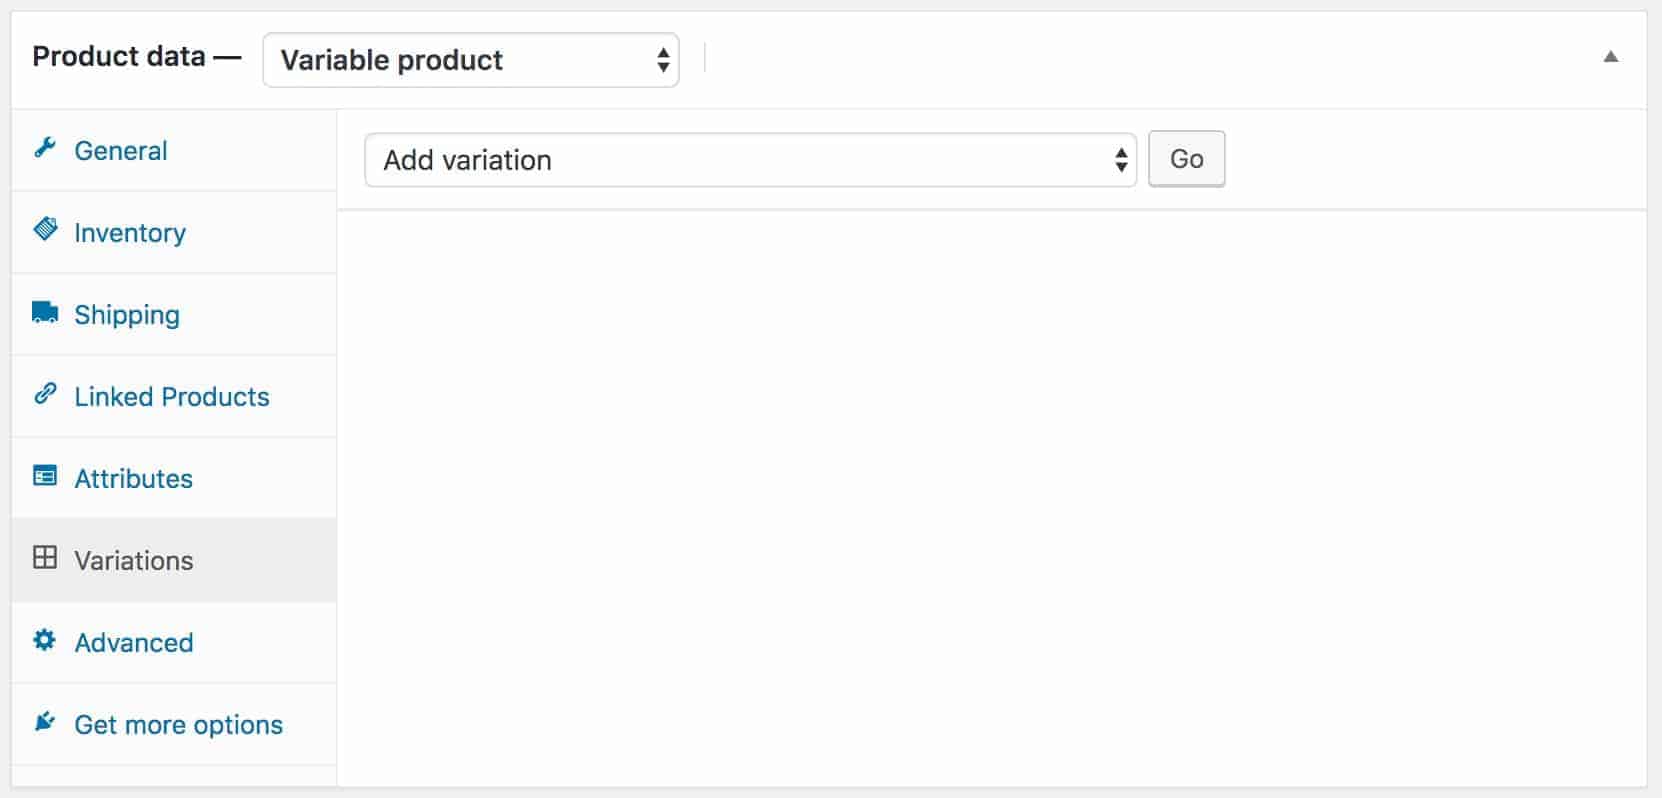
After you have assigned attributes to your variable product, click on the ‘Variations’ tab to add the variations. You can either do this individually, term by term, or you can choose to ‘Create variations from all attributes’.
You can now add data to each variation in the same way that you would for a simple product.
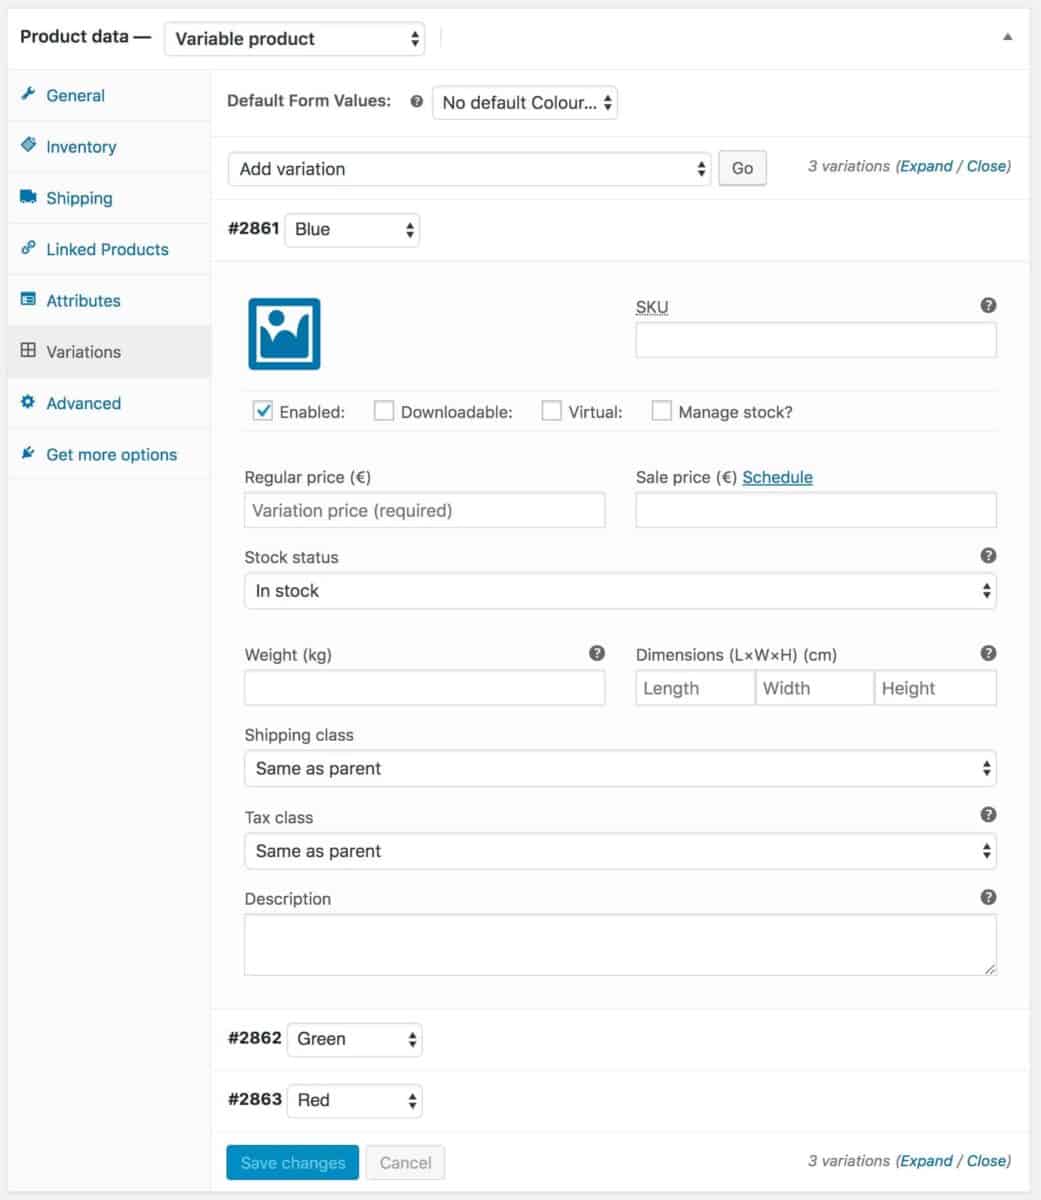
All the same data that we’ve looked at for simple products, like stock management, shipping and tax, can be updated for each variation.
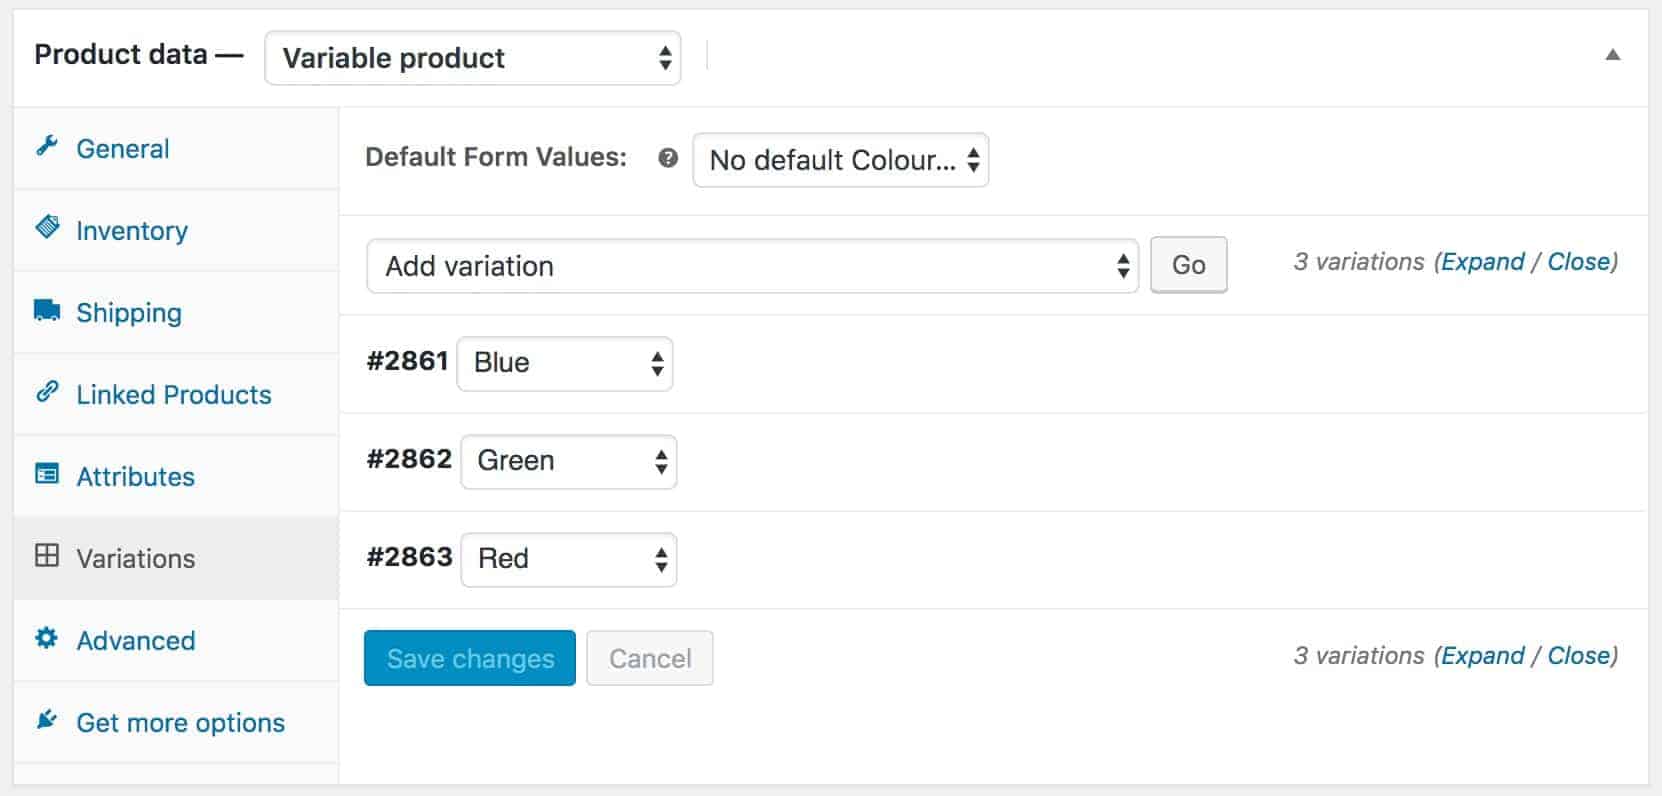
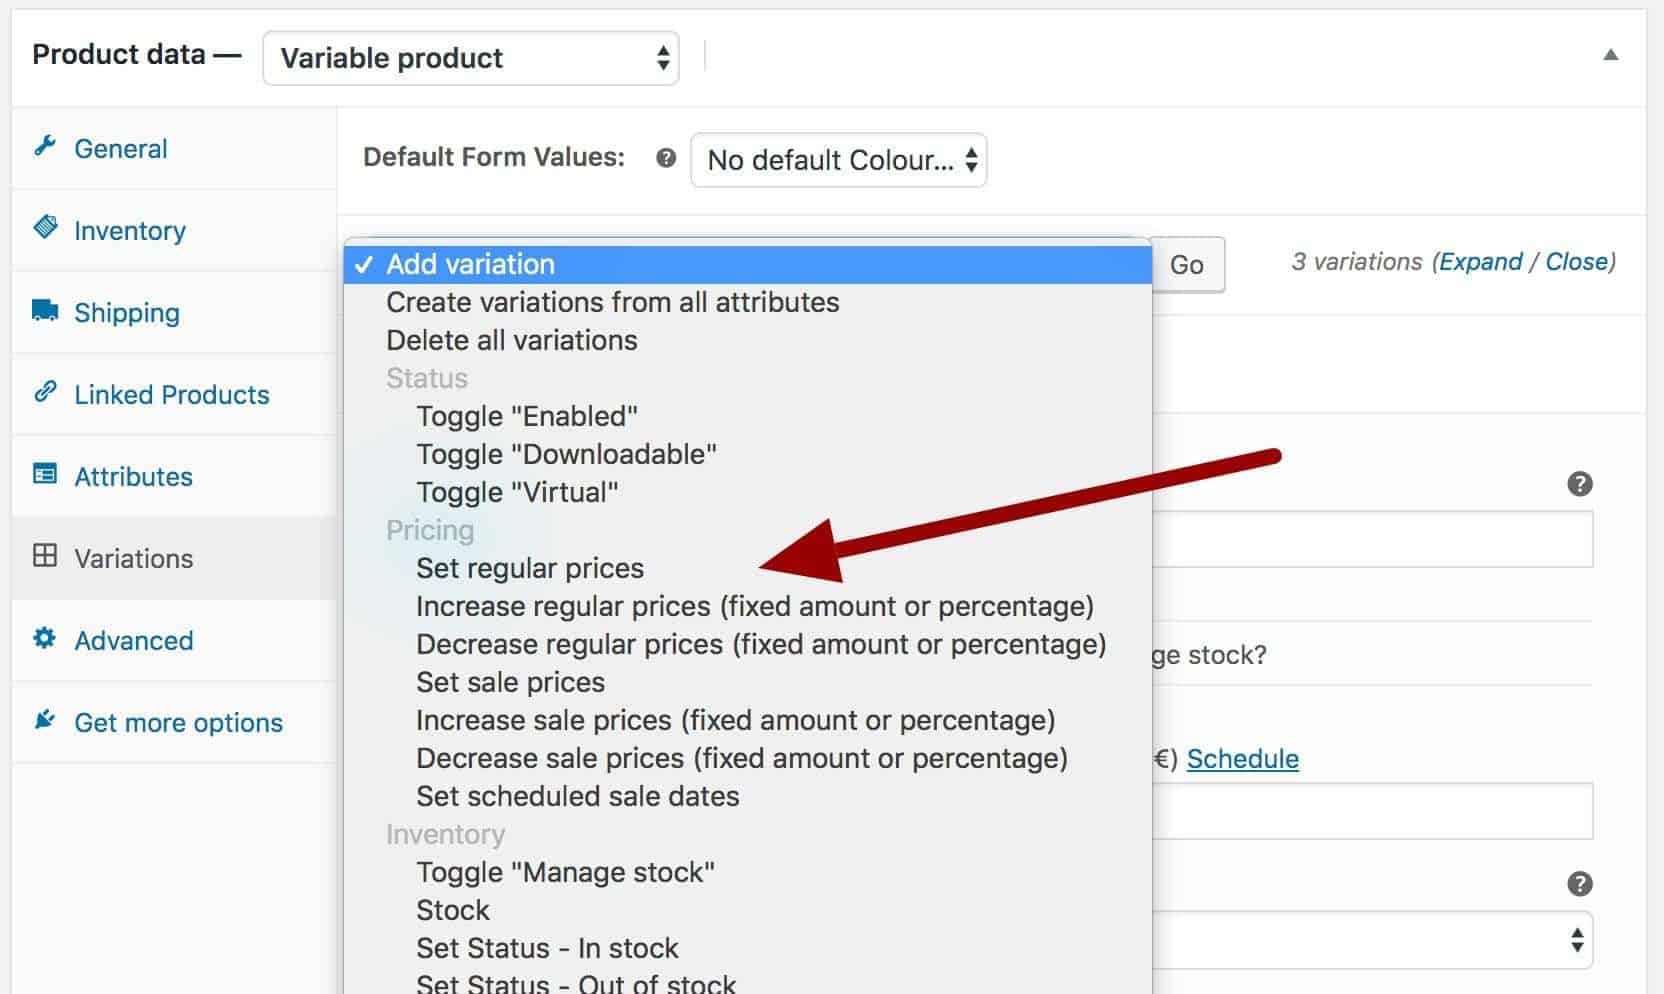
Updating multiple variations
Often, your products can have many variations yet much of their data is the same. For instance, you might be selling a shirt in a number of different colours but the price is always the same.
To edit multiple variations’ settings in one hit, click the ‘Add variation’ select field and choose the action. In this example, we’re going to set the regular price to the same value for all our variations.
WooCommerce product advanced settings
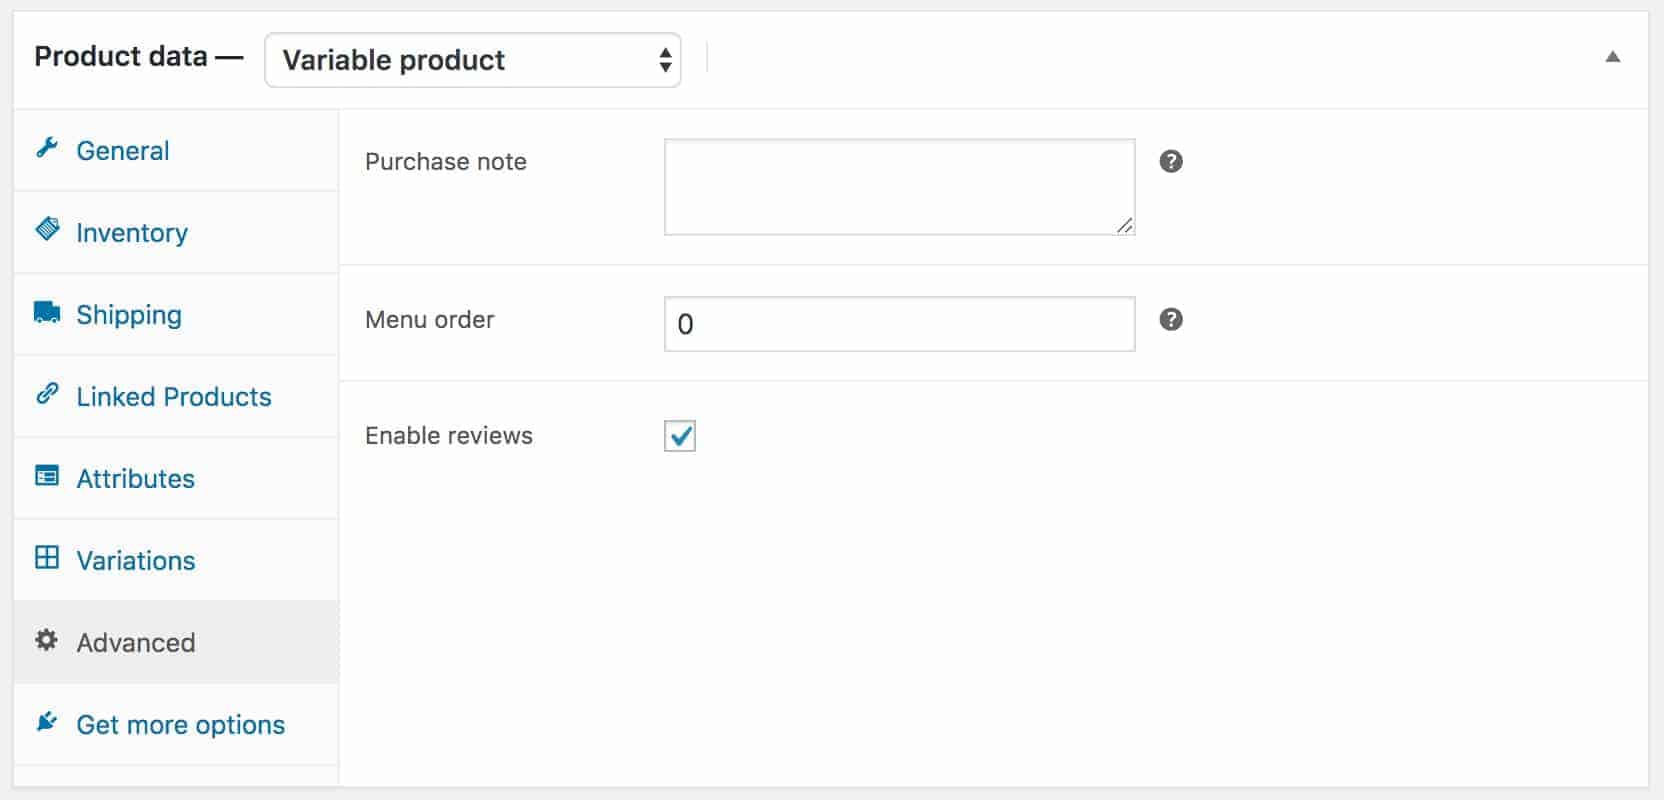
The ‘Advanced’ settings aren’t particularly advanced. There are just some different options here that don’t fit comfortably in the other panels.
Purchase note
You can add some text to your new product that will be sent as part of the confirmation email to the customer when they purchase the product.
Menu order
If you are using custom ordering for your products in the shop and category archives, you can define a menu position for the product here.
Enable reviews
If you have reviews enabled in your store, you can deselect this field if you don’t want to accept reviews for this product.
WooCommerce Product Categories
If you are used to using categories when writing blog posts, then WooCommerce Product Categories (marked ‘5’ in the image at the top of the post) should be familiar to you.
Like attributes, product categories are a way of grouping and organising your products. For example, if you are running a clothing store you might have categories for ‘Shirts’, ‘Trousers’, ‘Coats’, etc.
Products can belong to one or more categories. You can also create sub-categories – so in your ‘Shirts’ category you might have sub-categories for ‘Formal shirts’, ‘Casual shirts’, etc.
To add a new category, just click the ‘Add new category’ link.
WooCommerce Product Tags
As with product categories above, WooCommerce product tags (marked ‘6’ above) work in the same way as post tags. Tags are another way of organising your products into groups.
However, unlike categories, tags are not hierarchical – meaning that they don’t have sub-tags.
Tags are a good way of linking products across categories. For instance, you might have categories for ‘Shirts’, ‘Trousers’, ‘Coats’ and want to link certain products with the same design across those categories. You can use tags for this.
WooCommerce product image
The WooCommerce product image, marked ‘7’ above, is the equivalent of the featured image in your posts. Themes will usually display this above or next to the product title, price and short description.
To add a product image, click the ‘Set product image’ link. This will open the WordPress media manager. You can either choose from an image in the library or upload a new one.
WooCommerce product gallery
The WooCommerce product gallery, marked ‘8’ above, allows you to add multiple images to the same product. Use the gallery to show off your product from different angles or in different situations.
How the gallery is displayed on the front end will depend on the theme you’re using.
To add images to the product gallery, click the ‘Add product gallery images’ link. You can select multiple images and add them in one hit.
To re-order images in the gallery, just drag and drop.
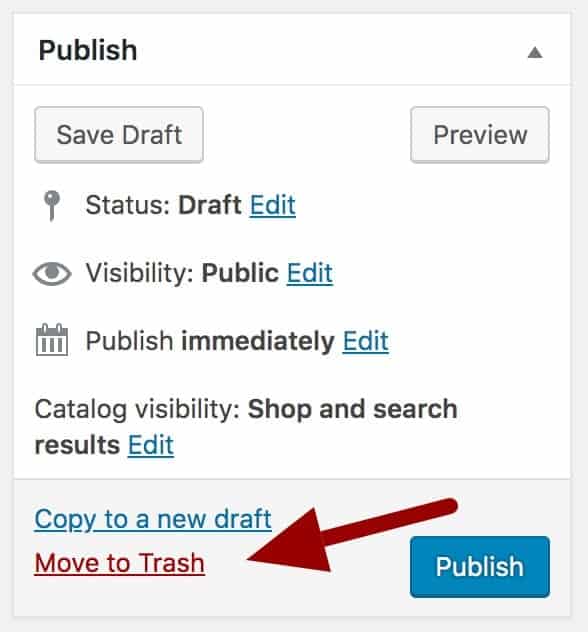
Publishing your new WooCommerce product
When you’ve entered all your product data, you’re ready to publish the product. However, there are a few settings still left to look at.
Take a look at the ‘Publish’ section, marked ‘9’ in the image above.
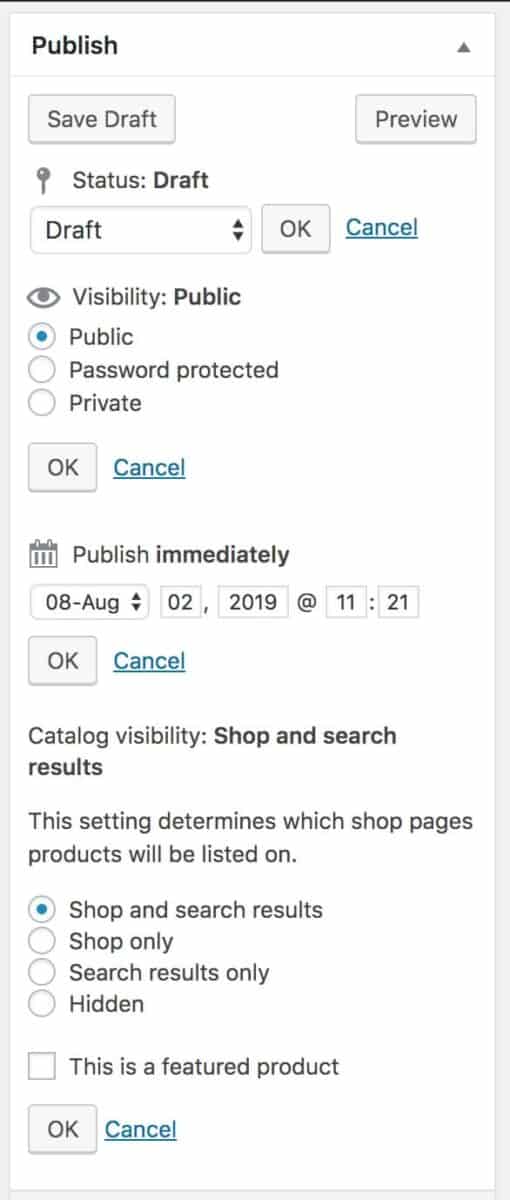
Password protected products
If you would like to protect your product from the general public and only access to it via a password, you can set its visibility to ‘Password protected’. There is more information about options for password protecting products here.
Catalog visibility
You can also choose where your product will appear – either in the shop and archives, in search results, or to be hidden.
By the way, click here for a detailed post on WooCommerce hidden products.
WooCommerce featured product
You can define your product as ‘featured’ by selecting the ‘This is a featured product’ option. Some themes will allow you to display featured images in dedicated sections on the home page.
How to duplicate a WooCommerce product
When you’re adding a new WooCommerce product, you might find that you’re repeating a lot of information from one product to the next. An easy way to save yourself time is to duplicate an existing product, then update the bits that are different.
You can duplicate a WooCommerce product in a couple of different ways:
- From the ‘Publish’ section of a product page, select ‘Copy to a new draft’
- From the ‘Products’ list, hover over an existing product and select ‘Duplicate’
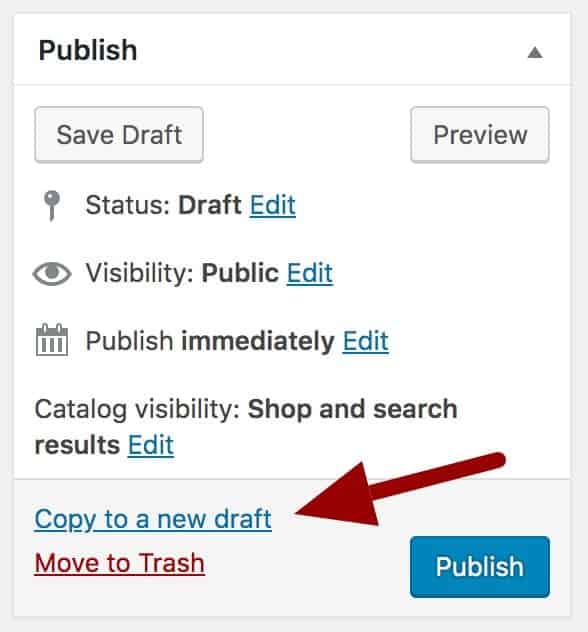
How to delete a WooCommerce product
If you want to delete a WooCommerce product, just click the ‘Move to Trash’ option in the ‘Publish’ section.
How to restore a deleted WooCommerce product
If you’ve deleted a product by mistake, you can easily restore it. To restore a deleted product, click the ‘Trash’ link above your products list.

How to extend WooCommerce products with extra options
Finally, let’s look at some functionality that extends the standard WooCommerce plugin. If you’d like to let your customers customise your products, you can use the WooCommerce Product Add-Ons Ultimate plugin.
This will allow you to add input fields, like text, date, select, radio groups, to your products so that your customers can enter information to personalise products.
There’s more information on adding custom fields to WooCommerce products here.

WooCommerce Product Add-Ons Ultimate
Personalise products with extra fields and custom options
Hi, how do i tag the product image to the menu color selection?
E.g. click on Dark brown to show the dark brown product?
Many thanks
Hi Terence
You can do this with an image swatch field using the Add-Ons Ultimate plugin: https://pluginrepublic.com/wordpress-plugins/woocommerce-product-add-ons-ultimate/
Thanks.
HI Gareth,
Can you confirm that all WP ecommerce sites need to purchase this if not the images will change upon selection?
Thanks Terence. Could you give me some more details about what you’re looking to do and clarify what you mean about images changing on selection?
Hi Gareth –
I have and use your plugin Ultimate Addons, but I have same question more or less about getting the main product photo to switch when an image swatch is selected. I believe this happens automatically when using a Variable product for the options, but what about when using your image swatch option in the plugin?
Is there a way to make this work – change the main product photo depending on image swatch selection, or should this be done another way?
Hi Matthew
Yes, you can do this: https://pluginrepublic.com/documentation/replace-main-image-with-selected-image-swatch/
If you need further help, it’s probably better to raise a ticket here: https://pluginrepublic.com/support/
Thanks.
Good, clear run through. Thanks Gareth.
Hi there. When new products are added to the woocommerce product catalogue they are automatically added at the front of the category list / displayed first on the page. How do I ensure new products get added to rear of the list under a category and are displayed last, so my careful curating of the order of products is not changed (unless I deem I want to and move it myself)?
Hi Ben
Please see this article for how to order your products: https://woocommerce.com/document/woocommerce-customizer/#default-product-sorting.
Gareth