Mastering WooCommerce: Adding custom fields for WooCommerce variations

In this article, we’ll look at how to add WooCommerce custom fields for variations. Custom fields can mean either:
- Fields to display additional data about a variation.
- Fields to accept user input for customizing the product variation.
We’ll look at both options.
Adding WooCommerce custom fields for variations
I wrote extensively about adding custom fields to WooCommerce products here. In this article, we’ll focus specifically on adding custom fields to variations.
Let’s take a look at an example product. We’ll imagine that we’re selling clothing and we would like to provide specific sizing information about each variation. Of course, you can use this to display any kind of additional product data.
What are custom fields for product variations in WooCommerce?
Custom fields in WooCommerce for product variations allow site owners to add data to a specific product or a variation of this product. Only when a customer clicks or chooses this item can they see the information relating to it.
Let’s take a look at an example product. Imagine that we’re selling clothing, and would like to provide specific sizing information about each variation. Of course, you can use this to display any kind of additional product data.
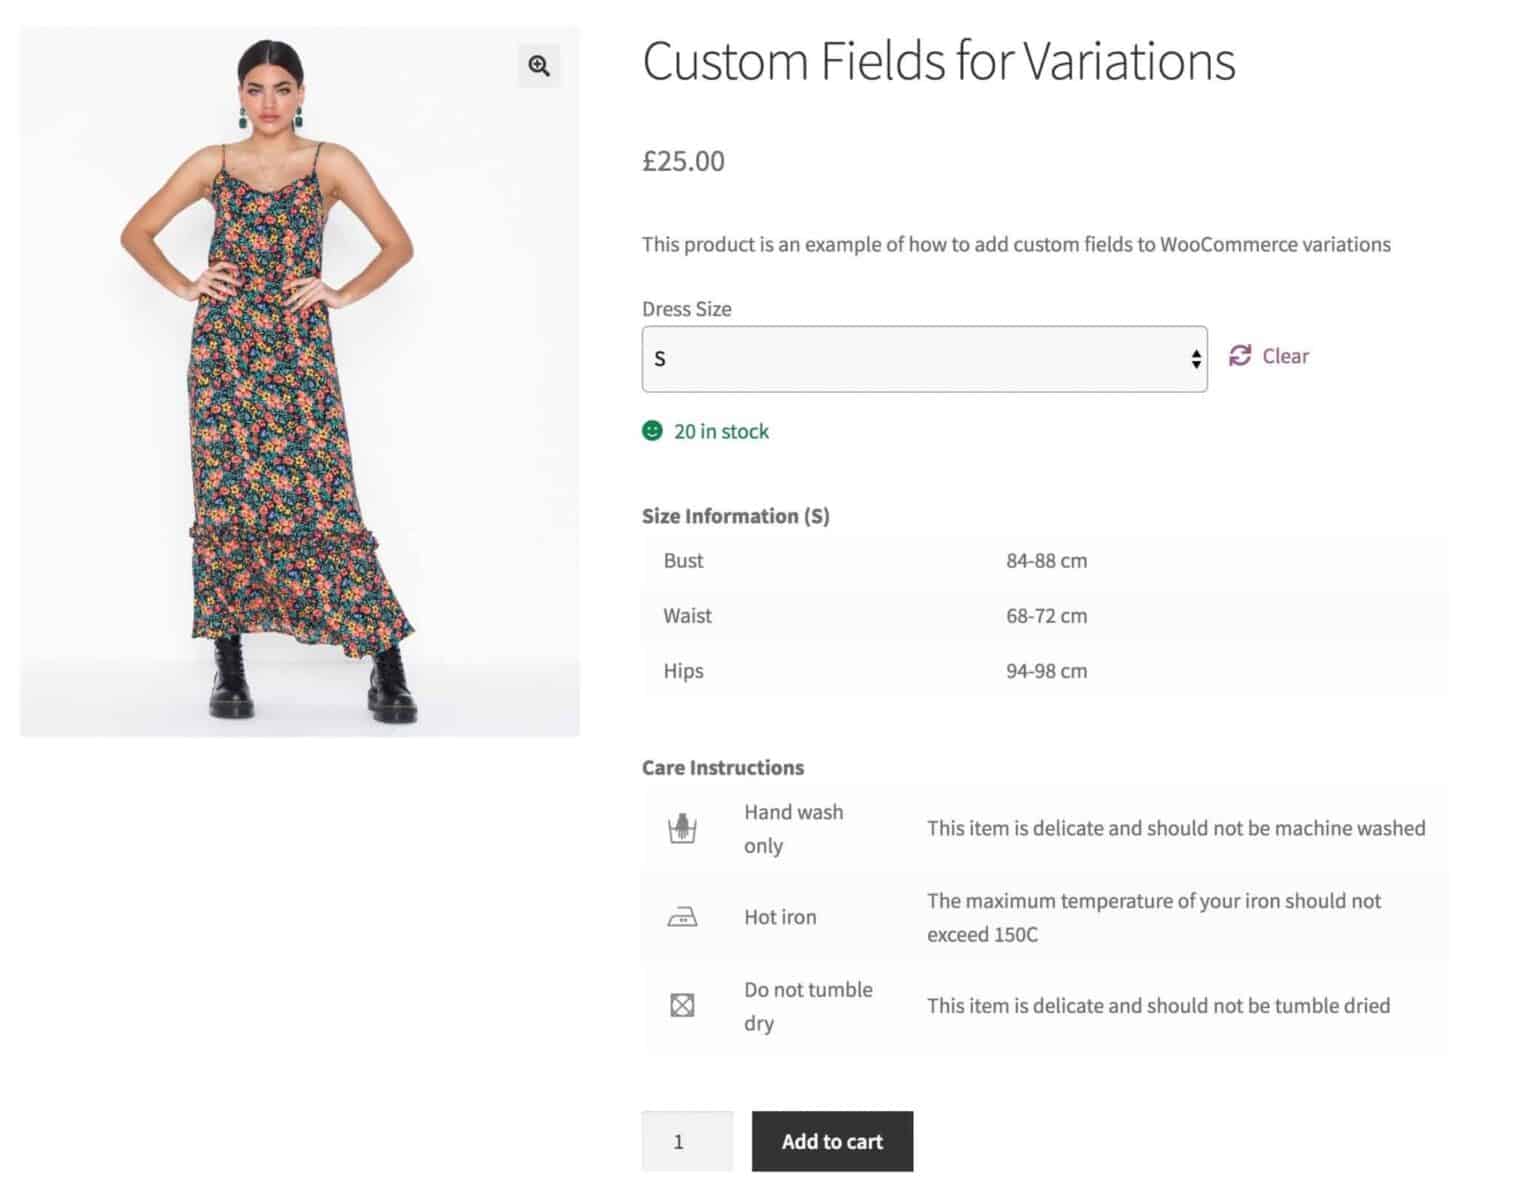
When the customer chooses a different variation, the size information changes, and this is the main idea behind custom fields for a specific variation. It makes no sense to fill the page with information that is not required, in this case, size information about XL, when the chosen product is in size S.
If you’re curious to see this in action, you can view the demo product here.
How do variation custom fields work?
On the back end, variation custom fields are just input fields that are directly connected to the specific variation of the product. It will only show up if a specific condition is met, for example, the customer choosing the size from a drop-down menu or putting the item in their cart.
Why do we need WooCommerce custom fields for variations?
Why not just add one big table for all variations? We could do this and then expect the user to find the data for the variation that they’re interested in.
But this would be clumsy and not helpful to the customer. Much better to give them exactly the information they need.
Custom fields for multiple variations
Note the second table in the screenshot above. It shows some care instructions for the garment. In this case, the custom field is added to multiple variations. We’ll also look at how to achieve this.
How to add custom data fields to WooCommerce variations
To add our custom fields, we’ll need the WooCommerce Product Add-Ons Ultimate plugin. This gives us the ability to add all kinds of custom fields to WooCommerce products.

WooCommerce Product Add-Ons Ultimate
Personalise products with extra fields and custom options
Once you’ve downloaded and installed the plugin, you can start adding your custom fields.
Step One: add a new field
Let’s assume our product variations are already set up. To add our variation-specific custom fields, go to the Product Add-Ons tab in the Product data section.
Click ‘Add Group’ then ‘Add Field’. In the ‘Field Type’ setting, choose ‘Information’.

In the screenshot above, you can see the Product Add-Ons panel. We’ve selected ‘Information’ as the field type and entered a label for the field.
Step two: add data rows
The Information field allows us to create a table of data for each variation. Click the ‘Add Row’ button to add a new row, then enter a label and data in each field.

Step three: specify the variation
Finally, you can select the variation(s) in the ‘Variations’ field. Choose the variations that you’d like this field to display for.
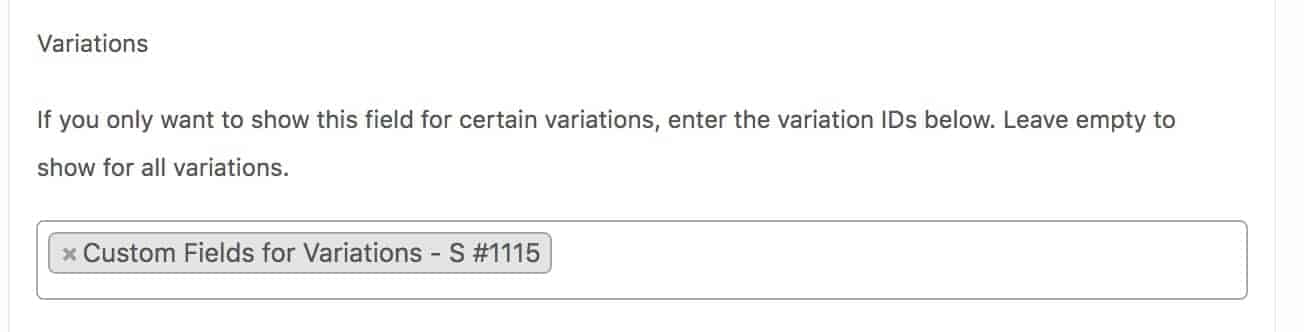
Note that you can choose more than one variation here if you’d like to display the custom field for multiple variations.
Step four: repeat
Finally, you just need to repeat these steps for any other custom fields you want to add for different variations. The Add-Ons Ultimate plugin allows you to duplicate fields – just click ‘Copy’ at the top of the field you want to duplicate.
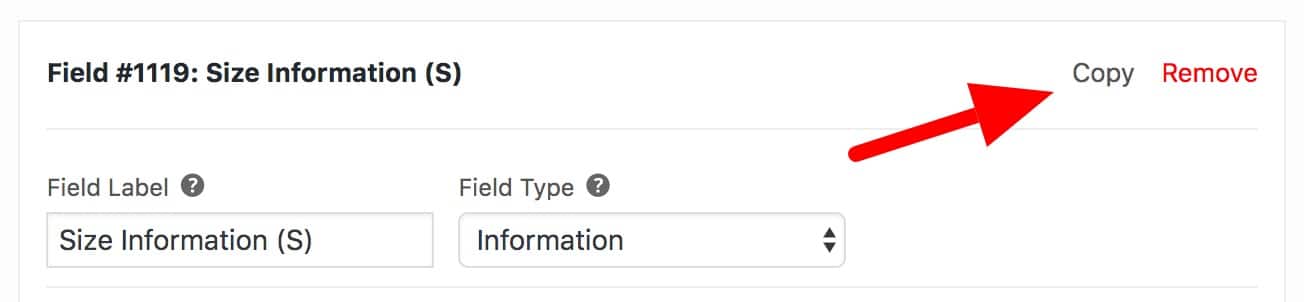
This makes it much easier to create multiple fields for all your variations.
On the front end, the product will now look like this.
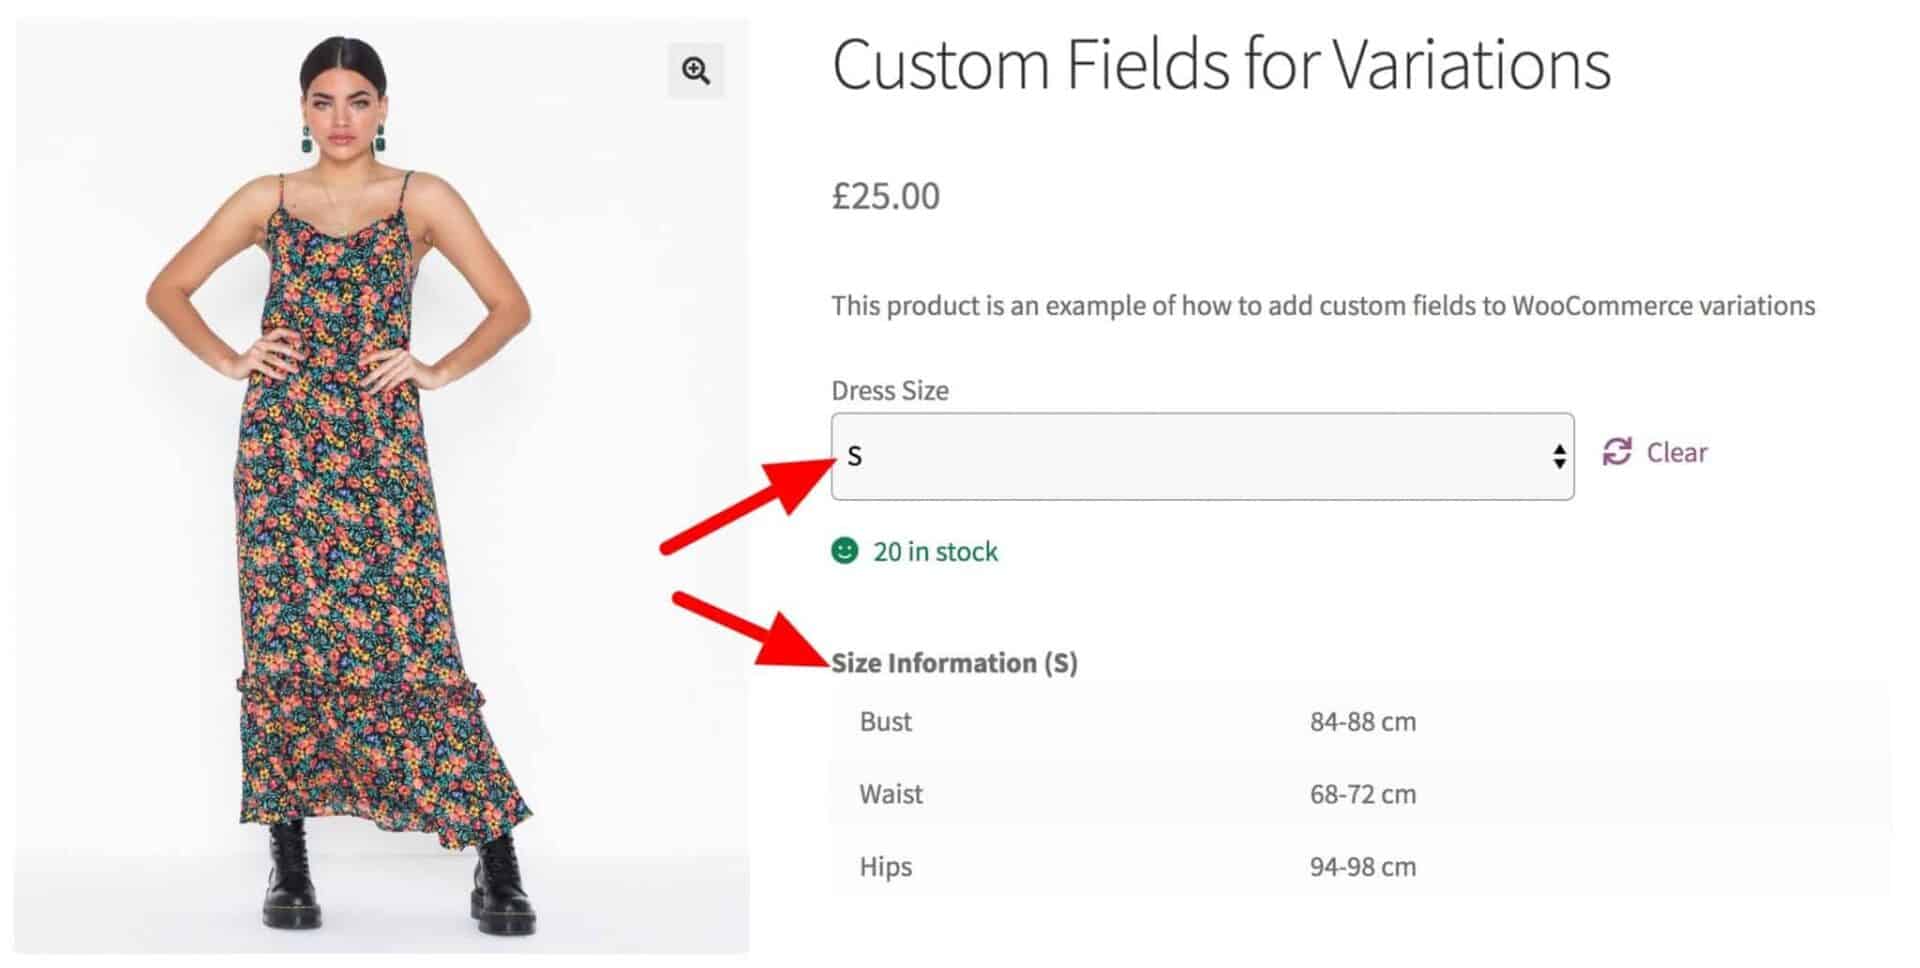
When the user changes the variation, the custom field will change too.
Adding WooCommerce custom fields to multiple variations
Now let’s look at adding the same custom field to multiple variations. This isn’t particularly different.
In our example product, we created a care instruction table, complete with icons. We’ll display this for all variations:

You can see in the screenshot above that we’ve added this field to multiple variations. You can add custom fields to as many or as few variations as you like.
If you want to display the field for all variations, just leave the ‘Variations’ field empty.
How to add custom input fields to WooCommerce variations
Add-Ons Ultimate allows you to add several input fields to WooCommerce variations, including:
- Calculation fields
- Checkbox fields
- Checkbox groups
- Datepickers
- Image swatches
- Name your price fields
- Number fields
- Child products
- Radio groups
- Select / dropdowns
- Text and textarea fields
Let’s have a look at another example, this time for a custom t-shirt that the user can personalise with their name and an image. You can see the demo product here.
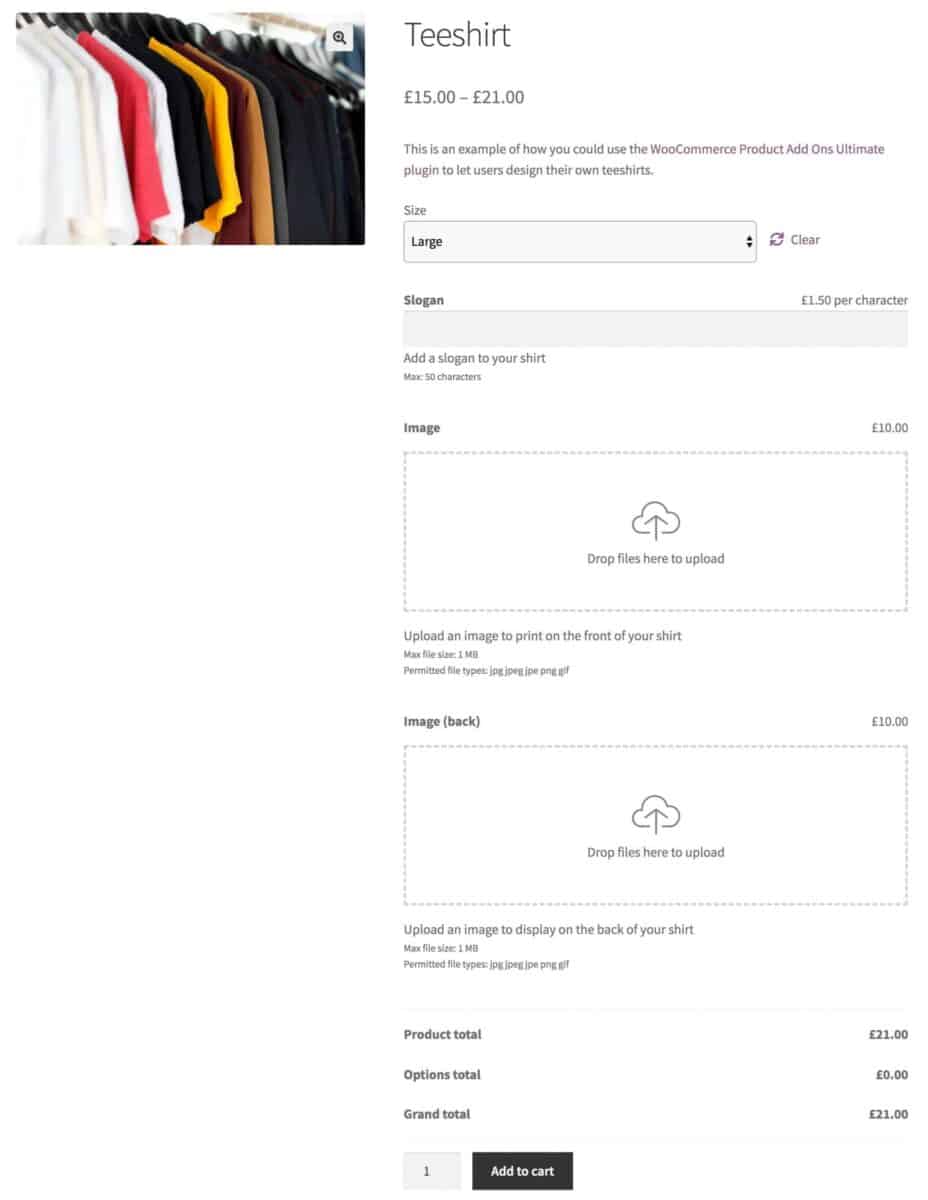
Adding a text field to a WooCommerce variation
Let’s look at how to add a text field to WooCommerce variations. In our example, this is for a custom slogan or name that will get printed on the teeshirt.
Just as above, click ‘Add Field’. Then choose ‘Text’ as the field type:
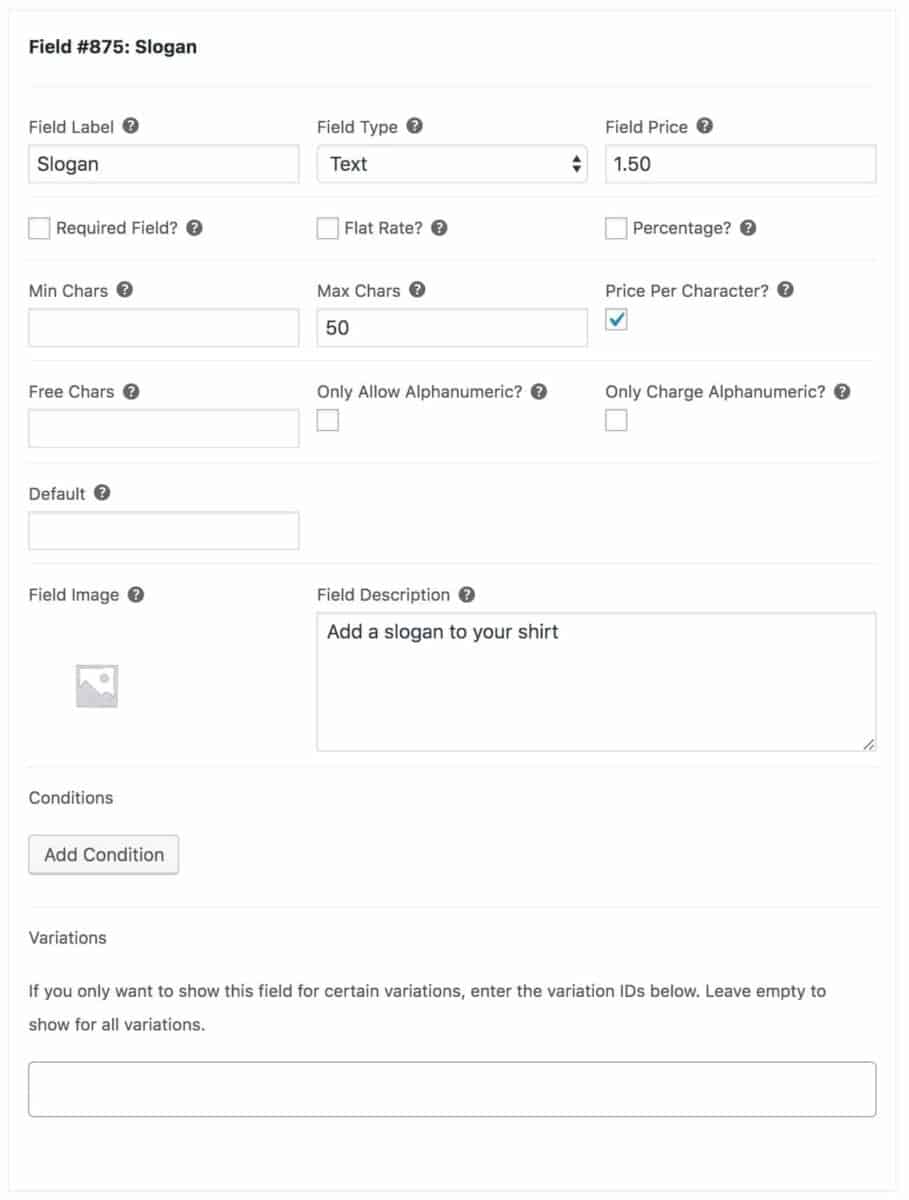
Text field parameters
Note that there are several parameters that you can use to refine your text field, including:
- Setting the field to be required
- Specifying a minimum and/or maximum number of characters
- Charging a cost per character
- Allowing some free characters
- Only allowing alphanumeric characters
- Only charging for alphanumeric characters
Again, as with the information field above, you can choose whether to display this field for one, some or all variations.
Adding a condition to WooCommerce custom fields
Another very handy feature of the WooCommerce Product Add Ons Ultimate is the option to add group and field conditions in WooCommerce.
As the name suggests, conditions are previously specified scenarios that are fulfilled once a certain condition is met. For example, you have a text field that only shows up when the end user selects a certain checkbox.
To do that, you’ll need two fields – the main one and the dependent one. The main field, the checkbox in our example, will appear no matter what, while the other one depends on the status of the first.
To add the desired condition, click the Add Condition button and go over the dropdown fields.
In the first one, you can choose between:
- Hide this field if.
- Show this field if.
In the second one, you can choose between:
- All rules match
- Any rules match
- After that, you only have to choose the type of the first field (checkbox in our case), the operator (Is), and the value of the field, and you’re done!
Group conditions are created very similarly, but you need to remember that you can’t use group conditions on global groups.
- Just like with the field condition, start by clicking the Add Condition button.
2. Then, you just need to fill in the same fields.
Product Add-Ons Ultimate plugin
Hopefully this has been a useful article on how to add custom fields to WooCommerce variations. All you need is the Add-Ons Ultimate plugin.
And if you’re interested in the further customization of your product pages, take a look at the following plugins:
- Better variations – Disable, style, and sort out-of-stock variations.
- WooCommerce Order Bump – Increase sales by recommending products and documenting progress.
WooCommerce Product Add-Ons Ultimate
Personalise products with extra fields and custom options
Hi there! Is it possible to display this additional info in the search filter? Let’s say I add material info to every t-shirt. Is it possible to look for maybe only polyester t-shirts from the search filter in the sidebar? So you have categories in the sidebar. Tshirts, Hoodies, Pants, etc., and underneath that would be option “Material”. I would be able to pick if I want only 100% cotton or polyester. Thank you for your time
Hi Michal
It’s not currently possible to filter by add-ons.
Thanks.
Hello Gareth, 🙂
Great article ! I tried to follow it step by step but my result is different from yours at the variation selection stage. (Step three: specify the variation)
The list that appears for me does not have the names of the different variations. Only the product name, 21 times, with different codes at the end. (e.g. ↑ Option – Overlay To Stick #43969; ↑ Option – Overlay To Stick #43970; ↑ Option – Overlay To Stick #43971, etc.)
For this test product, I created 3 attributes:
– Unit customization (6 variations)
– Support (1 variation)
– Support (3 variations)
Do you know why it does this? Is it an error on my part or a bug?
Thanks in advance,
Hi – I’ve passed this to the support team and they’ll get back to you directly.
Thanks.
Hello,
I hope you’re having a wonderful day.
I came across your excellent article. I was wondering if there’s a restriction on the number of fields I can include in the Add-ons. When I attempted to add more than 15, the additional data didn’t go through and was simply deleted. I appreciate you taking the time to address this. I’m eagerly anticipating your response.
Thank you very much!
Hi
Please raise a support ticket here, https://pluginrepublic.com/support/, and our team will be happy to help you with this.
Thanks.